Storing Pulses

Grain Storage chicpea silo

Storing pulses successfully requires a balance between ideal harvest and storage conditions. Harvesting at 14 per cent moisture content captures grain quality and reduces mechanical damage to the seed but requires careful management to avoid deterioration during storage.

KEY POINTS

  • Pulses stored above 12 per cent moisture content require aeration cooling to maintain quality.
  • Meticulous hygiene and aeration cooling are the first lines of defence against pest incursion.
  • Fumigation is the only option available to control pests in stored pulses, which requires a gas-tight, sealable storage.
  • Avoiding mechanical damage to pulse seeds will maintain market quality, seed viability and be less attractive to insect pests.

Quality characteristics

Time-is-Critical

Pulse crops most commonly grown in Australia include broad beans, faba beans, chickpeas, field peas, lentils, lupins, vetch and mungbeans.

Many of the quality characteristics of the grain from these crops are in the appearance, size and physical integrity of the seed. Mechanical seed damage, discolouration, disease, insect damage, split or small seeds will downgrade quality and market value.

Buyers prefer large, consistently-sized seed free of chemical residues for easy processing and marketing to consumers.

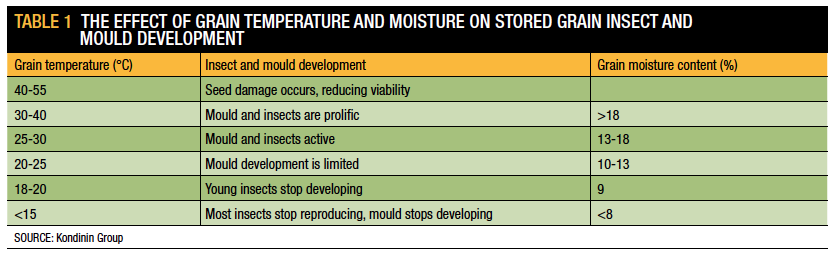
Optimum moisture and temperature

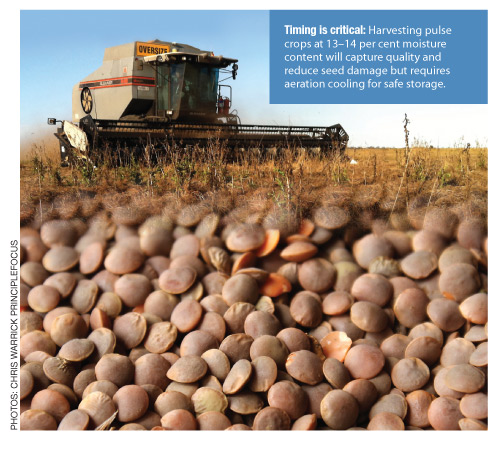
Research has shown that harvesting pulses at higher moisture content (up to 14 per cent) reduces field mould, mechanical damage to the seed, splitting and preserves seed viability. The challenge is to maintain this quality during storage as there is an increased risk of deterioration at these moisture levels. As a result, pulses stored above 12 per cent moisture content require aeration cooling to maintain quality.

Grain Trade Australia (GTA) sets a maximum moisture limit of 14 per cent for most pulses but bulk handlers may have receival requirements as low as 12 per cent. As a general rule of thumb, the higher the moisture content, the lower the temperature required to maintain seed quality (see Table 1).

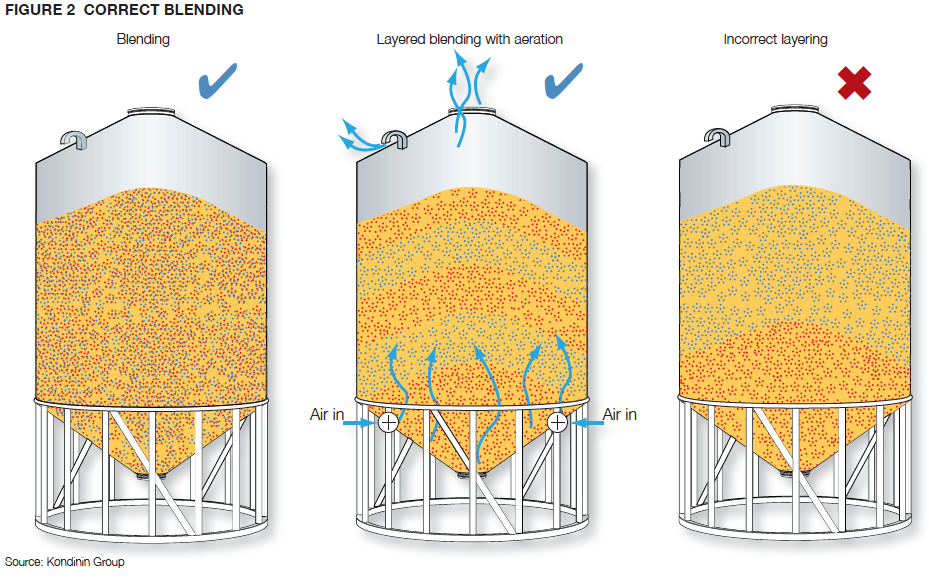
Green pods and grains increase the risk of mould developing during storage — even at lower moisture content. Aeration cooling will help prevent mould and hot spots by creating uniform conditions throughout the grain bulk.

Table 1 maximum recomended storage period

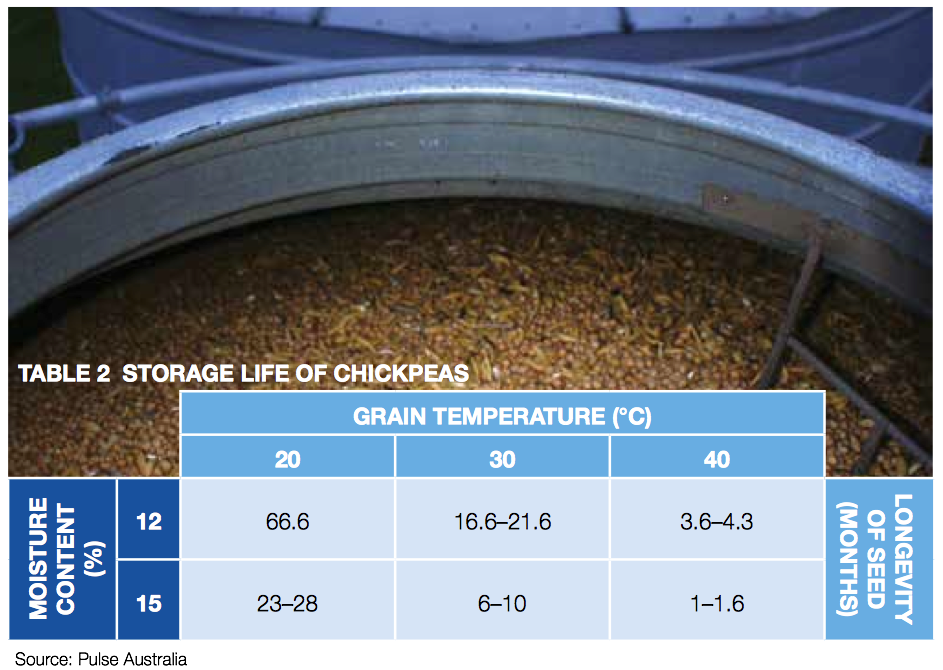
Weather damage hinders storage

Pulses exposed to weathering before harvest deteriorate more quickly in storage. Chickpeas stored for the medium to long term (6–12 months) continue to age and lose quality
(see Table 2). Growers can minimise the effects of seed darkening, declining germination and reduced seed vigour by:

  • Lowering moisture content and temperature
  • Harvesting before weather damages the grain.

Table 2 - storage life of chickpeas

Aeration cooling — vital tool

Aeration cooling:

  • Creates uniform conditions throughout the grain bulk.
  • Prevents moisture migration.
  • Maintains seed viability (germination and vigour).
  • Reduces mould growth.
  • Lengthens (and in some instances stops) insect reproduction cycles.
  •  Slows seed coat darkening and quality loss.

Aeration cooling allows for longer-term storage of low-moisture grain by creating desirable conditions for the grain and undesirable conditions for mould and pests. Unlike aeration drying, aeration cooling can be achieved with air-flow rates of as little as 2–3 litres per second per tonne of grain.

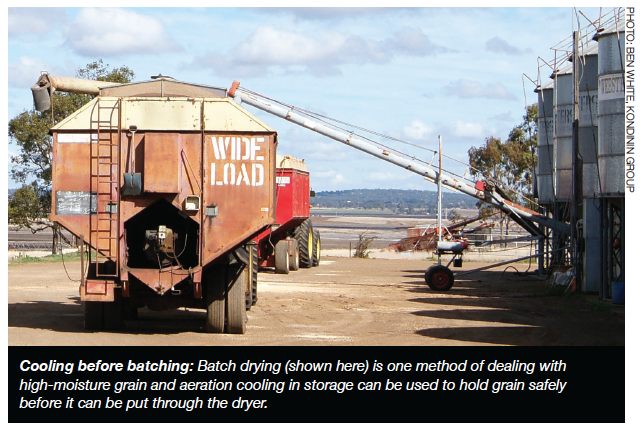
High-moisture grain can also be safely held for a short time with aeration cooling before blending or drying. Run fans continuously to prevent self heating and quality damage.

Be aware that small seeds such  as lentils will reduce the aeration fan capacity as there is less space for air to flow between the grains. For information on aeration cooling management, refer to the GRDC fact sheet, Aeration cooling for pest control.
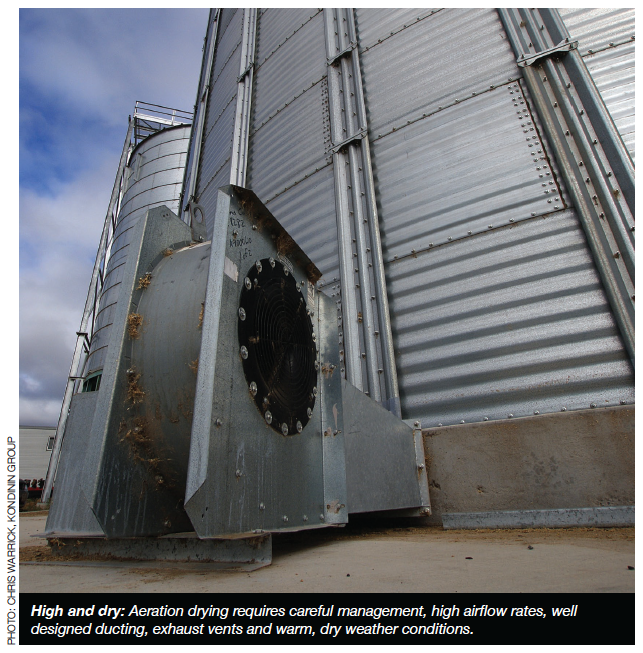
Damage-control

Aeration drying

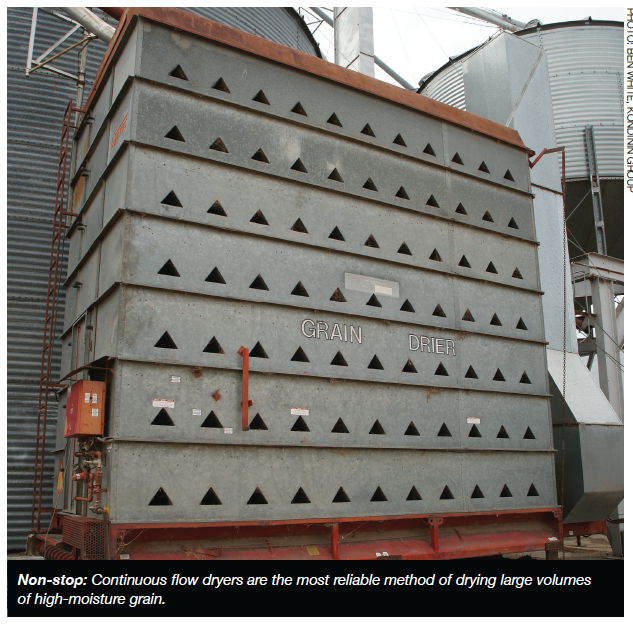
Pulses stored for longer than three months at high moisture content  (>14 per cent) will require drying or blending to maintain seed quality. Aeration drying has a lower risk of cracking and damaging pulses, which can occur with hot-air dryers.

Unlike aeration cooling, drying requires high airflow rates of at least 15–25 l/s/t and careful management. For more information on aeration drying refer to the GRDC booklet, Aerating stored grain, cooling or drying for quality control.
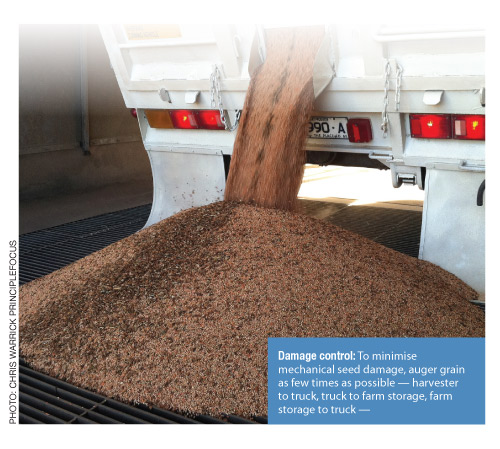
Handle with care

In addition to harvesting at high moisture content, growers can manage seeds quality at harvest by:

  • Minimising the number of times augers shift grain.
  • Ensuring augers are full of grain and operated at slow speeds.
  • Checking auger flight clearance — optimum clearance between flight and tube is half the grain size to minimise grain lodging and damage.
  • Operating augers as close as possible to their optimal efficiency — usually an angle of 30 degrees.
  • Using a belt conveyor instead of an auger where possible.

Silos fit the bill

Keep-it-safe-in-silos
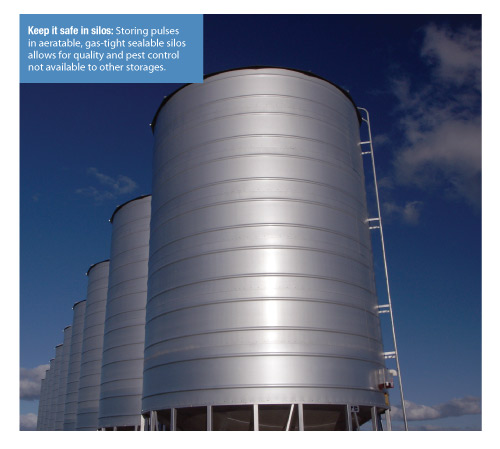
Silos are the ideal storage option for pulses, especially if they are cone based for easy out-loading with minimal seed damage. For anything more than short-term storage (3 months) aeration cooling and gas-tight sealable storage suitable for fumigation are essential features for best management quality control.

Always fill and empty silos from the centre holes. This is especially important with pulses because most have a high bulk density. Loading or out-loading off-centre will put uneven weight on the structure and cause it to collapse. Avoid storing lentils in silos with horizontally corrugated walls as the grain can run out from the bottom first and collapse the silo as the grain bulk slides down the silo walls.

Pests and control options

Common-insects-of-pulse-grains-

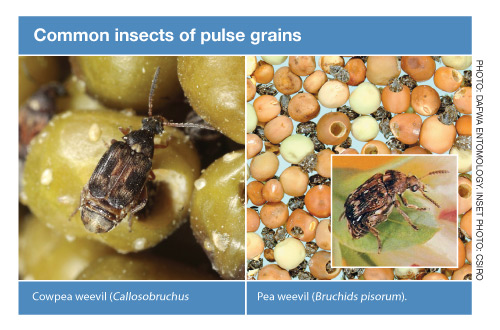
The most common pulse pests are the cowpea weevil (Callosobruchus spp.) and pea weevil (Bruchids pisorum). The cowpea weevil has a short life span of 10–12 days while the pea weevil only breeds one generation per year.

The only control options are phosphine, an alternative fumigant or controlled atmosphere, all of which require a gas-tight, sealable storage to control the insects at all life stages.

For more information refer to the GRDC booklet, Fumigating with phosphine, other fumigants and controlled atmospheres.

Chemical sprays are not registered for pulses in any State. While there is a maximum residue limit (MRL) for dichlorvos on lentils, the product is only registered for use on cereal grains.

Weevil development ceases at temperatures below 20°C. This is a strong incentive for aeration cooling, especially if gas-tight storage is not available.

Keep it clean

Clean-Sweep-Cleaning-Machinery
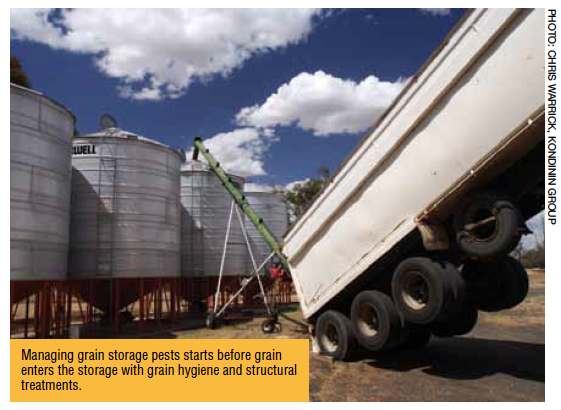
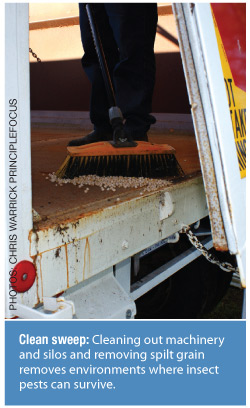
The first line of defence against grain pests is before the pulses enter storage — meticulous grain hygiene. Because pest control options are limited, it’s critical to remove pests from the storage site before harvest.

Cleaning silos and storages thoroughly and removing spilt and leftover grain removes the feed source and harbour for insect pests.

Clean the following areas thoroughly: 

  • Empty silos and grain storages
  • Augers and conveyers
  • Harvesters
  • Field and chaser bins
  • Spilt grain around grain storages
  • Leftover bags of grain

Chemicals used for structural treatments do not list the specific use before storing pulses on their labels and MRLs in pulses for those products are either extremely low or nil.

Using chemicals even as structural treatments risks exceeding the MRL so is not recommended.

Using diatomaceous earth (DE) as a structural treatment is possible but wash and dry the storage and equipment before using for pulses. This will ensure the DE doesn’t discolour the grain surface.

If unsure, check with the grain buyer before using any product that will come in contact with the stored grain. For more information see the GRDC fact sheet, Hygiene and structural treatments for grain storages.

Dealing with High Moisture Grain

Grain Storage blending

Grain at typical harvest temperatures of 25–30°C and moisture content greater than 13–14 per cent provides ideal conditions for mould and insect growth (see Figure 1). There are a number of ways to deal with high-moisture grain — the key is to act quickly and effectively.

Key Points

  • Deal with high-moisture grain promptly.
  • Monitoring grain moisture and temperature regularly (daily) will enable early detection of mould and insect development.
  • Aeration drying requires airfl ow rates in excess of 15 litres per second per tonne.
  • Dedicated batch or continuous flow dryers are a more reliable way to dry grain than aeration drying in less-than-ideal ambient conditions.

Cooling before batching: Batch drying (shown here) is one method of dealing with high-moisture grain and aeration cooling in storage can be used to hold grain safely before it can be put through the dryer.

Managing moisture quickly

EFFECTS OF TEMPERATURE AND MOISTURE ON STORED GRAIN

A Department of Employment, Economic Development and Innovation (DEEDI) trial revealed that high-moisture grain generates heat when put into a confi ned storage, such as a silo.

Wheat at 16.5 per cent moisture content at a temperature of 28°C was put into a silo with no aeration. Within hours, the grain temperature reached 39°C and within two days reached 46°C providing ideal conditions for mould growth and grain damage. Grain that is over the standard safe storage moisture content of 12.5 per cent can be dealt with by:

  • Blending — mixing high-moisture grain with low-moisture grain, then aerate.
  • Aeration cooling — grain of moderate moisture, up to 15 per cent moisture content, can be held for a short term under aeration cooling until drying equipment is available.
  • Aeration drying — large volumes of air force a drying front through the grain in storage and slowly removes moisture. Supplementary heating can be added.
  • Continuous flow drying — grain is transferred through a dryer, which uses a high volume of heated air to pass through the continual flow of grain.
  • Batch drying — usually a transportable trailer drying 10–20 tonnes of grain at a time with a high volume of heated air, which passes through the grain and out perforated walls.

Blending

Blending is the principle of mixing slightly over-moist grain with lower-moisture grain to achieve an average moisture content below the ideal 12.5 per cent moisture content. Successful for grain moisture content levels up to 13.5 per cent, blending can be an inexpensive way of dealing with wet grain, providing the infrastructure is available. Aeration cooling does allow blending in layers but if aeration cooling is not available blending must be evenly distributed (see Figure 2).

FIGURE 2 CORRECT BLENDING

Holding high-moisture grain with aeration cooling

Aeration cooling can be used to reduce the risk of mould and insect development for a month or two until drying equipment is available to dry grain down to a safe level for long-term storage or deliver. In most circumstances, grain can be stored at up to 14–15 per cent moisture content safely with aeration cooling fans running continuously, delivering at least 2–3 litres per second per tonne. It is important to keep fans running continuously for the entire period, only stopping them if the ambient relative humidity is above 85 per cent for more than about 12 hours, to avoid wetting the grain further.

Aeration drying

Aeration drying relies on a high air volume and is usually done in a purpose-built drying silo or a partly filled silo with high-capacity aeration fans. Aeration drying is a slow process and relies on four keys:

  • High airflow rates.
  • Well designed ducting for even airflow through the grain.
  • Exhaust vents in the silo roof.
  • Warm, dry weather conditions.

It is important to seek reliable advice on equipment requirements and correct management of fan run times, otherwise there is a high risk of damaging grain quality.

High airflow for drying

Unlike aeration cooling, aeration drying requires high airflow, in excess of 15L/s/t, to move drying fronts quickly through the whole grain profile and depth and carry moisture out of the grain bulk. As air passes through the grain, it collects moisture and forms a drying front. If airflow is too low, the drying front will take too long to reach the top of the grain stack – often referred to as a ‘stalled drying front.’ Providing the storage has sufficient aeration ducting, a drying front can pass through a shallow stack of grain much faster than a deep stack of grain. As air will take the path of least resistance, make sure the grain is spread out to an even depth.

Ducting for drying

High and dry: Aeration drying requires careful management, high airfl ow rates, well designed ducting, exhaust vents and warm, dry weather conditions.The way to avoid hot spots is with adequate ducting to deliver an evenly distributed flow of air through the entire grain stack. A flat-bottom silo with a full floor aeration plenum is ideal providing it can deliver at least 15L/s/t of airflow. The silo may only be able to be part filled, which in many cases is better than trying to dry grain in a cone-bottom silo with insufficient ducting.

Venting for drying

Adequate ventilation maximises airflow and allows moisture to escape rather than forming condensation on the underside of the roof and wetting the grain on the top of the stack. The amount of moisture that has to escape with the exhaust air is 10L for every one per cent moisture content removed per tonne of grain.

Weather conditions for drying

For moisture transfer to occur and drying to happen, air with a lower relative humidity than the grain’s equilibrium moisture content must be used. For example, Table 1 shows that wheat at 25°C and 14 per cent moisture content has an equilibrium point of the air around it at 70 per cent relative humidity. In order to dry this wheat from its current state, the aeration drying fans would need to be turned on when the ambient air was below 70 per cent relative humidity.

Phase one of drying

Aeration drying fans can be turned on as soon as the aeration ducting is covered with grain and left running continuously until the air coming out of the top of the storage has a clean fresh smell. The only time drying fans are to be turned off during this initial, continuous phase is if ambient air exceeds 85 per cent relative humidity for more than a few hours.

Phase two of drying

By monitoring the temperature and moisture content of the grain in storage and referring to an equilibrium moisture table, such as Table 1, a suitable relative humidity trigger point can be set. As the grain is dried down the equilibrium point will also fall, so the relative humidity trigger point will need to be reduced to dry down the grain further. Reducing the relative humidity trigger point slowly during phase two of the drying process will help keep the difference in grain moisture from the bottom to the top of the stack to a minimum, by ensuring the fans get adequate run time to push each drying front right through the grain stack.

TABLE 1 EQUILIBRIUM MOISTURE CONTENT FOR WHEAT

Supplementary heating

Heat can be added to aeration drying in proportion to the airfl ow rate. Higher airfl ow rates allow more heat to be added as it will push each drying front through the storage quick enough to avoid over heating the grain close to the aeration ducting. As a general guide, inlet air shouldn’t exceed 35°C to avoid over heating grain closest to the aeration ducting.

Cooling after drying

Regardless of whether supplementary heat is added to the aeration drying process or not, the grain should be cooled immediately after it has been dried to the desired level.

Dedicated drying machines

Dedicated drying machines are the next step up from aeration drying because they rely far less on the ambient conditions. For growers and bulk handlers who have large volumes of grain at high moisture contents, (above 16 per cent) dedicated drying machines are a more reliable option to dry grain quickly.

Batch drying

Designed for drying high-moisture grain in moderate quantities, batch dryers can typically remove about 3 per cent moisture content from 8–10t/hr depending on the type of grain, size of dryer and the ambient conditions. A batch of grain is put into the dryer, usually with mesh walls, and high volumes of pre-heated air are forced through the grain to dry it quickly. After grain is dried to the desired level the heater is turned off and the fan is left running for a period of time to cool the grain before augering it back into storage.

Continuous flow drying

Non-stop: Continuous flow dryers are the most reliable method of drying large volumes of high-moisture grain.

At the higher end of the grain drying equipment scale, continuous flow dryers are the most efficient way to dry large quantities of high-moisture grain. Typical operating capacity removes 3 per cent moisture content from 10–37t/hr depending on the type of grain, size of dryer and ambient conditions. Continuous flow dryers blow pre-heated air through a stream of grain before another fan blows cool air through the grain just before it leaves the dryer. The efficiency of a continuous flow dryer is largely due to the fact that the heaters remain on for the whole time and grain never stops moving.


Grain Storage Pest Control Guide – Western Region

Stored Grain Hygiene treatment

The tolerance for live pests in grain sold off farm is nil. With growers increasing the amount of grain stored on farm, an integrated approach to pest control is crucial.


Caution: Research on unregistered pesticide use Any research with unregistered pesticides or of unregistered products reported in this document does not constitute a recommendation for that particular use by the authors or the authors’ organisations. All pesticide applications must accord with the currently registered label for that particular pesticide, crop, pest and region.

KEY POINTS

  • Effective grain hygiene and aeration cooling can overcome 85 per cent of pest problems.
  • When fumigation is needed it must be carried out in pressuretested, sealed silos.
  • Monitor stored grain monthly for moisture, temperature and pests.

Prevention is better than cure

The combination of meticulous grain hygiene plus well-managed aeration cooling generally overcomes 85 per cent of storage pest problems. For grain storage, three key factors provide significant gains for both grain storage pest control and grain quality – hygiene, aeration cooling and correct fumigation.

Managing Grain Hygiene and Structural TreatmentsHygiene

The first grain harvested is often at the greatest risk of early insect infestation due to contamination. One on-farm test found more than 1000 lesser grain borers in the first 40 litres of wheat passing through the harvester. Remove grain residues from empty storages and grain handling equipment, including harvesters, field bins, augers and silos to ensure an uncontaminated start for new-season grain. Clean equipment by blowing or hosing out residues and dust and then consider a structural treatment (see Table 2, page 3). Remove and discard any grain left in hoppers and bags from the grain storage site so it doesn’t provide a habitat for pests during the off season.

Aeration cooling

Freshly-harvested grain usually has a temperature around 30°C, which is an ideal breeding temperature for storage pests (see Table 1, page 2). Studies have shown that rust-red flour beetles stop breeding at 20°C, lesser grain borer at 18°C and below 15°C all storage pests stop breeding. Aim for grain temperatures of less than 23°C during summer and less than 15°C during winter. When placing grain into storage, run aeration fans continuously for the first 2-3 days to push the first cooling front through the grain and to create uniform moisture conditions. Then run the fans during the coolest 9-12 hours per day for the next 3-5 days. This will push a second cooling front through the grain bulk. Aeration cooling generally only requires air-flow rates of 2-4 litres per second per tonne. Finally the grain requires approximately 50 hours of appropriate quality air each fortnight during storage. Use an aeration controller that will perform the cooling process at the right time and continue to aerate the grain selecting the coolest air to run fans. An effective aeration controller will also ensure fans don’t operate when the relative humidity is higher than 85 per cent, which can re-wet and damage grain if operated for extended periods.

Ineffective fumigation

Fumigation with phosphine is a common component of many integrated pest control strategies. Taking fumigation shortcuts may kill enough adult insects in grain so it passes delivery standards, but the repercussions of such practices are detrimental to the grains industry. Poor fumigation techniques fail to kill pests at all life cycle stages, so while some adults may die, grain will soon be reinfested again as soon as larvae and eggs develop. What’s worse, every time a poor fumigation is carried out, insects with some resistance survive, and pass the resistance gene into their progeny making control more difficult in the future.

Monitoring Grain Pitfall TrapEffective fumigation

Using the right type of storage is the first and most important step towards an effective fumigation. Only use fumigants, like phosphine, in a pressure-tested, sealed silo. Research shows that fumigating in a storage that is anything less than pressure sealed doesn’t achieve a high enough concentration of fumigant for a long enough period to kill pests at all life cycle stages. For effective phosphine fumigation, a minimum of 300 parts per million (ppm) gas concentration for seven days or 200ppm for 10 days is required. Fumigation trials in silos with small leaks demonstrated that phosphine levels are as low as 3ppm close to the leaks. The rest of the silo also suffers from reduced gas levels. Achieve effective fumigation by placing the correct phosphine rates (as directed on the label) onto a tray and hanging it in the top of a pressuretested, sealed silo or into a ground level application system if the silo is fitted with recirculation. After fumigation, ventilate grain for a minimum of one day with aeration fans running, or five days if no fans are fitted. A minimum withholding period of two days is required after ventilation before grain can be used for human consumption or stock feed. The total time needed for fumigating is 10-17 days. As a general rule, only keep a silo sealed while carrying out the fumigation (for example, one to two weeks). If grain moisture content is low (8-12%) the silo can remain sealed after fumigating but regular monitoring is essential to check for insect infestation and moisture migration to the head space.

Table 1 Effect of Grain Temp and Moisture

Monitoring

When grain is put into storage it needs monitoring just like it does when it’s in the paddock – regularly. Check stored grain at least monthly, taking samples from the bottom, and if safe, the top of the storage.

Things to monitor:

  • Insect pests
  • Grain temperature
  • Grain moisture content
  • Grain quality and germination

Storage choices

When buying a new silo, buy a quality, sealable silo fitted with aeration and check with the manufacturer that it meets the Australian Standard for sealable silos (AS2628). Experience has shown that at least two sealable, aerated silos on farm provide the option for an effective fumigation and delivery program. Many older silos are not designed to be sealed and cannot be used for fumigation, however retrofitting aeration can reduce insect multiplication through grain cooling.

Seed held on farm (cereals — wheat, barley, oats)

Seed that is dry, cool and sound (not weather damaged) will remain viable for longer. In well-managed storage, germination percentages can be expected to reduce by only 5 per cent after six months. To achieve this, keep grain moisture content below 12%. Grain temperature also has a major impact on germination. Aim for grain temperatures of 20°C and below in seed storage by using aeration cooling (with auto control). Wheat at 12 per cent moisture content stored at 30-35°C (unaerated grain temperature) will reduce germination percentages and seedling vigour when stored over a long period. Position small seed silos in the shade or paint them reflective white to assist keeping grain cool. WA growers can treat seed with a grain protectant combined with a dyed grain fungicide in combination with aeration cooling to maximise insect control.

Pulse and oilseeds

Insect control options are limited for stored pulses and oilseeds. Aeration and phosphine fumigation are the main methods and controlled atmosphere (inert gasses such as carbon dioxide or nitrogen) may be an option. The effectiveness of phosphine fumigation on oilseeds is often reduced due to phosphine sorption during treatment. Monitoring gas concentrations with a gas monitor is essential to ensure the correct concentration is achieved for the correct length of time. Use sound grain hygiene in combination with aeration cooling to reduce insect activity. Small seed-size grains, such as canola, may need larger-capacity aeration fans to combat the greater amount of back pressure in the storage. Always store these grains at their recommended grain moisture content level.

Table 2 Resistence and Efficiancy Guide Stored Grain 2010

Fig 1 Phoshine Resistence - National Situation

Phosphine resistance is widespread – plan, monitor and control for clean grain

  • Dispose of grain residues and seed gradings. Clean empty storages and grain handling equipment, including harvesters, field bins and augers.
  • Sieve stored grain for the presence of insects at least monthly, or use pitfall traps. Also check grain temperature and moisture.
  • If grain temperature has been kept below 15°C by aeration, live insect numbers are likely to be low.
  • Sample grain three weeks before sale to allow time for any treatment.
  • For effective fumigations, pressure test sealable silos at least once a year to identify any leaks and ensure rubber seals are maintained.
  • Phosphine fumigation typically requires 7 to 10 days in a gastight sealed silo. When completed, open silo top with care, ventilate using aeration fan for one day; if not aerated, open silo top and ventilate for five days. The minimum withholding period is then two days after ventilation is completed. The total time needed for fumigation is therefore 10-17 days.
  • Sieve a half-litre sample onto a white tray. Hold tray in sunlight to warm for 20 to 30 seconds to encourage insect movement.
  • If live insects are found, identify them and fumigate in a gas-tight silo according to the label.
  • Take care when climbing silos to sample grain for insects and wear a safety harness. Sample from the base, and if safe, take a sample from the surface of the grain.