
GRDC GrowNotes Grain Storage


Grain storage specialist Chris Warrick presents a webinar on how hygiene and structural treatments prevent pest problems.
Continue reading
Philip Burrill explains the fundamentals of good grain storage hygiene

GroundCover™ Supplement Issue: 119 | 02 Nov 2015 | Author: Philip Burrill and Andrew Ridley
Diatomaceous earth (DE) is an inert dust made from the fossil remains of diatom skeletons. Diatoms are a type of green or brown algae that grows in freshwater lakes and marine estuaries. There are many species of diatoms and each has a unique size and shape. The various DE products are produced from different mine sites in Australia and overseas and as such have different properties. The way DE is processed also affects its insecticidal properties.
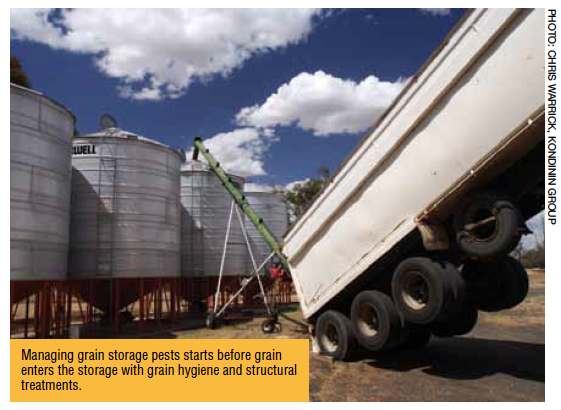
Loading grain into an infested silo guarantees problems down the track. On the other hand, diligently cleaning empty storages and grain-handling equipment significantly reduces the number of pest breeding sites on-farm.
The best hygiene results come from physically cleaning out/washing down residues, followed by a diatomaceous earth (DE) treatment. However, grower queries about the effectiveness of different DE products prompted Queensland Department of Agriculture and Fisheries (DAF) researchers to put them to the test.
Queensland DAF researchers in Brisbane tested the efficacy of four commercial DE products: Dryacide®, Permaguard®, Cut’n’dry® and Absorbacide®.
Three of the most common stored grain pests, the lesser grain borer (Rhyzopertha dominica), the rice weevil (Sitophilus oryzae) and the rust-red flour beetle (Tribolium castaneum) were contained on sections of steel treated with label rates of the DE products.
Dryacide® was the fastest-acting product for all three species tested. The most significant difference between products was their efficacy against the rust-red flour beetle, with only two products showing acceptable results. Product performance from best to worst was – Dryacide®, Permaguard®, Cut’n’dry® and Absorbacide® (Figure 1).

Figure 1 Efficacy of four DE products and a no treatment control over three weeks against red-rust flour beetles.
SOURCE: Queensland DAF
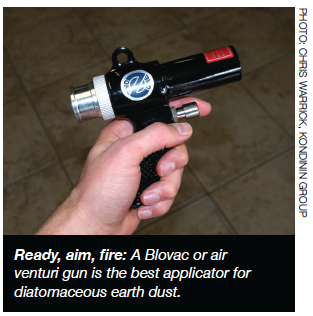
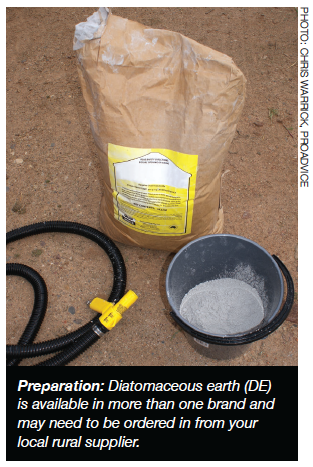
DE can be applied to structures and equipment either as a dry dust or added to water to form a slurry. The rate for dust application (straight out of the bag) is two grams per square metre, which is equivalent to one kilogram of DE over 500m². A Blow-Vac gun is one option for application.
DE dust can also be mixed into water at 120g dust per litre of water and applied at a rate of 5L/100m², giving an application of approximately 6g/m² dry basis to the storage structure.
The label specifies a flat fan nozzle with at least 5L per minute flow rating, so an XR11015VK ceramic nozzle would be a suitable choice. The ceramic will withstand the abrasion much longer than a plastic nozzle. At 3-bar this nozzle will flow at 5.9L per minute.
The label allows for DE’s use as a grain treatment. The problem for grain treatments at the label rate of 1kg DE/tonne of grain is that it affects grain flow characteristics and therefore handling. It also has an impact on grain ‘angle of repose’.
For this reason most bulk-handling companies and other grain buyers do not accept bulk grain treated with DE.
The presence of DE in grain can also impact on milling quality and there may be other specific market objections to DE dust application to bulk grain.
Always check with buyers before applying it to grain. Current retail cost for DE ranges from $6 to $10/kg, making it an expensive treatment for bulk grain.

The lesser grain borer.
PHOTO: Queensland DAF
DE dust particles kill insects by absorbing some of the waxy layer covering the insect’s body. Damage to this outer ‘water-proofing wax layer’ leads to desiccation and eventual death over several days.
Research in the US indicates DE’s impact on the insect’s body is both abrasion and desiccation. Therefore, DE works best in low-humidity conditions. Stored cereal grains, such as wheat, must be at no greater than 12 per cent moisture content (60 per cent relative humidity) for DE to be effective.
DE is one of the few products available as a structural treatment suitable for all cereal grains, pulses and oilseeds. Chemical insecticides such as fenitrothion can lead to chemical residues on oilseeds and pulses being detected by domestic and export grain buyers if used inappropriately.
The best approach for all storages and equipment is to physically clean and/or water wash all grain residues and dust, then consider using a DE structural treatment to deal with any remaining pests.

When it comes to controlling pests in stored grain — prevention is better than cure. Grain residues in storages or older grain stocks held over from last season provide ideal breeding sites. Meticulous grain hygiene combined with structural treatments, such as diatomaceous earth (DE), can play a key role in reducing the number of stored grain pests.
[ Prevention: Successful pest management starts before grain goes into storage.
 A bag of infested grain can produce more than one million insects during a year, which can walk and fl y to other grain storages where they will start new infestations. Meticulous grain hygiene involves removing any grain that can harbour pests and allow them to breed. It also includes regular inspection of seed and stockfeed grain so any pest infestations can be controlled before pests spread.
Removing an environment for pests to live and breed in is the basis of grain hygiene, which includes all grain handling equipment and storages. Grain pests live in dark, sheltered areas and breed best in warm conditions.
Common places where pests are found include:
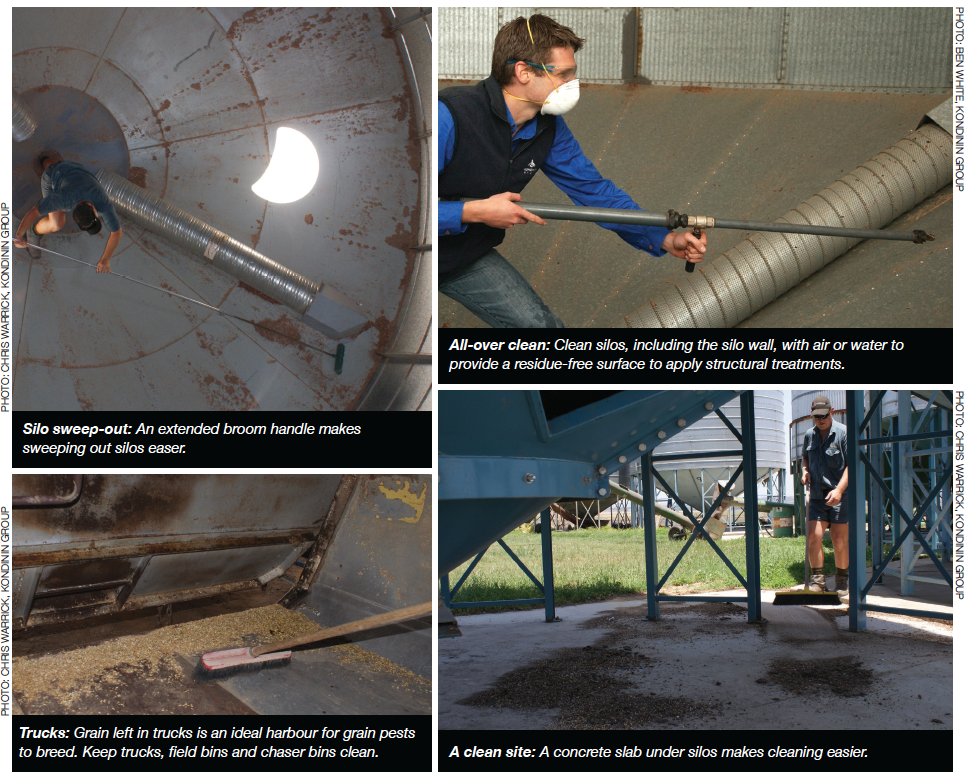
Successful grain hygiene involves cleaning all areas where grain gets trapped in storages and equipment. Grain pests can survive in a tiny amount of grain, so any parcel of fresh grain through the machine or storage becomes infested
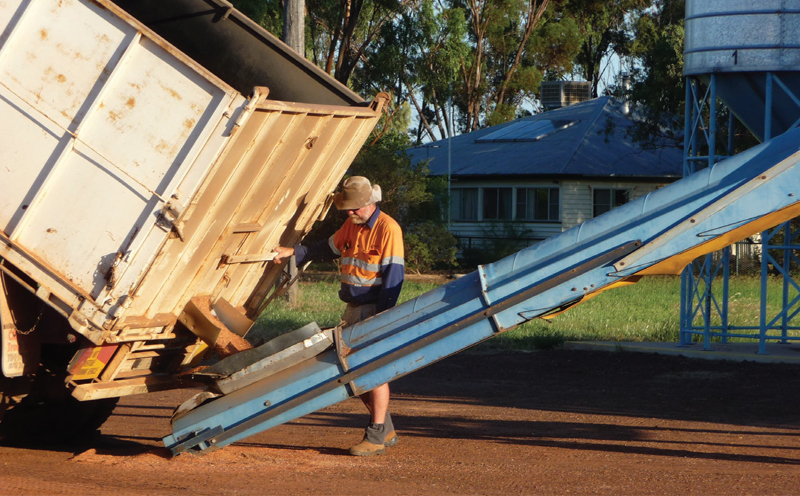
Straight after harvest is the best time to clean grain handling equipment and storages, before they become infested with pests. A trial carried out in Queensland revealed more than 1000 lesser grain borers in the first 40 litres of grain through a harvester at the start of harvest, which was considered reasonably clean at the end of the previous season. Discarding the first few bags of grain at the start of the next harvest is also a good idea. Further studies in Queensland revealed insects are least mobile during the colder months of they year. Cleaning around silos in July – August can reduce insect numbers before they become mobile.
The better the cleaning job, the less chance of pests harbouring. The best ways to get rid of all grain residues use a combination of:
Using a broom or compressed air gets rid of most grain residues, a follow-up wash-down removes grain and dust left in crevices and hard-to-reach spots. Choose a warm, dry day to wash storages and equipment so it dries out quickly to prevent rusting. When inspecting empty storages, look for ways to make the structures easier to keep clean. Seal or fill any cracks and crevices to prevent grain lodging and insects harbouring. Bags of left-over grain lying around storages and in sheds create a perfect harbour and breeding ground for storage pests. After collecting spilt grain and residues, dispose of them well away from any grain storage areas.
After cleaning grain storages and handling equipment treat them with a structural treatment. While most grain buyers accept small amounts of residue on cereal grains from chemical structural treatments, avoid using them or wash the storage out before storing oilseeds and pulses.
It is always safer to check with the grain buyer’s delivery standards for maximum residue level (MRL) allowances before using grain protectants. Diatomaceous earth (DE) (amorphous silica), commonly known as Dryacide®, can be applied either as a dust or a slurry to treat storages and handling equipment for residual control. DE acts by absorbing the insect’s cuticle (protective exterior), causing death by desiccation (drying out). If applied correctly with complete coverage in a dry environment, DE can provide up to 12 months protection — killing most species of grain insects and with no risk of building resistance.
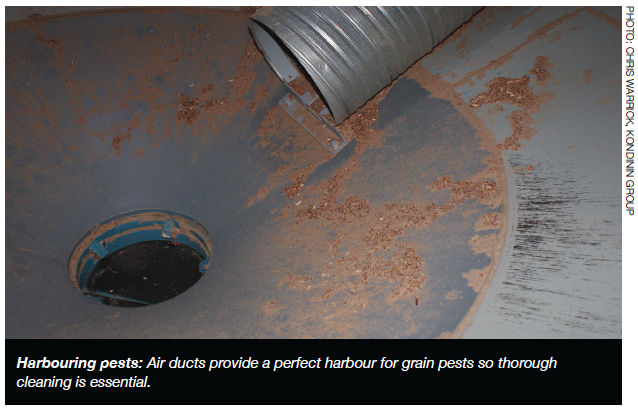

DE requires a moving air-stream to direct it onto the surface being treated. Throwing it into silos by hand will not achieve an even cover so will not be effective.
For small grain silos and bins a handoperated duster, such as a bellows duster, is suitable. If compressed air is available it is the most economical and suitable option for on-farm use — connected to a venturi duster such as the Blovac BV-22.
 The application rate is calculated at two grams per square metre of surface area treated.See table 1.
Although inert, breathing in excessive amounts of dust is not ideal, so use a disposable dust mask and goggles during application.
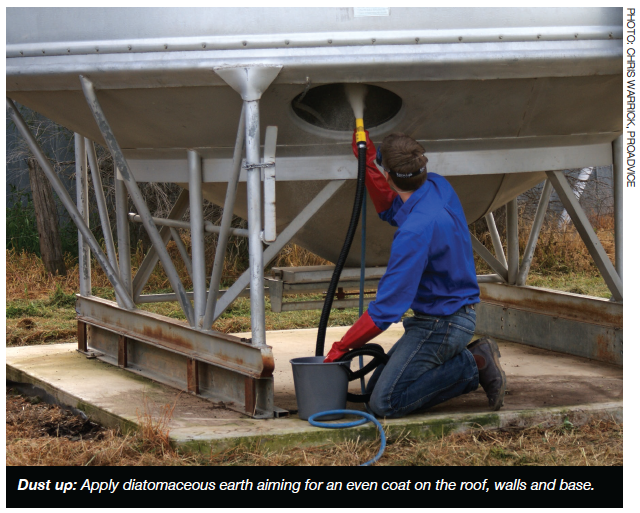 If safe, apply the DE dust from the top of the silo, otherwise open all outlets and apply via the ground access door. Moving the Blovac gun quickly, coat the roof, walls then base of the silo.
Finish by closing all outlets top and bottom to capture the remaining suspended dust and keep moisture out of the silo. If silos are fitted with aeration systems, distribute the DE dust into the ducting without getting it into the motor, where it could potentially cause damage. Machinery application Calculation of surface areas of machinery is not normally possible.
For augers, conveyors and grain handling equipment, use a Blovac to apply a steady dust stream into accessible openings, coating all the internal surfaces as much as possible. Continue until a dust stream emerges from the exit/discharge points of the equipment. For an average harvester the recommended quantity of inert dust is about 2.5 kilograms.
 With the right equipment, DE can also be applied in a slurry form. A little more involved than applying dust, the slurry needs to be mixed in a mixing tank then sprayed on through a fl at fan nozzle capable of at least five litres per minute. Mix the DE with water at a rate of 10-20 per cent to form a slurry and apply at six grams per square metre (dry basis). The aim is to apply the slurry to give complete coverage but ensure it doesn’t run off the walls of storages and equipment. An inline filter with 1000 micron (one millimetre) mesh and a recirculation hose will help prevent nozzle blockages and keep the slurry mixed during application. Impeller pumps are most suitable — typically a fire-fighting pump with a 3.7 kilowatt (five horsepower) motor. Do not use positive displacement pumps, such as gear or piston pumps, as they will block easily.
If applying a lot of slurry regularly, use a designated, older pump as pumping slurry will reduce a pump’s working life. Apply the slurry in the same order as the dust — start at the top of the silo or storage and work down the walls applying an even coat, avoiding runs from spraying too close or too much slurry. A solid pipe extension on the application hose will enable a more even coating on hard-to-reach areas such as silo walls.
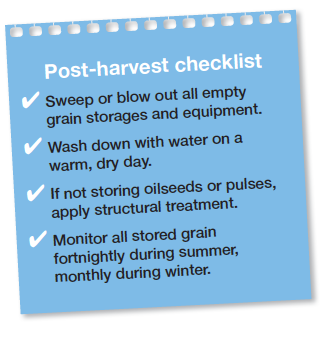 Grain kept for seed or stockfeed is a common breeding ground for pests so monitor all grain storages every two weeks during warmer periods of the year and at least monthly during cool periods of the year. Use grain insect sieves and traps to monitor for pests in all stored grain and regularly check grain handling equipment during the off season. Finding grain pests early allows them to be identified, treated appropriately and removed before they spread and become a much larger problem, which may be more difficult to treat. See Fact sheet, “Stored grain pests — identification” for more information.

Caution: Research on unregistered pesticide use Any research with unregistered pesticides or of unregistered products reported in this document does not constitute a recommendation for that particular use by the authors or the authors’ organisations. All pesticide applications must accord with the currently registered label for that particular pesticide, crop, pest and region.
The combination of meticulous grain hygiene plus well-managed aeration cooling generally overcomes 85 per cent of storage pest problems. For grain storage, three key factors provide significant gains for both grain storage pest control and grain quality – hygiene, aeration cooling and correct fumigation.
 Hygiene
The first grain harvested is often at the greatest risk of early insect infestation due to contamination. One on-farm test found more than 1000 lesser grain borers in the first 40 litres of wheat passing through the harvester. Remove grain residues from empty storages and grain handling equipment, including harvesters, field bins, augers and silos to ensure an uncontaminated start for new-season grain. Clean equipment by blowing or hosing out residues and dust and then consider a structural treatment (see Table 2, page 3). Remove and discard any grain left in hoppers and bags from the grain storage site so it doesn’t provide a habitat for pests during the off season.
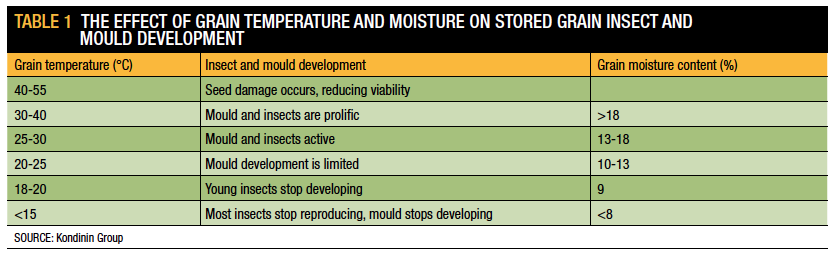
Freshly-harvested grain usually has a temperature around 30°C, which is an ideal breeding temperature for storage pests (see Table 1, page 2). Studies have shown that rust-red flour beetles stop breeding at 20°C, lesser grain borer at 18°C and below 15°C all storage pests stop breeding. Aim for grain temperatures of less than 23°C during summer and less than 15°C during winter. When placing grain into storage, run aeration fans continuously for the first 2-3 days to push the first cooling front through the grain and to create uniform moisture conditions. Then run the fans during the coolest 9-12 hours per day for the next 3-5 days. This will push a second cooling front through the grain bulk. Aeration cooling generally only requires air-flow rates of 2-4 litres per second per tonne. Finally the grain requires approximately 50 hours of appropriate quality air each fortnight during storage. Use an aeration controller that will perform the cooling process at the right time and continue to aerate the grain selecting the coolest air to run fans. An effective aeration controller will also ensure fans don’t operate when the relative humidity is higher than 85 per cent, which can re-wet and damage grain if operated for extended periods.
Fumigation with phosphine is a common component of many integrated pest control strategies. Taking fumigation shortcuts may kill enough adult insects in grain so it passes delivery standards, but the repercussions of such practices are detrimental to the grains industry. Poor fumigation techniques fail to kill pests at all life cycle stages, so while some adults may die, grain will soon be reinfested again as soon as larvae and eggs develop. What’s worse, every time a poor fumigation is carried out, insects with some resistance survive, and pass the resistance gene into their progeny making control more difficult in the future.
 Effective fumigation
Using the right type of storage is the first and most important step towards an effective fumigation. Only use fumigants, like phosphine, in a pressure-tested, sealed silo. Research shows that fumigating in a storage that is anything less than pressure sealed doesn’t achieve a high enough concentration of fumigant for a long enough period to kill pests at all life cycle stages. For effective phosphine fumigation, a minimum of 300 parts per million (ppm) gas concentration for seven days or 200ppm for 10 days is required. Fumigation trials in silos with small leaks demonstrated that phosphine levels are as low as 3ppm close to the leaks. The rest of the silo also suffers from reduced gas levels. Achieve effective fumigation by placing the correct phosphine rates (as directed on the label) onto a tray and hanging it in the top of a pressuretested, sealed silo or into a ground level application system if the silo is fitted with recirculation. After fumigation, ventilate grain for a minimum of one day with aeration fans running, or five days if no fans are fitted. A minimum withholding period of two days is required after ventilation before grain can be used for human consumption or stock feed. The total time needed for fumigating is 10-17 days. As a general rule, only keep a silo sealed while carrying out the fumigation (for example, one to two weeks). If grain moisture content is low (8-12%) the silo can remain sealed after fumigating but regular monitoring is essential to check for insect infestation and moisture migration to the head space.
When grain is put into storage it needs monitoring just like it does when it’s in the paddock – regularly. Check stored grain at least monthly, taking samples from the bottom, and if safe, the top of the storage.
Things to monitor:
When buying a new silo, buy a quality, sealable silo fitted with aeration and check with the manufacturer that it meets the Australian Standard for sealable silos (AS2628). Experience has shown that at least two sealable, aerated silos on farm provide the option for an effective fumigation and delivery program. Many older silos are not designed to be sealed and cannot be used for fumigation, however retrofitting aeration can reduce insect multiplication through grain cooling.
Seed that is dry, cool and sound (not weather damaged) will remain viable for longer. In well-managed storage, germination percentages can be expected to reduce by only 5 per cent after six months. To achieve this, keep grain moisture content below 12%. Grain temperature also has a major impact on germination. Aim for grain temperatures of 20°C and below in seed storage by using aeration cooling (with auto control). Wheat at 12 per cent moisture content stored at 30-35°C (unaerated grain temperature) will reduce germination percentages and seedling vigour when stored over a long period. Position small seed silos in the shade or paint them reflective white to assist keeping grain cool. WA growers can treat seed with a grain protectant combined with a dyed grain fungicide in combination with aeration cooling to maximise insect control.
Insect control options are limited for stored pulses and oilseeds. Aeration and phosphine fumigation are the main methods and controlled atmosphere (inert gasses such as carbon dioxide or nitrogen) may be an option. The effectiveness of phosphine fumigation on oilseeds is often reduced due to phosphine sorption during treatment. Monitoring gas concentrations with a gas monitor is essential to ensure the correct concentration is achieved for the correct length of time. Use sound grain hygiene in combination with aeration cooling to reduce insect activity. Small seed-size grains, such as canola, may need larger-capacity aeration fans to combat the greater amount of back pressure in the storage. Always store these grains at their recommended grain moisture content level.


Test
Continue reading