
The decision to buy a silo for on farm grain storage can be daunting given it’s a major investment, and one you will live with for some time.
The decision to buy a silo for on farm grain storage can be daunting given it’s a major investment, and one you will live with for some time.

Pressure testing a grain silo. 2 of 3 demonstration videos by DAFWA’s Chris Newman.

Applying diatomaceous earth to a grain silo for insect control. 3 of 3 demonstration videos by DAFWA’s Chris Newman.

The rate of quality deterioration in stored oilseeds depends on the quality of grain placed in storage and management of temperature, moisture content and insects. The quality of oilseed is generally measured by testing the free fatty acids (FFA), oil colour, oil content, residues of unregistered chemicals, insects or evidence of insect damage, moulds and mycotoxins. With the exception of oil content, storage management affects all of these qualities.
Weather or mechanically damaged seed will deteriorate more quickly during storage than high-quality seed. When oilseeds become damaged, processes such as oxidation are in progress and difficult to slow.
A dull grey and brown seed coat colour in canola is one indicator of weather damage. Another indicator is the colour of crushed seed — weather-damaged seed will be light brown in colour compared with the normal bright yellow.
The formation of FFA and off-flavours in oil will occur more rapidly in damaged seed. Canola with FFA levels greater than one per cent is more difficult to store and may be rejected at receival sites.
It is often asked, why canola has to be stored at low-moisture content of 7–8 per cent. The oil content in oilseeds is higher than that in cereal grain. If the moisture content of canola is converted to an oil-free basis, canola with 45 per cent oil content and eight per cent moisture content is equivalent to cereals at 14.5 per cent moisture content.
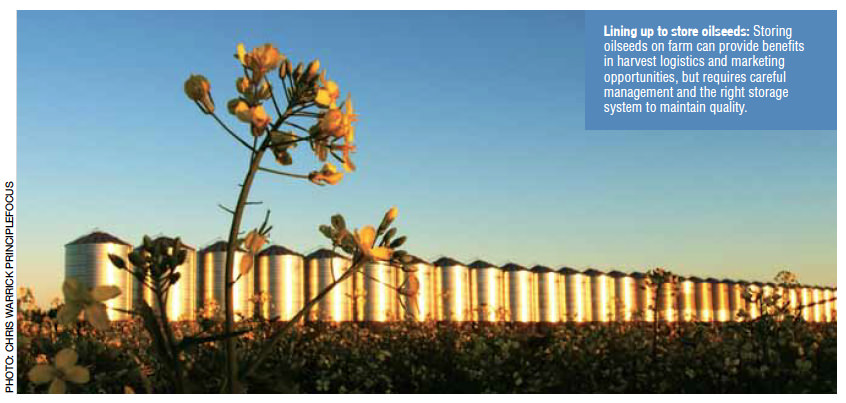
Image: Lining up to store oilseeds: Storing oilseeds on farm can provide benefits in harvest logistics and marketing opportunities, but requires careful management and the right storage system to maintain quality.
Cereals stored at 14.5 per cent moisture content are highly susceptible to quality loss, mould growth and insect infestation. Canola at the equivalent eight per cent moisture content requires aeration cooling. Canola stored at high moisture or oil content is also at risk of spontaneous combustion.
When grain is cool (below 20°C), mould growth and insect development are significantly reduced and cooling below 18°C will stop most insects from breeding and mould from growing.
Unlike cereal grains (which typically contain only about two per cent oil by weight) oilseeds contain from 17 per cent in soybeans and up to 50 per cent oil content in canola. The oil fraction of the seed absorbs minimal moisture, meaning a small increase in moisture content can quickly produce self heating and seed damage.
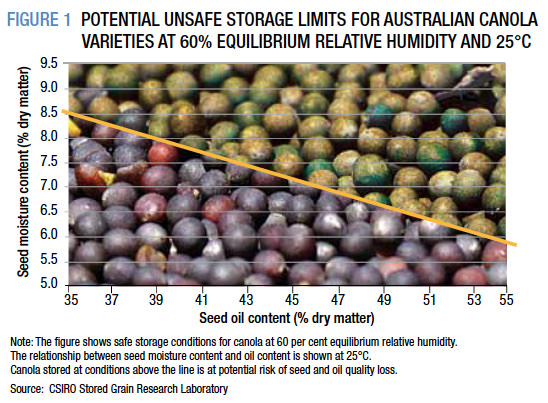
The general recommended storage conditions for canola are below 25°C and below 7 per cent moisture content but vary according to the oil content. Figure 1 shows the safe moisture contents for canola stored at 25°C, depending on its oil content. For example, canola with an oil content of 35 per cent can be safely stored at 8.5 per cent moisture content and below 25°C. But canola with higher oil content of around 50 per cent must be stored below 6.5 per cent moisture content and 25°C to be safe. The recommended safe storage for sunflowers at 40 per cent oil content is below nine per cent moisture content, or below 7.5 per cent moisture content if oil content is higher than 50 per cent.
The first step towards insect control is done before any oilseed even goes into storage — meticulous grain hygiene. Due to the limited treatment options to control insect pests in oilseeds, the first line of attack is removing them from the storage site before harvest. Cleaning silos and storages thoroughly and removing spilt and leftover grain removes the feed source and harbour for insect pests.
For more information see the GRDC fact sheet, Hygiene and structural treatments for grain storages.
The common insects found in stored oilseed are:
These insects tend to favour the top of the grain stack and around silo outlets. Sample both of these sites regularly. Under optimum breeding conditions of about 30°C, insects can complete their full life cycle in as little as four weeks.
Reducing the grain temperature with aeration cooling plays a vital role in lengthening the insect breeding life cycle or in most cases stopping reproduction if cooled below 18°C.
VapormateTM and phosphine are the only registered fumigants for controlling insects in oilseeds. For oilseeds, pyrethrins and diatomaceous earth (DE) are only suitable for use as structural treatments and must never be applied directly to the grain.
If using DE as a structural treatment:
For more information see the GRDC fact sheet, Hygiene and structural treatments for grain storages.

VapormateTM can only be applied by a licensed fumigator, which leaves phosphine as the only insect treatment option for growers to use on farm.
The key to successful phosphine fumigation is to apply only in gas-tight, sealed silos. This will ensure the phosphine concentration reaches the lethal dose for the required period to kill insects at all life stages. Fumigating in a non-gas-tight silo is likely to only kill a percentage of the adult insects leaving the eggs, larvae, pupae and remaining adults to reinfest the grain.
When buying a new gas-tight sealable silo, which is covered under the Australian Standard 2628, it must pass a five-minute half-life pressure test. For existing silos, a three-minute half-life pressure test will provide gas-tight conditions adequate for a successful fumigation. For more information see the GRDC fact sheet, Pressure testing sealable silos.
Most oilseeds absorb phosphine gas during the fumigation so it is vital to use the correct label dose rates and to follow the required ventilation periods stated on the label. The phosphine fumigation exposure period must be extended to 10 days if grain temperature is between 15°C and 25°C. For more information see the GRDC booklet, Fumigating with phosphine, other fumigants and controlled atmospheres.
Aeration is an essential storage tool for oilseeds. Correct management creates uniform, cool conditions in the seed bulk and slows most quality deterioration processes.
Aeration cooling:
■ Maintains oil quality — colour, low FFA, odour and rancidity.
■ Reduces the risk of ‘hot spots’, moisture migration and mould development.
■ Slows or stops insect pests’ reproduction cycle.
■ Maintains germination and seed vigour for longer.
Aeration cooling can be achieved with air-flow rates of 2–3 litres per second per tonne. Operating an aeration fan for cooling requires a planned control program, which is best achieved with an automatic aeration controller.
A critical point to managing aeration manually is to avoid running fans for extended periods when the ambient relative humidity is above 85 per cent. Selecting air well below this ensures moisture from the air is not increasing the grains moisture content especially as oilseeds are more susceptible to quality loss.
When managing aeration cooling, the initial aim is to get maximum air-flow through the grain bulk as soon as it enters storage, to prevent it from sweating and heating. After the aeration fans have been running continuously for 2–3 days to flush out any warm, humid air, reduce run time to 9–12 hours per day during the coolest period, for the next seven days.
This initial reduction in grain temperature of 10°C ensures grain is less prone to damage and insect attack, while further cooling becomes a more precise task.
During the final phase of longer-term storage, automated aeration controllers generally run fans during the coolest periods of the day, averaging 100 hours per month. For more information see the GRDC fact sheet, Aeration cooling for pest control.
 Compared to aeration cooling of cereal grains, canola being a much smaller seed adds significantly more back pressure to the aeration fan. This means that an aeration cooling system set up to produce 2–3 l/s/t in cereal grain will typically be reduced to 40–60 per cent of that when used in canola.
When setting up a storage unit to cater for cereals and canola, consider using several smaller fans rather than one big fan for cooling. When canola is stored, all the fans will be needed to achieve the 2–3 l/s/t but when cereal is stored one or some of the fans can remain turned off to save using unnecessary power.
Other factors that also affect the amount of airflow through the grain are:
■ depth of the grain in storage,
■ the amount of un-thrashed and foreign plant material in the grain, and
■ the size of the motor driving the fan.
The area and type of ducting must also be adequate to disperse the air through the storage and not be blocked by the small canola seeds. Avoid splitting airflow from one fan into multiple silos as the back pressure in each silo will vary and unfavourably portion the amount of airflow to each. This will be exacerbated if different grains are stored in each silo such as canola in one and a cereal in the other.
Aeration drying can be a valuable harvest tool for oilseeds but requires purpose built equipment capable of airflow rates of at least 15–25 l/s/t and adequate ventilation. Even with these higher airflow rates, aeration drying is a much slower process than aeration cooling and requires careful management. In saying that, as an example, sunflower seed can be aeration dried successfully with ambient conditions of 30°C and 30–50 per cent relative humidity. For more information on the possibilities for aeration drying and how to manage it, refer to the GRDC booklet, Aerating stored grain, cooling or drying for quality control.
The ideal storage for oilseeds is a cone-bottom silo fitted with aeration and sealable for gas-tight fumigation. Generally oilseeds are higher-value grains as well as being prone to mould and insect attack, so should be given priority over other grain to the best storage facility on the farm.
The ideal oilseed storage will have:
■ Aeration cooling, with an automatic controller.
■ Aeration ducting suitable for small seeds.
■ Easy ways to inload and outload causing minimal seed damage from machinery.
■ Access to the top of the grain stack to monitor temperature, moisture and insect activity.
■ Quality sealing to meet the minimum three-minute half-life pressure test for gas-tight fumigation with phosphine.
■ An easy-to-clean structure so grain can be put into a clean storage, free of insect pests and unregistered pesticide residues.
Storing oilseeds successfully requires careful management with a planned approach and a suitable storage system. Always remember that oilseeds carry a higher risk of fire during harvest, drying and storage.

Grain storage consultant Peter Botta gives useful tips on the monitoring of grain storage insect pests. GRDC Ground Cover TV

A key concern for grain growers is on-farm grain storage. And not helping them in their attempt to ensure grain quality has been the lack of an Australian standard for sealed silos. In early 2010 a manufacturing standard was specified however it is a voluntary standard leaving it up to growers to make sure when they buy “air tight” that’s what they get. This report from the Grains Research and Development Corporation’s Ground Cover TV.

For more than 40 years Phosphine has been a safe and reliable means of controlling grain storage insects. Over 80% of stored grain is treated with this chemical but resistance to Phosphine is building amongst insect populations. So when a previously resistant strain of Rust Red Flour Beetle in Western Australia was eradicated by Phosphine it was a remarkable result.

Grain growers are using silo aeration on their stored grain to gain harvest flexibility and more marketing options. Silo aeration can be used to cool grain and keep insect populations low. But it can also be used to dry the grain – allowing greater tolerance of moisture at harvest. But aeration drying makes the task of storing grain on farm even more challenging.

Fumigating a grain silo with phosphine.1 of 3 demonstration videos by DAFWA’s Chris Newman.