This GRDC Back Pocket Guide is a practical field reference designed to help growers, grain handlers and storage managers quickly identify and manage common stored grain pests found in Australia. The guide provides clear photographs and easy-to-follow descriptions of major insect pests affecting stored grain, pulses and processed grain products, helping users recognise pests early before infestations become serious.
Grain storage systems come in a range of shapes and sizes to meet farm requirements and careful planning is needed to optimise an on-farm grain storage facility investment. According to the option selected, on-farm grain storage systems can provide a short-term or long-term storage facility. Depending on the goal of on-farm storage, whether it be access to improved markets or simply to maximise harvest efficiency, there are a number of options available.
Harvest is the ideal time to plan future grain storage system requirements, as it can help identify issues and opportunities for future harvest operations that may otherwise be forgotten once next year’s crop cycle gets underway. Costs and storage flexibility can vary between grain storage options as can longevity of the investment. Table 1 identifies the major on-farm grain storage options, their advantages and disadvantages.
Silos are the most common method of storing grain in Australia, constituting 79% of all on-farm grain storage facilities nationally (see Figure 1).
Silos come in a variety of configurations, including flat-bottom or cone base, and both are available as gas-tight sealable or non-sealed, aerated and non-aerated. The balance of on-farm grain storage facilities can be split between grain storage bags (9 per cent) and bunkers or sheds (12 per cent). Grain-storage bags are increasing in popularity as a short-term storage solution to assist harvest logistics. With careful management growers can also use silo bags to provide short-term marketing opportunities. For similar storage time-frames to grain storage bags, and where options are limited, growers can also use sheds to temporarily store grain during harvest — provided they have been well prepared.
Superior silo: The dominant on-farm grain storage option is the silo in either a flat-bottom or cone-base configuration.
Benefits and pitfalls of various storage types
Silos: fumigation options
A gas-tight sealable silo will ensure phosphine, or other fumigants and controlled atmospheres, are maintained at a sufficient concentration to kill insects through their complete life cycle of eggs, larvae, pupae and adult. Be aware of cunning marketing terminology such as ‘fumigatable silos’. Although such a silo might be capable of sealing with modifications, a gas-tight sealable silo needs to be tested onsite to meet Australian Standard (AS 2628-2010) after installation. Gas-tight sealable silos also can be used for alternative methods of insect control including controlled atmospheres of inert gasses, such as carbon dioxide or nitrogen. Current costs of using these gases (between $5 and $12/tonne to treat stored grain compared with $0.30 per tonne using phosphine) carbon dioxide and nitrogen atmospheres will arguably be used solely by niche growers, such as organic growers, until gas is less expensive.
There is significant work being carried out in lower-cost nitrogen gas generation and if buying a silo, ensure it is gas-tight for future proofing of the investment.
Silos: sizes and construction
Silos can be transported fully constructed and ready to stand, or can be built onsite. While intra-state variations apply, transportable silos are typically limited to 140 tonnes capacity due to road transport regulation limitations. Most smaller, 50–70t, cone-bottom silos are prefabricated and transported. Cone-bottom silos are easier to clean than flat-bottom silos due to their self-emptying design, but are limited to capacities less than 300t. Some growers require gas-tight storage facilities of greater capacity and increasing silo capacity requires quality materials and design. Silos can be built onsite and are available in sizes up to 3000t. The increased surface area of a larger silo requires more sheet metal joins, providing more opportunity for gas to escape.
TABLE 2 Typical Grain Bulk Densities Per Cubic Metre
Silos: lifespan
Silo lifespan is another advantage delivered through investment in gas-tight sealable silo storage infrastructure. A well-built, aerated, quality gas-tight sealable silo constructed to meet the Australian standard (AS 2628-2010) with a thorough maintenance regime could be expected to provide around 25 years of serviceable life before major repairs may be required. Silos: aeration While some preliminary research has been carried out using other grain-storage methods, silos permit simple administration of aeration after harvest to cool grain.
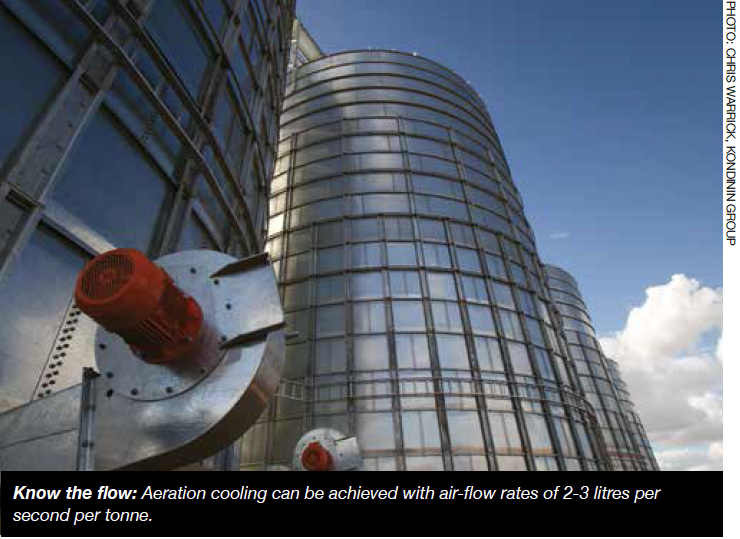
Aeration cooling of grain in-storage creates uniform moisture conditions and slows or stops insect pest life cycles.
Depending on the temperature reductions achieved; this can deliver significantly-reduced insect numbers.
For older, unsealed silos, consider retro-fitting aeration as the first option. Aeration cooling requires airflows of at least 2-3 litres of air, per second, per tonne. For example, a 100t silo will require 200-300 litres per second (l/s) of air to cool the grain effectively. Aeration fans also require well-designed perforated ducts or a plenum to assist in dispersing airflow evenly throughout the silo. Selecting the coolest air for the grain is best done using an aeration controller, but aeration fans should be run continuously for at least three days for smaller silos (less than 100t) and up to a week for large silos (over 100t) as soon as grain covers the aeration ducting. This initial process removes the harvest heat and equalises grain moisture. After initial harvest heat has been removed, the controller can be switched on to continue the cooling process.
Silos: aeration drying
Specific drying silos are designed to maximise drying efficacy and have minimum air-flow rates of between 15–20 litres per second per tonne (l/s/t) of storage. Specially-designed drying silos often have a truncated, or secondary, base cone to assist in the efficiency and efficacy of drying stored grain. Drying with ambient air requires a relative humidity well below that of the equilibrium relative humidity of the grain. Drying silos often allow the addition of heat at the air intake to improve the moisture removal capacity of the air flowing through the grain.
Silos: capital investment
As a permanent infrastructure fixture on a farm, silos are initially one of the most expensive options of grain storage at around $100 to $140/tonne for transportable sealed silos. To this can be added foundation requirements, which can vary between $2500 for a 70t transportable silo to considerably more for a flat-bottom silo with aeration ducting incorporated into the floor. Larger silos built onsite typically have an outlay cost of about $80 per tonne of stored grain. But looking at this investment over the life of the storage can see this figure drop significantly to being one of the cheapest forms of on-farm grain storage.
Silos: safety
Working at heights can be dangerous without the appropriate safety precautions. In the case of silos, this can mean working up to 16m off the ground. A climb to the top is required for regular inspection through the top hatch if grain is stored for more than a month. Silo designs now incorporate ground-operated lids, caged ladders, platforms and top rails to minimise the risk of operators falling. Facilities for harness attachments, which should be worn by all operators climbing silos, are also fitted.
Silos: retro-sealing
To meet the requirements of fumigation and utilising existing silo infrastructure, some growers have invested in retro-sealing older silos. In most instances these silos are high capacity (> 500t), flat-bottomed silos. Retro-sealing specialists use an array of rubber, specialised rubberised cements and silicon compounds to seal sheet joins, bolts, rivets, lids and openings on older silos. These are typically sprayed on with an air-operated gun with coarse flows to handle the heavy product viscosity.
[box]The interface between the pad and the bottom sheet of the silo and the top sheet meeting the roof should be given special attention as they are commonly points of limited seal integrity. Customised sealing plates can also be fabricated for doors, vents and openings. Oil-filled pressure-relief valves will also be fitted. The cost of retro-sealing an older style silo can be significant, often totalling as much as 50 per cent of the cost of a new sealed unit. Ensure the retro-seal contractor includes a guarantee that when completed the silo will meet the Australian Standard for sealed silos AS2628. After sealing, consider ongoing maintenance costs. Check coating integrity annually and patch as required to maintain an effective seal. Particular vigilance is needed around the storage base, and where the walls meet the lid, as expansion and contraction of the metal can damage the retro-seal finish.[/box]
Silo buyers’ checklist
Aerated, gas-tight sealable silos should always be the preferred option.
Ask the manufacturer to provide a guaranteed pressure test in accordance with AS2628-2010 on-site after construction or delivery. Pressure testing a storage when full of grain is also important.
Ensure a pressure relief valve capable of handling the maximum air-flow in and out of the silo due to ambient temperature variations is fitted.
A silo aeration fan can be used with care to pressurise a sealable silo to carry out the annual pressure test for leaks.A tyre valve or a larger fitting may also be installed to determine the volume of air required for the test.
Seal mechanisms on inlets and outlets should be simple to operate and provide even seal pressure.
Seal rubbers should be quality high-density EPDM (ethylene-propylene-diene-monomer) rubber, maintain a strong memory and be UV resistant.
Look for ground-operated lids that provide an even seal on the silo inlet.High-quality ground-opening lids will provide a gas-tight seal, but some will still require a climb to the top of the silo to lock down the lid for fumigation.
Aeration cooling fans are a must-have accessory for a new silo and provide significant benefits for stored grain.Buy these with the silo or as an aftermarket accessory and specify airflow rates of at least 2–3l/s for every tonne of grain storage capacity of the silo.
Aeration drying silos are an option, but are typically shaped to maximise drying efficiency.Drying fans need to deliver between 15 and 20l/s for every tonne of grain storage capacity of the silo and additional sealable venting in the roof should be fitted.
Outlet access for unloading should be simple to operate and permit ample auger access.
Look for a sturdy base and frame on elevated cone base silos with quality weldments. Galvanised tubing has a heavier coating than galvanised rolled hollow section (RHS) but is more difficult to shape and weld joins.
Ensure wall sections incorporate a positive seal between sheets and sealed riveting where rivets are exposed.
Always consider access and safety features, including roof rails, ladder lockouts, platforms and ladder cages. It can be argued that a ladder should always be fitted, as inspection of the grain in the top of the silo should be carried out regularly.
A quality outside finish will provide a superior life. White paint reduces heating of grain in storage. It comes at a cost premium but is superior to zincalume finishes over time.
A chalk-board patch painted on the silo base can be useful for recording grain and treatment details, including variety, protein and moisture content, fill date and fumigation details.
Check silo design inside and outside for ease of cleaning. Check walls and aeration ducting including the floor for grain trap points.
Ensure adequate venting is fitted to the roof of silos with aeration fans to permit adequate air-flow without restriction. These vents should be easy to clean. Check seals and lock down if it is a sealable silo.
Grain-storage bags
As a relatively new on-farm grain storage option, silo bags have been widely used in Australia since the early 2000s, although they have been used overseas for much longer. As with most things new, numerous disasters, mostly due to operator error and lack of inspection vigilance, have earned grain bags a bad name. They can provide useful short-term storage (less than three months) and a logistics management tool during harvest. They must be installed on a well-prepared site away from bird habitats, including trees and water sources.
Grain-storage bags: capacity
Typical storage capacity is around 240 tonnes, but other sizes including 200t and 150t bags are also available.
Take care when buying bags. Quality of bag materials varies and using bags for grain storage that have been designed for silage storage is not recommended.
Grain-storage bags: using them successfully
Successful use of grain bags as an on-farm grain storage option requires a carefully-prepared pad. Anecdotally, an elevated, well-drained pad provides optimal results where no stubble (which can harbour vermin) or rocks can tear the grain storage bags as they are being filled and unloaded.
Fill rates are typically 3–4 tonnes per minute. Always fill bags up-the-slope and ensure brake settings on the filler are set to ensure the appropriate stretch of the bag is achieved. While typically a 10 per cent stretch, this can be adjusted down for hot weather conditions or up for cool ambient weather. When full, regularly and vigilantly check the bags for cuts, nicks and holes and patch these with silicon or bag sticky tape available from the bag supplier.
Grain-storage bags: costs
The two pieces of equipment required for loading and unloading grain storage bags can cost around $27,000 each. This equipment can be hired, although having your own can reduce the pressure of having to get grain in and out of the bags within a specified timeframe as demand for this hire equipment is high at the peak of harvest. The bags themselves are single-use and cost around $5 per tonne stored, or $1000 plus for a 240t bag. Consider site-preparation, including any earthworks and fencing requirements, time and labour costs for maintenance when calculating the comparative costs of using grain bags.
Grain-storage bags: useable lifespan
Grain-storage bags are best used for short-term storage only. While longer-term storages are possible, three months is regarded as a maximum storage period. Beyond this, there is considerable risk of grain losses and spoilage in many of Australia’s grain production regions.
Grain-storage bags: pest and insect control
Fumigation with phosphine in bags has been recently proven in Australia as an option if the correct method of application and venting is followed. Alternatively, fumigation of grain-storage bags can also be performed using gases like ProFume. But this is only available for use by licensed fumigators and the cost is generally considerably higher than phosphine. In addition to insects, vermin including mice and birds can attack grain bags. Outside baiting, reducing habitat provision and food sources (including regular checking and patching of bags where required) is the best way to reduce vermin risk. Grain storage bags: access One often-overlooked aspect of using grain-storage bags in the paddock is their accessibility after harvest. Unless the bags are placed on, or near, an all-weather access road, they can be difficult to unload if wet weather conditions prevail post-harvest. The pad site needs to be large enough for trucks and machinery for bag unloading and allow access in wet conditions.
Sheds and bunkers
Bunkers are commonly used by bulk handling companies, but require careful site preparation, labour for handling large tarp covers and machinery to move grain on and off the grain stack. Effective treatment of insect infestation is difficult in sheds and bunkers. For on-farm storage, grain bags may be a more suitable short-term alternative. Sheds can provide dual-purpose functionality for storage of other products including fertiliser and machinery. But the risk of grain contamination requires a focus on impeccable hygiene practices. As a permanent infrastructure investment, sheds can be continually used and have a retained value on-farm with a service life expected to exceed 30 years.
Specialist grain-storage sheds can be constructed to make filling and unloading simpler. Aeration and sealing methods for fumigations are best considered in the early shed design phase.
Sheds are most useful as a short-term storage solution to assist harvest logistics. They can be a useful component of an on-farm grain storage system that incorporates other gas-tight sealable grain storage facilities
Sheds: costs
Cost of grain storage in sheds varies widely depending on footing and slab requirements as determined by soil type. Method of construction and alternative uses can also vary the cost of construction. Sheds: aeration Aerating grain stored in a shed is difficult due to the open design of most shed structures. But customised ducting and air manifolds can be designed by grain aeration specialists to aerate grain stacked in a shed.
Sheds: pest and insect control
Given the open nature of most sheds on-farm, pest and insect control presents some challenges. Fumigation with gas-proof sheeting placed over the stack is difficult. Bulk handlers, including CBH in Western Australia, have invested heavily in sealing gas-tight bulk storage sheds to permit fumigation. On-farm, sheds are also prone to spoilage by mice and birds.
Sheds: loading and unloading
One of the biggest drawbacks of sheds used for grain storage is the ease of getting grain in and out. Using an auger or belt conveyor to fill the shed from the truck is common practice. For out-loading, some operators opt for bulk-handling buckets on front-end-loaders or tele-handlers to fill direct into trucks. Some grain trade operators use this approach to minimised grain damage when handling grains prone to splitting, such as lentils. Sump load points are occasionally used, with a lowered section of the floor utilising gravity to assist in sweeping grain into a loading point. Grain vacuums can also be used to out-load grain from sheds. Regardless of the out-loading options, inevitably, a final clean is performed with a broom and grain shovel, which can take time if hygiene is to be maintained.
On-farm grain storage facility considerations
Depending on budget and expectations, investing in and planning a grain-storage facility requires a range of considerations, regardless of the storage type.
Access for in-loading and out-loading
Continuous loop roads around the grain-storage facility requiring minimal, or no, reversing are ideal and can dramatically improve loading and out-loading rates as well as minimising damage to equipment through accidental collision. Dedicate an ample-sized pad to permit auger or grain conveyor access and ease of shifting grain loads. Where steeper slopes exist, some growers have terraced the slope with a retaining wall, to allow them to reduce the lift height (and auger size) for loading the silo. Where retaining walls exceed 1m in height, consider guard rails and access steps.
Proximity to resources (power sources — electricity and fuel)
Whether the facility is to be powered for aeration, i.e. using petrol or electricity, consider the proximity to these resources, particularly if the facility will be built in stages as each stage becomes affordable. Connection to mains power can be expensive depending on the distance to the line. Some large drying fans also require three-phase power which requires a specific pole transformer.
With augers, machinery and tipping trucks in use around the facility, placing power underground is expensive, but can significantly improve safety.
It is worth considering fuel sources and fuel lines for dryer installations, or future dryer installations, when planning the facility layout and constructing the pad.
Health and safety considerations
Operational safety considerations should be key to the facility design. Allow plenty of space for auger transport and movement around the facility.Ensure overhead power-lines are located nowhere near the pad where augers, conveyors or trucks might be operating — ideally locate power underground.
Pads should be flat, hard-packed stands that allow tipping trucks to elevate without risk of toppling over sideways.
Minimise any slopes and ensure they are of a constant grade. Position drainage lines and holes away from high-traffic areas to reduce the risk of equipment falling through while maximising drainage effectiveness. Electrical switch boards should incorporate residual current devices (RCDs) to prevent electrical shock if, for example, an electrical cable was accidentally cut. A qualified technician is required to carry out any 240-volt electrical work. They will ensure the components are safe to use in areas where combustible dusts are present.
Road access
The ability to get trucks in and around the grain-storage facility is paramount to its success. Sealed or hard, all-weather roads to the site from a main road are essential for year-round out-loading, which will ensure grain sale contracts are met in a timely manner and can deliver marketing advantages. Proximity to trees and insect or bird havens Avoid locating storage facilities near trees, haystacks and haysheds. All are havens for insects and birds, making migration from nature to the grain stored in the facility easier. Similarly, water sources are attractions for vermin and birds. Avoid water sources when selecting a site for a grain storage facility.
Proximity to harvest locations
One of the most important considerations of facility placement and layout is harvest logistics. While placing silos close to a house or existing infrastructure is most common, it may not be the most efficient placement from a logistics perspective. More often than not, storage facilities are located according to proximity to power and facilities, so a balance between ease of accessing services and optimising harvest logistics has to be struck.
Determining storage capacity requirements
Calculating ‘adequate storage capacity’ can involve an enormous range of variables. Consider what would be the ’ultimate‘ in on-farm storage capacity for the farm and then plan a series of stages to achieve this ultimate goal. For some growers, ultimate storage capacity is 100 per cent of their harvest, while others will always use an external bulk handling system to some extent. This is likely to vary between State bulk handling operators, dominant crop types, target markets and distance from the farm to bulk handlers. As an initial step, aim for a reasonable proportion of the total harvest and plan to expand the facility from there. Consider investing in a number of small silos as the first step and buy larger silos as the business expands. Smaller silos, for example around 70 to 100 tonnes, will always be valuable for segregation and blending or insect control in small parcels of grain. Fumigating a small amount of grain in a large silo can be expensive because treatment is based on silo volume, not grain volume.
Determining out-loading throughput rates
A standard out-loading rate is around 3-4 tonnes per minute and anything exceeding that will enable the driver to get back on the road to their delivery port quicker.
Weighbridges
With fines for overloading increasing in severity and occurrence in most States, using a weighbridge could pay for itself quickly. Weighbridges can be incorporated into the silo load-and-unload loop with effective installations providing readouts for the driver when approaching from both sides. A weighbridge, fully installed will add a cost of about $130,000 to the facility.
Blending abilities
The ability to blend grains and optimise specifications is one of the primary benefits of an on-farm storage facility. The ease of out-loading for blending is greatly improved by adding a belt or drag-chain grain conveyor and elevator system to the facility. Grain can be simultaneously out-loaded from multiple silos and loaded into another. The alternative is to blend into a truck and then auger back, which can be fiddly but effective if small batches are blended occasionally.
Sampling abilities
Keeping a record and sample of grain stored on-farm can be useful for subsequent testing and quality assurance. Owners of larger on-farm, grain-storage facilities commonly add a sampling shed where grain-quality specifications are collected and stored. Taking the sample from silos can be easier if sealed silo ports for sample collection can be easily accessed to obtain a cross section of the stored product. Truck sampling options include push spears and vacuum spears, which are designed to take a profile section of the load. They are used by many growers and are easier to operate from an elevated platform. If adding an elevated platform to the facility, remember to add handrails to minimise the risk of falling.
Cleaning and facility maintenance
Maintaining good site hygiene is easier with a quality hard surface. Concrete pads are essential for silos to sit on but extended aprons can also assist cleaning spilt grain from loading and unloading.
Common grain trap points include dump-pits, drainage or aeration channels and around silo bases.
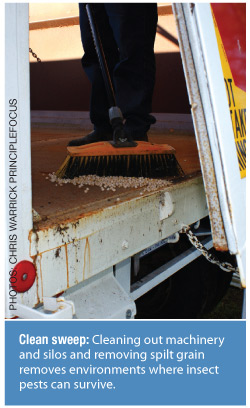
Clean all grain off the site on a regular basis to avoid harbouring insects, which may infest stored grain. Ensure a water point is accessible for washing out silos after they are emptied. Grain vacuums are popular with owners of flat-bottomed silos to remove residual grain where sweep augers have not been able to reach.
Facility earthworks
When determining the requirement for earthworks, always allow a buffer around the pad for construction-vehicle movement. Raised pads are most common as they minimise the potential for water damage to the facility and stored grain. The height of the pad will typically vary according to the overall topography of the site relative to the landscape but 500mm above average topographic level is not uncommon.
Soil type impacts
Soil type can have a huge bearing on silo foundation thickness and requirements for facility earthworks. Foundations are normally engineered with depth of footing and reinforcing is determined according to the physical properties of the soil. Highly-reactive soils shrink and swell according to their level of moisture and typically require additional foundation engineering and reinforcing, which comes at a greater cost. As a rule of thumb, experienced silo-pad concreters assume soil type according to region for quoting purposes with slight variations dependent upon on-site requirements.
Drainage
In addition to maintaining a raised, firm pad for the storage facility, plan for drainage to handle and direct run-off away from the pad. In some cases the natural topography of the site may assist free drainage while on flat sites, drainage channels may have to be formed to carry water away from the site. A well-designed pad for transportable cone-bottom silos will ensure water does not pool near the base structure, which can quickly rust out.
Lighting
Loading and out-loading is often carried out at night during harvest and effective lighting not only makes the job easier for drivers but also improves safety at the site. Efficient and robust forms of lighting, including LED, are suitable choices for short-throw requirements. If laying electrical cables underground, for aeration or auger drives, consider laying electrical cables for lighting at the same time.
Communications
With numerous market opportunities and volumes of information and data detailing specifications of stored grain increasing, facilities for data transfer and communication add value to any site plan, particularly if the site is to be equipped with a sampling and testing shed.
Planning to expand
It is rare any grower would set out to build a complete on-farm grain storage system from scratch. The capital requirement would be enormous and in most cases grain storage facilities grow with increasing farm productivity. The careful planning of a facility to be built in stages can ensure design aspects of the larger site are not overlooked when constructing these stages. It can also lead to savings through coordinated placement of pipes, electricals and concrete pads. Expansion is most commonly, and simplistically, an extension of a single line of silos, although variations include circles with a central receival and out-loading point. Single lines of silos offer the ability to run a single out-loading belt, which can feed grain into an elevator for out-loading or transfer to other silos.
When planning to expand, consider drying options including the ability to undertake batch drying or dedicated drying silos with ample airflow rates.
Also plan for aeration controller placement and associated electricals.
Staking out the facility
Everything can look good on plans, but it is important to physically stake out the site of grain facilities to ensure proportions have not been underestimated or overlooked. Driving pegs onto the site to indicate silo placement, pad borders and the positioning of roads and weighbridges can help visualise the suitability of the plan for the site.
Adapting existing facilities
In many cases, existing facilities are worked into the design to use existing infrastructure.Upgrading, including retro-sealing silos and sheds, can be an option to reduce the overall cost of storage per tonne, but remember to include ongoing maintenance costs for retro-sealed facilities. Offset placement of silos in lines parallel to lines of existing silos can be an option and can offer out-loading efficiencies. Apart from fitting in around older storages, the first modification to older silos should be the installation of an appropriately sized aeration fan and ducting.
On-site office and sampling sheds
An on-site office is ideal for keeping records and samples of stored grain. It can house expensive, sensitive testing equipment and be used as a crib-room for drivers and employees. Portable site offices are a common choice as they can be fitted with air-conditioning and are often pre-wired for electrical outlets. Used site offices regularly come up for sale on mining sites and can be bought at a fraction of the new price. As a minimal alternative, an on-site cabinet for load documentation and records will ensure hard copies of silo contents and load specification details are kept on site.
Dump pits
Dump pits can be installed in combination with paddle or drag conveyors to quickly and easily take and elevate grain to load silos.
Carefully cover dump pits when not in use to keep water out and keep pits and surrounding areas clean to minimise contamination and spoilt grain.
Conveyor types
Numerous options for shifting grain around the site are available and each has benefits and disadvantages. Maximum angles of elevation vary between conveyors according to grain but figures are usually quoted for wheat. Augers are most common due to their portability and are one of the cheapest methods of elevating grain into a number of silos. Elevation angle and flight turn speed have a bearing on flow rates with higher elevation angles reducing throughput and impacting on hygiene. Hygiene can be compromised with lower throughput, as grain tends to sit between the auger flights. It is best removed by reversing the auger until all grain has been cleared.
Augers can occasionally damage split-prone grain — particularly old augers with worn flighting. Belted conveyors are the second most-commonly-used grain transfer method and are preferred by operators transferring damage-prone grain. Being a transportable unit, elevation angle is limited to the angle of repose of the grain. The angle of repose is a physical stacking property of a grain and varies between grain types. The repose angle is a measure of the angle of the sides of a conical grain pile from horizontal.
For example, the angle of repose for wheat is 27 degrees while canola is 22 degrees. Flow rates reduce as the angle of elevation increases to approach the repose angle. Belts are often cupped along the conveyor length to accommodate grain and hygiene is excellent with the design of a belted conveyor being self-cleaning. Bucket elevators are predominantly used to elevate grain vertically and are commonly used together with belted conveyors transferring grain horizontally, or splitters diverting grain down chutes through a gated manifold.
Bucket elevators are self-cleaning by design and are typically fixed position equipment Drag-chain conveyors or paddle conveyors use a series of paddles fixed to a loop of chain moving inside a conduit. Drag chains can elevate at any angle, including horizontal, and are largely self-cleaning, although corners of the chain-loop will normally require attention. Drag-chain conveyors are a permanent installation but are extendable for facility expansion.
In order to kill grain pests at all stages of their life cycle (egg, larva, pupa, adult), phosphine gas needs to reach, and be maintained at, a concentration possible only in a gas-tight storage.
To control insects at all life stages the only option is to fumigate in a gas-tight storage.
Cool grain temperatures require a longer fumigation period.
Aeration fans fitted on gas-tight silos provide a number of benefits including a shorter ventilation period following a fumigation.
The total time required for effective fumigation ranges from 10–17 days, accounting for the minimum exposure period, ventilation and withholding period. This highlights the importance of monitoring grain regularly and at least 17 days before out-loading to allow sufficient time to fumigate if required.
Avoid Exposure: Wearing full Personal Protective Equipment (PPE), work with phosphine in an open, well-ventilated area with the wind coming from the side.
Rates for success
When determining how much phosphine to apply, it is important to treat the entire storage volume, regardless of how much grain is contained inside. For example, a 100 tonne silo full of grain requires 200 phosphine tablets. If that same 100t silo is only half full of grain, it still requires 200 phosphine tablets for effective fumigation.
Handle with care
Phosphine is a highly toxic gas with potentially fatal consequences if handled incorrectly. As a minimum requirement, the label directs the use of cotton overalls buttoned at the neck and wrist, eye protection, elbow-length PVC gloves and a breathing respirator with combined dust and gas cartridge.
Where to apply
Arrange the tablets where as much surface area as possible is exposed to air, so the gas can disperse freely throughout the grain stack. Spread phosphine tablets evenly across trays before hanging them in the head space or placing them level on the grain surface inside a gas-tight, sealed silo. Hang bag chains in the head space or roll out flat on the top of the grain so air can freely pass around them as the gas dissipates. Bottom-application facilities must have a passive or active air circulation system to carry the phosphine gas out of the confined space as it evolves. Without air movement, phosphine can reach explosive levels if left to evolve in a confined space.
Time to kill
To control pests at all life stages and prevent insect resistance, phosphine gas concentration needs to reach 300 parts per million (ppm) for seven days (when grain is above 25°C) or 200ppm for 10 days (between 15–25°C). Insect activity is slower in cooler grain temperatures so require longer exposer to the gas to receive a lethal dose.
Table 1 – Application rates for phosphine tablets in storage
Gas venting
Following fumigation, ventilate silos so grain can be delivered free from harmful gas residues. With tablet residue or bag chains removed, leave silos open for no less than five days, or no less than one day with aeration fans operating. The final step is to hold grain for a further two days after ventilation before using for human consumption or stockfeed
Disclaimer
Any recommendations, suggestions or opinions contained in this publication do not necessarily represent the policy or views of the Grains Research and Development Corporation. No person should act on the basis of the contents of this publication without first obtaining specific, independent professional advice. The Corporation and contributors to this Fact Sheet may identify products by proprietary or trade names to help readers identify particular types of products. We do not endorse or recommend the products of any manufacturer referred to. Other products may perform as well as or better than those specifically referred to. The GRDC will not be liable for any loss, damage, cost or expense incurred or arising by reason of any person using or relying on the information in this publication.
The decision of which silo to buy can be daunting, mainly because it’s a 20+ year investment and not a purchase that is easily returned or traded-in if it proves unsuitable. The following information will help identify the key features to look for when purchasing silos.
Buying silos is a significant, long-term investment – take the time to make the right choice.
Consider the storage requirements for the next 20 years — not just the next season.
For reliable insect control and grain quality maintenance, choose a gas-tight sealable storage, which also has aeration.
Gas-tight sealable storage must meet the Australian Standard AS2628.
Choose carefully: While all silos are made to store grain and ‘do the job’, some will enable superior grain quality management than others.
Quality in – quality out
Maintaining grain quality during storage relies on the ability to control moisture, temperature and insects. It makes sense to look for storage with aeration cooling as well as being gas-tight sealable for effective fumigation. While aeration cooling won’t reduce grain moisture significantly, it will prevent moisture migration and lower grain temperature. Properly managed aeration cooling provides cool, uniform conditions throughout the storage, which discourages pest infestation and mould growth and maintains grain quality. An added benefit of aeration is that it can be used to ventilate a silo after fumigation in one day, rather than waiting five days.
Insect pest control
Western Australia has given up access to contact pesticides long ago and the eastern states are under increasing pressure to follow suit to protect our markets. This puts added pressure on fumigants, mainly phosphine, to control pests during storage. In order to control pests at all life stages (eggs, larvae, pupae, adult) and prevent further resistance, phosphine and other fumigants are only effective in a gas-tight storage.
A little maintenance goes a long way
In the same way that all farm machinery needs regular maintenance to keep it working reliably, so do silos, especially gas-tight sealable silos. A small gas leak can mean the difference between a successful fumigation and insects surviving, leading to loads being rejected upon receival.
Grain hygiene is the other important maintenance component. Well designed silos won’t have areas that trap grain and dust making them quick and easy to clean.
Find a safe bet
The WHS (previously OH&S) spotlight continues to shine on agricultural industries and is undoubtedly here to stay. Consider silos that meet state WHS requirements and more importantly can be safely operated by everyone on site.
While some silos come without ladders, mould and insects are often found in the top of a silo before they can be detected at ground level. The main options are to have an WHS compliant ladder, use a safety harness or build a platform that spans along the top of a line of silos.
The fundamental approach to grain storage safety is the same as for all other farming activities. The aim is to have a safe workplace for everyone on the farm, including workers, contractors, families, visitors and the owner/managers.
Safety is a three-step process — identify hazards, assess risk and address the hazard.
Safe grain storage starts with well thought-out design and planning.
Consider safety features when buying new storage.
Using the correct storage for commodities such as granular fertiliser and high-moisture grain reduces the need enter the storage.
Ventilate silos before entering and never enter a silo while it is being emptied.
Use fumigants and chemicals carefully and follow the safety instructions on the label.
Be aware of and comply with any worksafe and chemical use regulations in your state.
Start by identifying any hazards associated with the grain storage site. This involves talking with workers who use the site, taking time to thoroughly inspect the site and equipment and seeking advice and information from industry and Workplace health and safety (WHS) organisations to help identify risks that may not be initially apparent.
Secondly, assess the risk of each hazard in terms of its potential severity. If an accident occurred due to the identified hazard, would it result in scratches and bruises or is there potential for someone to be seriously injured or killed?
The third step is to address the hazard, starting with the highest-risk hazards first. The ultimate aim is to totally remove the risk, but where that’s not possible, find a way to control it. This could mean altering the way activities are carried out or providing protective equipment. After controlling the risk as much as possible, it is important to develop a plan of action in the event that an accident does occur. For example, if a worker is exposed to phosphine gas, or another harmful chemical, ensure emergency phone numbers are readily available to get medical help.
Designing a safe storage
Regardless of the type of grain storage used, selecting a suitable site is the first consideration when designing a safe grain storage system. If the storage site is already established, assess the site for following safety considerations and potential for improvement. If future expansion is being considered, it may be beneficial to build on a new site and decommission the current site when it reaches the end of its working life.
Site safety considerations include:
Surroundings — locate the storage site away from overhead powerlines, houses where children might play, or houses or work areas that will be affected by dust and noise from grain storage activities.
Access — ensure safe access for trucks turning into and out of the site from public roads without endangering other road users.
Expansion — ensure the site is clear of trees, sheds and permanent structures to allow for expansion without having to manoeuvre trucks and augers in a cramped area.
Drainage — select a relatively level site for easy and safe manoeuvring of augers and trucks, but ensure sufficient drainage is available to prevent having to work in wet, slippery and boggy conditions.
Smart storage selection
Choose storage that is cost effective and practical for the volume of grain to be stored. Considering safety in the mix makes for the ultimate storage result.
Sheds and bunkers are cost-efficient options for large quantities of grain, but require a considerable amount of manual labour and dedicated equipment to empty.
Silos are comparatively less labour intensive, although the amount of manual shovelling to completely empty silos is significantly reduced by choosing cone-bottom silos or flat-bottom silos with sweep augers.
Cone-bottom silos are the obvious choice for easy and safe out-loading. They are particularly beneficial if filled more than once a year — used as a buffer for harvest logistics.
Granular fertiliser, high-moisture grain and grain with a high percentage of screenings does not empty from standard silos very well, which commonly leads to people climbing into the silo to shovel out the stubborn grain. It is better to only store these types of commodities in silos with steeper cone bottoms or sheds where they can be out-loaded with a front-end loader.
Manufacturers are well placed to provide advice on choosing suitable storage types for various commodities.
Safety features on silos
Before buying a silo, consider the safety features on offer.
In most cases ladders are still required for monitoring grain in the top of the silo. State-based WHS requirements for ladders exist, but as a guide look for ladders with a safety cage and platforms every two metres, handrails on the top of the silo and a system that prevents children climbing the ladder.
Features that limit the need to climb the ladder are a valuable addition to silos and include:
Sight glasses or a device to indicate the level of grain inside the silo.
A system for applying fumigation at ground level, which will distribute the gas to the head space in the silo.
Lids that can be opened and closed from the ground. (Be aware that few ground-operated lids can be closed and latched tight enough to be gas-tight for fumigation. Most lids still require a climb to the top of the silo to inspect rubber seals and latch the lid before the silo will meet a half-life pressure test, required for effective fumigation. When checking this point with manufacturers, refer to AS2628 — the Australian Standard for gas-tight silos.)
Safety on the inside
When working in a potentially dangerous environment, such as inside a silo, it is preferable to have another person outside to call if help is needed. Before entering the silo, ensure you are well hydrated and wearing suitable clothing to do the job (for example, sturdy, enclosed footwear). Avoid heat stress by carrying out the job during a cool time of the day so the internal silo temperature is more comfortable.
Before entering a silo:
Open all lids and ventilation points well before entering to allow as much free-flowing air as possible. Damp grain, especially canola, will produce carbon dioxide and carbon monoxide at toxic levels. Monitors are available to test for these gases.
Ensure all augers or conveyers filling or emptying the silo are stopped and cannot be started by someone else while you are in the silo.
Stop and think if there is any way the job can be done from outside the silo.
If entry is not through an access door at ground level, ensure the ladder has an appropriate safety cage. If not, a certified safety harness must be worn.
While working inside a silo:
Have someone outside the silo to assist and get help if required.
Wear an appropriate dust mask to prevent fine dust particles entering your lungs.
Stay on the ladder above the level of compacted or bridged grain while dislodging it.
If you become trapped under grain, avoid movement and don’t panic as this will worsen the problem — try to remain calm and call for help
Filling and emptying
Always fill and empty silos from the middle. Filling or emptying a silo from the sides will cause uneven loading on the silo, potentially causing a structural failure. Ensure augers and conveyors are fitted with adequate guarding.
Wear high-visibility clothing while working around moving machinery to reduce the chance of being run over. Ensure all workers are trained to safely operate the grain storage facilities, filling and emptying equipment and associated machinery.
Fatigue and stress are common during harvest; ensure all operators get enough rest or downtime to avoid fatigue and stress-related accidents.
Stored grain fumigants and chemicals
Even though alternative fumigants are becoming more readily available, phosphine is still widely relied upon to control pests in stored grain.
Phosphine is also one of the most dangerous products used on farm, which is why it is classed as a schedule seven poison, indicated on the label — DANGEROUS POISON.
As a minimum requirement, the label directs the use of cotton overalls buttoned to the neck and wrist, eye protection, elbow-length PVC gloves and a breathing respirator with a combined dust and gas cartridge.
Never rely on the odour of phosphine to determine if the atmosphere is safe. The odour threshold of phosphine (for those that can smell it) is 2 parts per million (ppm). The threshold limit value for a time weighted average is 0.3ppm and the short-term exposure limit is 1ppm. This means by the time workers can smell phosphine (2ppm) the gas concentration level is already exceeding the safe exposure limits.
Always read the product label and Material Safety Data Sheet (MSDS) for safety information and required personal protection equipment (PPE). The respirator must be fitted with a combined dust and gas cartridge (canister) with an international code that includes the letter ‘B’, which stands for inorganic gas. The number in the code refers to the capacity of the cartridge, for example an ABE1 has a shorter life span than an ABE2.
Personal phosphine monitors are available and easy to use. The monitors simply clip onto the operator’s collar or top pocket (close to their nose and mouth) and will sound an alarm if more than 0.3ppm is detected and sound another alarm if more than 0.6ppm is detected. Price may deter growers who only use phosphine occasionally, but these handy devices can potentially save a life, so are worth serious consideration.
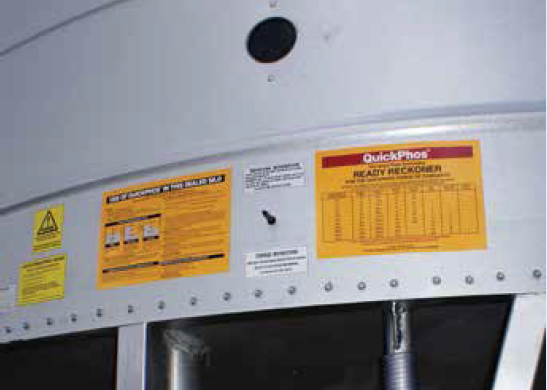
Place a warning sign on the silo to tell others to stay away. The sign must contain the words DANGER — POISONOUS GAS, KEEP AWAY.
State Worksafe organisations and government WHS contacts
Fumigating with phosphine in unsealed silos does not kill pests at all stages of their life cycle. Repeat fumigations in unsealed silos increases resistance levels and selects for insects with a higher phosphine tolerance. Pressure testing a silo ensures it can hold gas concentrations sufficient to kill all insects at all life stages.
A silo sold as a ‘sealed silo’ needs to be pressure tested to be sure it’s gas-tight.
It is strongly recommended that growers ask the manufacturer or reseller to quote the AS2628 on the invoice as a means of legal reference to the quality of the silo being paid for.
Pressure test sealed silos upon erection, annually and before fumigating with a five-minute half-life pressure test.
Maintenance is the key to ensuring a silo purchased as sealable can be sealed and gas-tight.
What is a sealed silo?
Just because a silo is sold as a sealed silo, does not automatically mean it’s suitable for fumigation.
To some people a sealed silo may be one that keeps rain out or one that is sold labelled as a sealed silo.
A silo is only truly sealed if it passes a five-minute half-life pressure test according to the Australian Standard AS2628. Often silos are sold as sealed but are not gas-tight — rendering them unsuitable for fumigation.
Even if a silo is sold as ‘sealed’ it is not sealed until it is proven gas-tight with a pressure test.
The term ‘sealed’ has been used loosely during the past and in fact some silos may not have been gas-tight from the day they were constructed.
However, even a silo that was gas-tight to the Australian Standard on construction will deteriorate over time so needs annual maintenance to remain gas-tight.
Why do I need to do a pressure test?
In order to kill grain pests at all stages of their life cycle (egg, larvae, pupae, adult), phosphine gas concentration levels need to reach and remain at 300 parts per million (ppm) for seven days or 200ppm for 10 days.
Trials show that these levels of gas concentration are impossible to achieve in silos that are not pressure tested and gas-tight, so insects will not be killed at all life stages. The fumigation may appear successful when the adults die but the surviving eggs and pupae will continue to develop and reinfest the grain.
A pressure test is a measure of how well a silo will seal to contain fumigation gas.
When to perform a pressure test
If silos are properly maintained pressure testing does not take long and should be done at three distinct times.
When a new silo is erected on farm carry out a pressure test at a suitable time of day to make sure it’s gas-tight before paying the invoice or filling with grain.
Importantly, a silo also needs to be pressure tested when full, before fumigating grain. If the silo has a slide plate outlet that has been tested empty, retest when full to make sure the pressure of the grain doesn’t compromise the seal. The weight of grain can break the seal on the slide-plate outlet where it is not well supported by cams or bolts etc. For older, poorly-designed cone-bottom silos, gentle pressure from a jack may assist the seal. If the weight of grain on the slide plate stops it from sealing, some added pressure from a jack under the silo will assist the sealability.
Pressure testing silos needs to be part of the annual maintenance. It is much easier to replace seals and carry out repairs when silos are empty.
Carrying out a pressure test
If regular silo maintenance is undertaken to keep seals in working order, pressure testing is easy by following these seven simple steps.
1. Choose the right time to pressure test
Consider the ambient conditions of the day before pressure testing.
The best time to pressure test silos is in the morning within an hour of sunrise or on a cool, overcast day — when the ambient temperature is stable and the sun is not heating the silo.
Air inside a silo heats and expands as the daily temperature rises and the sun warms the silo walls.
If a pressure test is done when the ambient conditions are changing, air inside the silo expands and gives a false reading.
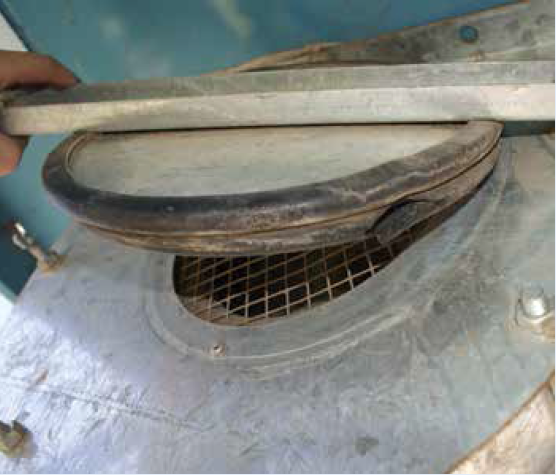
2. Check seals
Before performing a pressure test check seals around the lid, access hatch, hopper or boot and make sure the aeration fan seal is in a sound condition.
Check to ensure all latches on lids are locked down firmly.
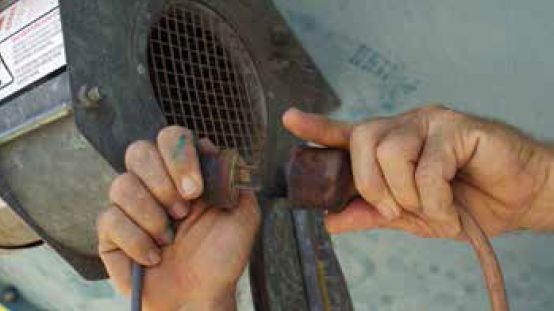
3. If there is no aeration fan – install an air valve
If the silo doesn’t have an aeration fan, install a tubeless tyre valve to pressurise the silo using an air compressor. Unscrew the centre of the valve to get higher air-flow into the silo.
Alternatively for larger silos or if the air compressor is too small, install a PVC male fitting that can connect to a venturi gun (Blovac) that fits on the end of the air line.
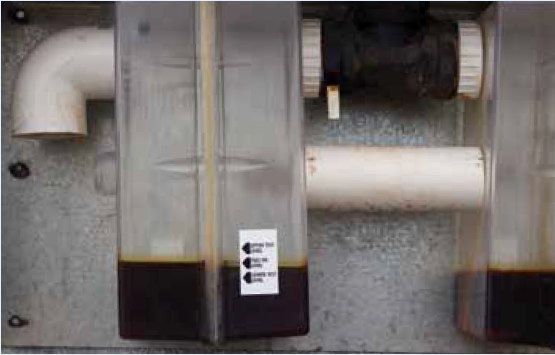
4. Check oil levels
Some sealable silos do not have a gauge on the oil relief valve. If this is the case mark the start and finish oil levels with a pen.
Oil relief valves can be bought and fitted, or a piece of clear tube connected to a second air valve fitted to the silo will suffice.
Before pressurising the silo, check the oil levels are equal on both sides of the gauge and are at the middle indicator mark as shown below.
5. Pressurise the silo
If fitted with an aeration fan, pressurise the silo by turning the fan on for a few seconds, then sealing the inlet on the fan.
This job is easier with two people —one to operate the fan and the other to watch the oil gauge and look for leaks, see step 7.
As soon as the oil levels are more than 25mm apart, or the oil is bubbling, stop the aeration fan and close off the fan inlet immediately. Be careful — there is potential for damage if fans are left running for extended periods while the silo is sealed or with the inlet blocked off.
If the silo doesn’t have an aeration fan, use the tyre valve and an air compressor to pressurise the silo. An air-operated venturi gun, such as a Blovac, with connection fittings to the silo can also be used.
6. Time the half life
Wait until the pressure drops and the oil levels are 25mm apart (aligned with top and bottom marker).
The time taken for the oil to drop from 25mm to 12mm apart must be no less than five minutes on new silos.
For older silos three minutes is acceptable.
Whether it is three or five minutes, this process is known as the half-life pressure test.
7. Looking for leaks
If the the half-life pressure test on a new silo is less than five minutes, there is a leak that needs fixing. If an existing silo does not meet a three minute half-life pressure test, it as a leak that needs fixing.
To find leaks, pressurise the silo again and use soapy water in a spray bottle to check for air leaks around seals.
Common places for leaks are: bottom outlet, aeration inlet seal, damaged lids (caused by the auger when lining it up to fill the silo), stretched springs on latches, between the bottom cone or base and the silo wall joint, the roof and wall joint and where the lid ring joins the roof.
Cone-bottom silos with a slide plate outlet can be sealed by adding a small amount of pressure to the slide plate with a jack.
Older silos may require more extensive maintenance to achieve a gas-tight seal. When the leak has been fixed, pressurise the silo again and redo the half-life test — steps five and six.
Australian standard for sealed silos
A benchmark for sealing grain silos has been developed to boost the effectiveness of pest control.
Standards body SAI Global published an Australian standard for gas-tight sealed silos in response to industry concerns that phosphine fumigation performed in improperly sealed storages was not killing off the full life cycle of pests.
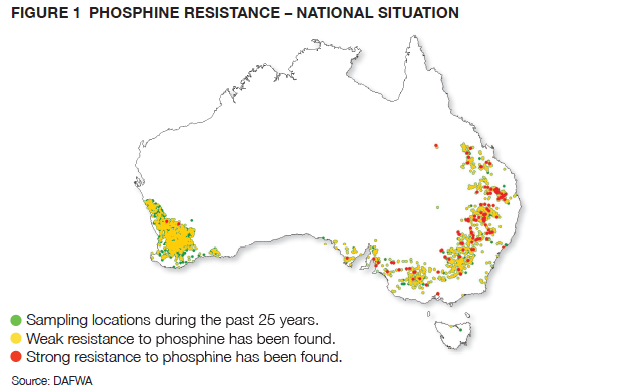
Resistance to phosphine has increased over the past 10 years with many grain silos failing to meet the gas-tight standard required for effective fumigation.
Resistance to phosphine in target insect pests has increased in frequency and strength threatening effective control.
The standard is based on a new silo meeting a five-minute half-life pressure test. When a pressure test is undertaken, oil levels in the pressure relief valve must take a minimum of five minutes to fall from 25mm to a 12.5mm difference if the silo is sufficiently gas-tight.
The standard allows growers to refer to an industry benchmark when choosing to buy a sealable silo. It is strongly recommended that growers ask the manufacturer or reseller to quote the AS2628 on the invoice as a means of legal reference to the quality of the silo being paid for. Ultimately, this gives growers confidence they have invested in a silo that will perform in the way it is intended. That is, work as a gas-tight chamber and hold a lethal concentration of gas for the time specified on the label, for control of insects at all life stages.
This will prolong the life of phosphine rather than add to the already increased level of resistant insects.
Grain aeration provides growers with a powerful tool to maintain grain quality during harvest and storage. Aeration cooling may not eliminate the need for chemical insect control, but it will dramatically slow insect development.
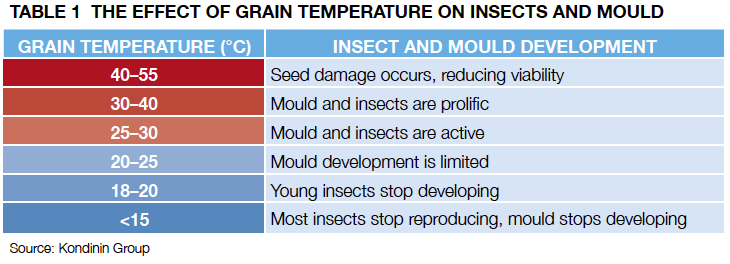
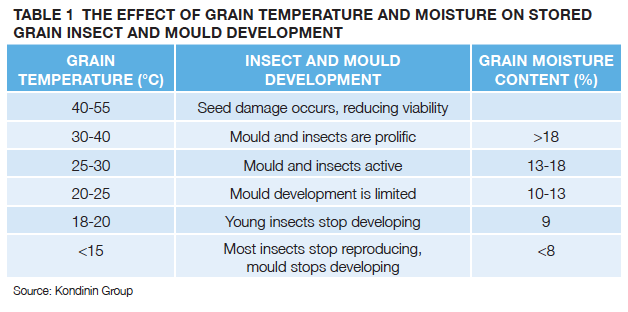
Grain temperatures below 20°C significantly reduce mould and insect development.
Reducing grain temperature with aeration cooling protects seed viability.
Controlling aeration cooling is a three-stage process — continual, rapid and then maintenance.
Stop aeration if ambient, relative humidity exceeds 85 per cent.
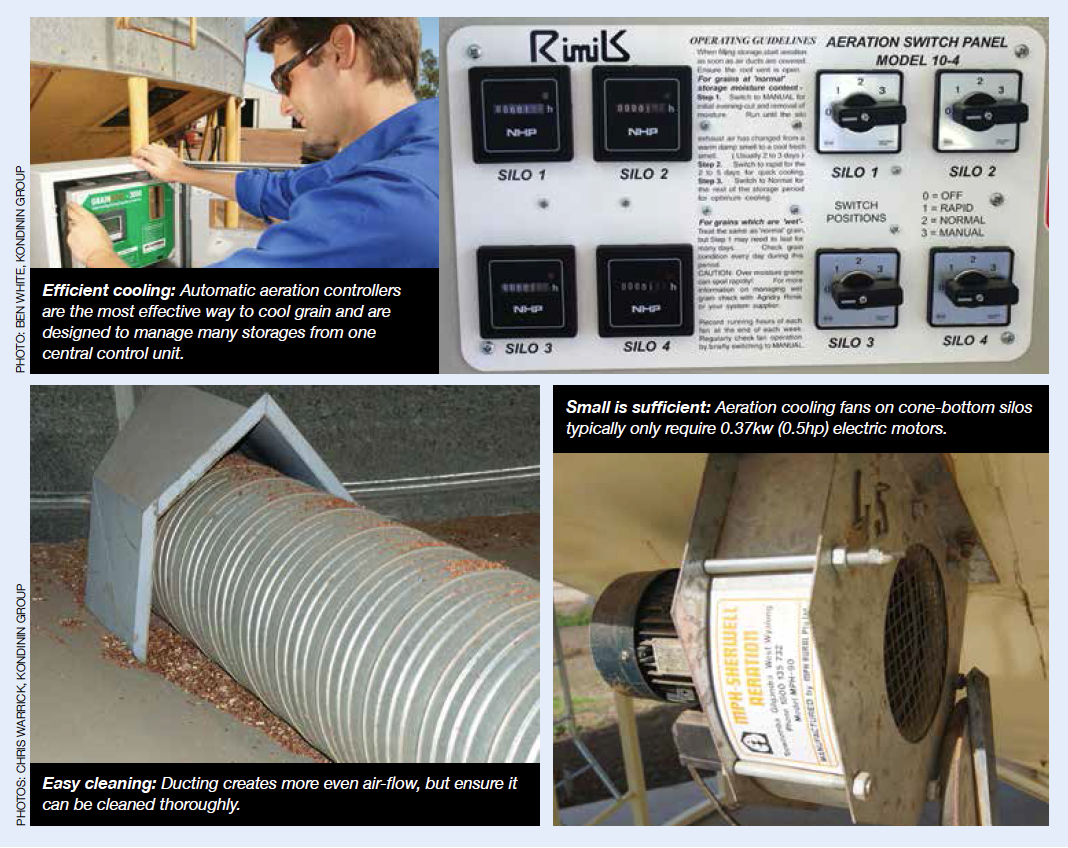
Automatic grain aeration controllers that select optimum fan run times provide the most reliable results.
Aeration cooling for pest control
While adult insects can still survive at low temperatures, most young storage pests stop developing at temperatures below 18–20°C (see Table 1).
At temperatures below 15°C the common rice weevil stops developing.
At low temperatures insect pest life cycles (egg, larvae, pupae and adult) are lengthened from the typical four weeks at warm temperatures (30-35°C) to 12-17 weeks at cooler temperatures (20-23°C).
An effective insulator
Without aeration, grain is an effective insulator and will maintain its warm harvest temperature for a long time.
Like housing insulation, grain holds many tiny pockets of air within a stack — 100 tonnes of barley requires a silo with a volume of about 130 cubic metres, 80m3 is taken up by grain and the remaining 50m3 (38 per cent) is air space around each grain.
Seed viability
Research trials reveal that wheat at 12 per cent moisture content stored for six months at 30-35°C (unaerated grain temperature) will have reduced germination percentage and seedling vigour.
Aeration cooling
Aeration cooling can be achieved with air-flow rates of 2–3 litres per second per tonne delivered from fans driven by a 0.37 kilowatt (0.5 horsepower) electric motor for silos around 100t.
Research carried out by the Department of Agriculture, Fisheries and Forestry (DAFF), Queensland shows that with the support of an aeration controller, aeration can rapidly reduce stored grain temperatures to a level that helps maintain grain quality and inhibits insect development.
During trials where grain was harvested at 30°C and 15.5 per cent moisture, grain temperatures rose to 40°C within hours of being put into storage.
An aeration controller was used to rapidly cool grain to 20°C and then hold the grain between 17–24°C during November through to March.
Before replicating similar results on farm, growers need to:
Know the capacity of their existing aeration system.
Determine whether grain requires drying before cooling can be carried out.
Understand the effects of relative humidity and temperature when aerating stored grain.
Determine the target conditions for the stored grain.
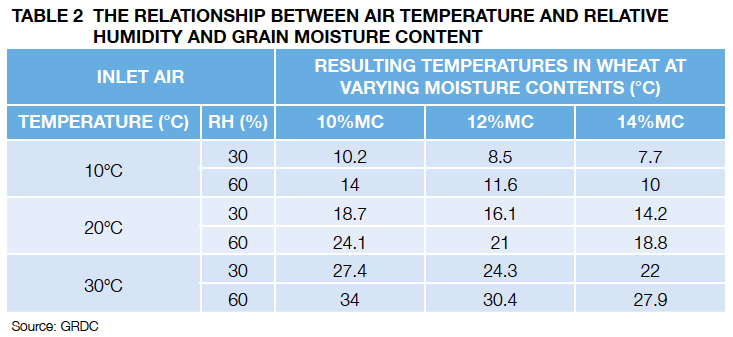
Air used for cooling grain
Varying ambient conditions affect stored grain differently depending on the combination of temperature and relative humidity outside the silo and the temperature and moisture content of the stored grain (see Table 2).
Grain with a higher moisture content can be cooled quickly with low-humidity air due to the evaporative cooling effect that occurs inside the storage.
The relative humidity of the ambient air affects the efficiency of grain cooling.
In an ideal world we would select air for cooling that is low in temperature and relative humidity, but these conditions rarely occur.
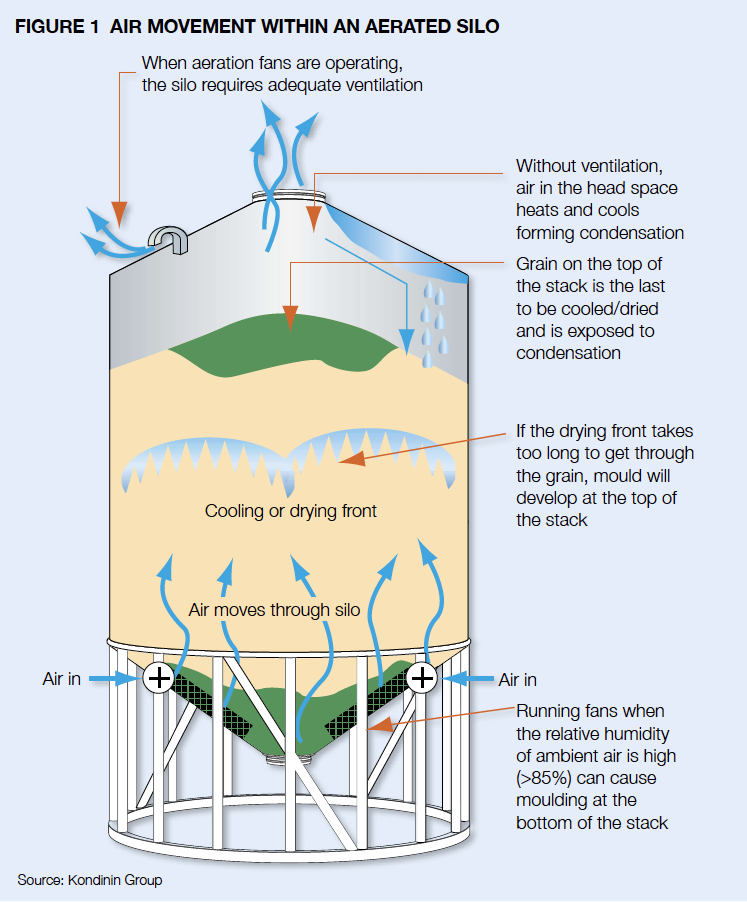
Air movement within the stack
Grain at the top of the stack is the hottest, as heat rises through the grain and it is exposed to the head space in the silo (see Figure 1).
As the air in the head space heats and cools each day, it creates ideal conditions for condensation to form and wet the grain on the top of the stack.
Be aware aeration drying requires specifically-designed equipment and the process is much slower than aeration cooling or hot-air drying.
The cooling process
Operating an aeration fan for cooling requires a planned control program, which is best done with an automatic aeration controller.
But even without an aeration controller growers need to aim for the same run time, following the same process.
Without aeration, grain typically increases in temperature immediately after it enters the storage.
The initial aim is to get maximum air-flow through the grain bulk as soon as it enters storage, to stop it from sweating and heating.
When first loading grain into storage, run the aeration fans continuously from the time the grain covers the aeration ducts for the next 1-3 days, until the cooling front reaches the top of the storage.
However, do not operate the aeration fans on continuous mode if the ambient relative humidity is higher than 85 per cent for extended periods of time as this will wet the grain.
After the aeration fans have been running continuously for 2–3 days to flush out any warm, humid air, reduce run time to 9–12 hours per day during the coolest period, for the next seven days.
The goal is to quickly reduce the grain temperature from the mid 30s°C down to the low 20s°C.
An initial reduction in grain temperature of 10°C ensures grain is less prone to damage and insect attack, while further cooling becomes a more precise task. During this final stage, automated aeration controllers generally run fans during the coolest periods of the day, averaging 100 hours per month.
Grain temperature is gradually reduced as low as possible and then maintained throughout the storage period.
The risks of getting it wrong
Running aeration fans on timers that are pre-set for the same time each day will not ensure the selection of the most appropriate air for grain quality maintenance.
The biggest risk with running aeration fans without a controller is forgetting or not being available to turn fans off if the relative humidity exceeds 85 per cent.
Operating fans for extended periods of a few hours or days in humid conditions can increase grain moisture and cause moulding.
Aeration controllers are designed to automatically select the best time to run aeration fans. Fans on these systems only run when the conditions will benefit the stored grain.
Cooling or drying — making a choice
Knowing whether grain needs to be dried or cooled can be confusing but there are some simple rules of thumb.
For longer-term storage grain must be lowered to the correct moisture content.
Grain that is dry enough to meet specifications for sale (12.5 per cent for wheat or 13.5 per cent for sorghum) can be cooled, without drying, to slow insect development and maintain quality.
Grain of moderate moisture (up to 15 per cent for wheat and sorghum)
can be either cooled for short periods to slow mould and insect development or, dried providing the right equipment and conditions are available.
After drying to the required moisture content, grain can be cooled to maintain quality.
High-moisture grain (for example, 16 per cent or more for wheat and sorghum) will require immediate moisture reduction before cooling for maintenance.
Installation and maintenance tips
When retrofitting an aeration system, avoid splitting air-flow from one fan to more than one storage. Each storage will provide
a different amount of back-pressure on the fan resulting in uneven air-flow and inefficient or even ineffective cooling.
If buying an aeration controller be aware that most controllers need to be installed by an electrician.
The preferred mounting location for aeration controllers is outside where the sensors can get ambient condition readings but are sheltered from the direct elements of the weather.
To avoid the chance of a dust explosion, avoid installing aeration controllers in a confined space.
Ensure your electrician installs wiring properly insulated and protected from potentially-damaging equipment, such as augers.
Monitoring a must
Aeration controllers reduce the amount of time operators need to physically monitor grain storages and turn fans on and off, but units and storage facilities still need to be checked regularly.
Most controllers have hour meters fitted so run times can be checked to ensure they are within range of the expected total average hours per month.
Check fans to ensure they are connected and operating correctly.
The smell of the air leaving the storage is one of the most reliable indicators if the system is working or not.
The exhausted air should change from a humid, warm smell to a fresh smell after the initial cooling front has passed through the grain.
Animals can damage power leads and automatic controller sensors and fan blades or bearings can fail, so check these components regularly.
Check for suction in and feel for air-flow out of the storage vents when the fans are running.
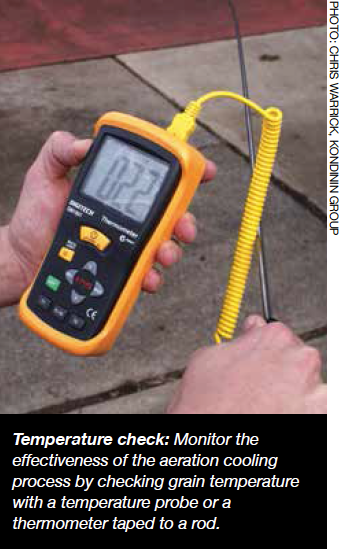
Keeping grain at the right moisture and temperature levels will reduce the likelihood of insect infestations, but stored grain still needs to be sampled regularly and monitored for any changes.
If possible, safely check the moisture and temperature of the grain at the bottom and top of the stack regularly.
The tolerance for live pests in grain sold off farm is nil. With growers increasing the amount of grain stored on farm, an integrated approach to pest control is crucial.
Effective grain hygiene and aeration cooling can overcome 85 per cent of pest problems.
When fumigation is needed it must be carried out in pressure-tested, sealed silos.
Monitor stored grain monthly for moisture, temperature and pests.
Prevention is better than cure
The combination of meticulous grain hygiene plus well-managed aeration cooling generally overcomes 85 per cent of storage pest problems. For grain storage, three key factors provide significant gains for both grain storage pest control and grain quality – hygiene, aeration cooling and correct fumigation.
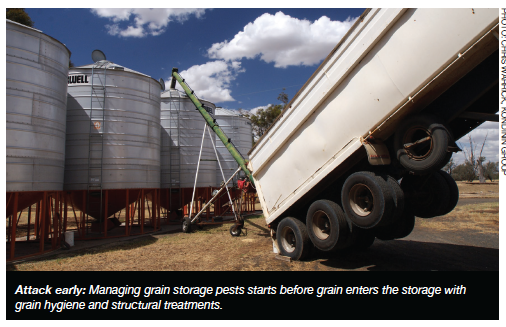
Hygiene
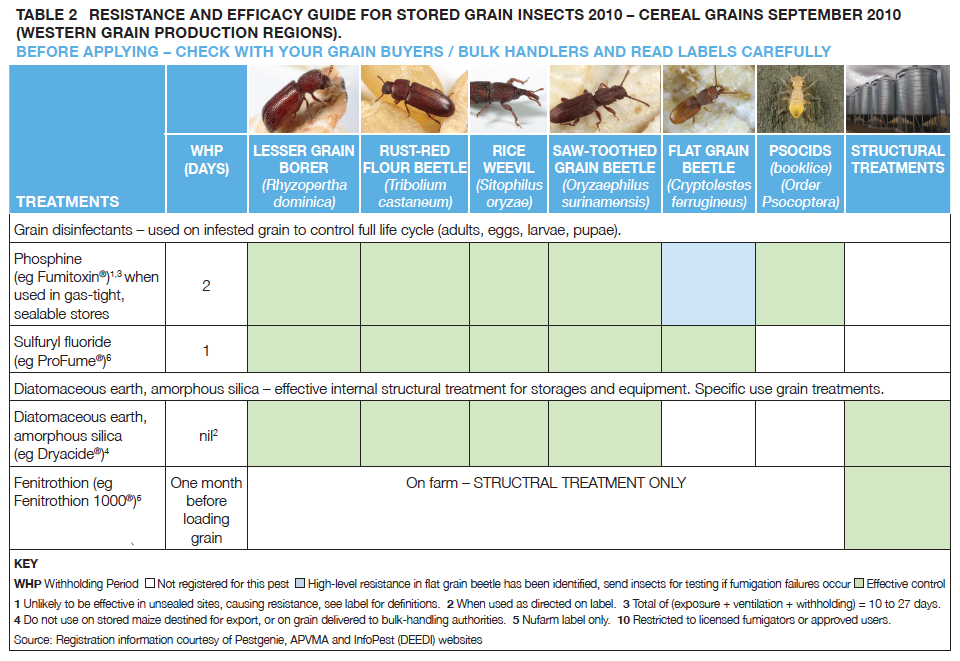
The first grain harvested is often at the greatest risk of early insect infestation due to contamination. One on-farm test found more than 1000 lesser grain borers in the first 40 litres of wheat passing through the harvester. Remove grain residues from empty storages and grain handling equipment, including harvesters, field bins, augers and silos to ensure an uncontaminated start for new-season grain. Clean equipment by blowing or hosing out residues and dust and then consider a structural treatment (see Table 2, page 2). Remove and discard any grain left in hoppers and bags from the grain storage site so it doesn’t provide a habitat for pests during the off season.
Aeration cooling
Freshly-harvested grain usually has a temperature around 30°C, which is an ideal breeding temperature for storage pests (see Table 1). Studies have shown that rust-red flour beetles stop breeding at 20°C, lesser grain borer at 18°C and below 15°C all storage pests stop breeding.
Aim for grain temperatures of less than 23°C during summer and less than 15°C during winter. When placing grain into storage, run aeration fans continuously for the first 2-3 days to push the first cooling front through the grain and to create uniform moisture conditions. Then run the fans during the coolest 9-12 hours per day for the next 3-5 days. This will push a second cooling front through the grain bulk.
Aeration cooling generally only requires air-fl ow rates of 2-4 litres per second per tonne. Finally the grain requires approximately 50 hours of appropriate quality air each fortnight during storage. Use an aeration controller that will perform the cooling process at the right time and continue to aerate the grain selecting the coolest air to run fans. An effective aeration controller will also ensure fans don’t operate when the relative humidity is higher than 85 per cent, which can re-wet and damage grain if operated for extended periods.
Ineffective fumigation
Fumigation with phosphine is a common component of many integrated pest control strategies. Taking fumigation shortcuts may kill enough adult insects in grain so it passes delivery standards, but the repercussions of such practices are detrimental to the grains industry. Poor fumigation techniques fail to kill pests at all life cycle stages, so while some adults may die, grain will soon be reinfested again as soon as larvae and eggs develop. What’s worse, every time a poor fumigation is carried out, insects with some resistance survive, and pass the resistance gene into their progeny making control more diffi cult in the future.
Effective fumigation
Using the right type of storage is the first and most important step towards an effective fumigation. Only use fumigants, like phosphine, in a pressure-tested, sealed silo. Research shows that fumigating in a storage that is anything less than pressure sealed doesn’t achieve a high enough concentration of fumigant for a long enough period to kill pests at all life cycle stages. For effective phosphine fumigation, a minimum of 300 parts per million (ppm) gas concentration for seven days or 200ppm for 10 days is required. Fumigation trials in silos with small leaks demonstrated that phosphine levels are as low as 3ppm close to the leaks. The rest of the silo also suffers from reduced gas levels.
Achieve effective fumigation by placing the correct phosphine rates (as directed on the label) onto a tray and hanging it in the top of a pressure-tested, sealed silo or into a ground level application system if the silo is fitted with recirculation. After fumigation, ventilate grain for a minimum of one day with aeration fans running, or five days if no fans are fitted. A minimum withholding period of two days is required after ventilation before grain can be used for human consumption or stock feed. The total time needed for fumigating is 10-17 days.
As a general rule, only keep a silo sealed while carrying out the fumigation (for example, one to two weeks). If grain moisture content is low (8-12%) the silo can remain sealed after fumigating but regular monitoring is essential to check for insect infestation and moisture migration to the head space.
Monitoring
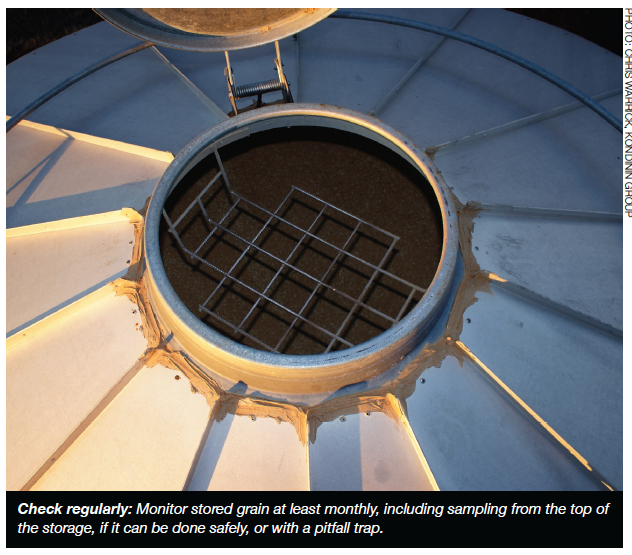
When grain is put into storage it needs monitoring just like it does when it’s in the paddock – regularly.Check stored grain at least monthly, taking samples from the bottom, and if safe, the top of the storage.
Things to monitor:
Insect pests
Grain temperature
Grain moisture content
Grain quality and germination
Storage choices
When buying a new silo, buy a quality, sealable silo fi tted with aeration and check with the manufacturer that it meets the Australian Standard for sealable silos (AS2628). Experience has shown that at least two sealable, aerated silos on farm provide the option for an effective fumigation and delivery program. Many older silos are not designed to be sealed and cannot be used for fumigation, however retro-fitting aeration can reduce insect multiplication through grain cooling.
Seed held on farm (cereals — wheat, barley, oats)
Seed that is dry, cool and sound (not weather damaged) will remain viable for longer. In well-managed storage, germination percentages can be expected to reduce by only 5 per cent after six months. To achieve this, keep grain moisture content below 12%. Grain temperature also has a major impact on germination. Aim for grain temperatures of 20°C and below in seed storage by using aeration cooling (with auto control). Wheat at 12 per cent moisture content stored at 30-35°C (unaerated grain temperature) will reduce germination percentages and seedling vigour when stored over a long period. Position small seed silos in the shade or paint them reflective white to assist keeping grain cool. WA growers can treat seed with a grain protectant combined with a dyed grain fungicide in combination with aeration cooling to maximise insect control.
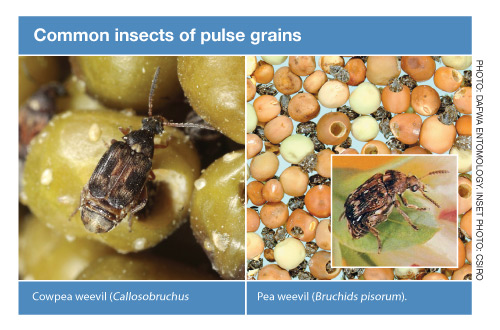
Pulse and oilseeds
Insect control options are limited for stored pulses and oilseeds. Aeration and phosphine fumigation are the main methods and controlled atmosphere (inert gasses such as carbon dioxide or nitrogen) may be an option. The effectiveness of phosphine fumigation on oilseeds is often reduced due to phosphine sorption during treatment.Monitoring gas concentrations with a gas monitor is essential to ensure the correct concentration is achieved for the correct length of time. Use sound grain hygiene in combination with aeration cooling to reduce insect activity. Small seed-size grains, such as canola, may need larger-capacity aeration fans to combat the greater amount of back pressure in the storage. Always store these grains at their recommended grain moisture content level.
PHOSPHINE RESISTANCE IS WIDESPREAD – PLAN, MONITOR AND CONTROL FOR CLEAN GRAIN
Dispose of grain residues and seed gradings. Clean empty storages and grain handling equipment, including harvesters, field bins and augers.
Sieve stored grain for the presence of insects at least monthly, or use pitfall traps. Also check grain temperature and moisture.
If grain temperature has been kept below 15°C by aeration, live insect numbers are likely to be low.
Sample grain three weeks before sale to allow time for any treatment.
For effective fumigations, pressure test sealable silos at least once a year to identify any leaks and ensure rubber seals are maintained.
Phosphine fumigation typically requires 7 to 10 days in a gas-tight sealed silo. When completed, open silo top with care, ventilate using aeration fan for one day; if not aerated, open silo top and ventilate for five days. The minimum withholding period is then two days after ventilation is completed. The total time needed for fumigation is therefore 10-17 days.
Sieve a half-litre sample onto a white tray. Hold tray in sunlight to warm for 20 to 30 seconds to encourage insect movement.
If live insects are found, identify them and fumigate in a gas-tight silo according to the label.
Take care when climbing silos to sample grain for insects and wear a safety harness. Sample from the base, and if safe, take
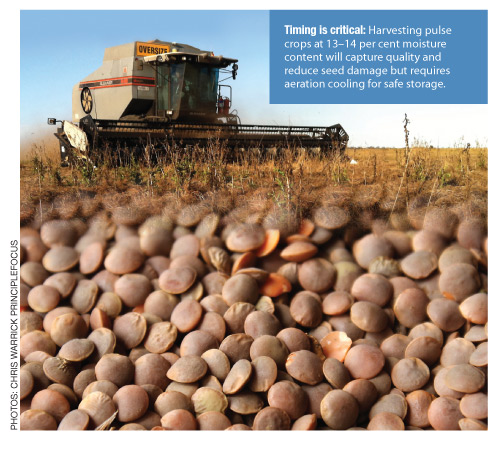
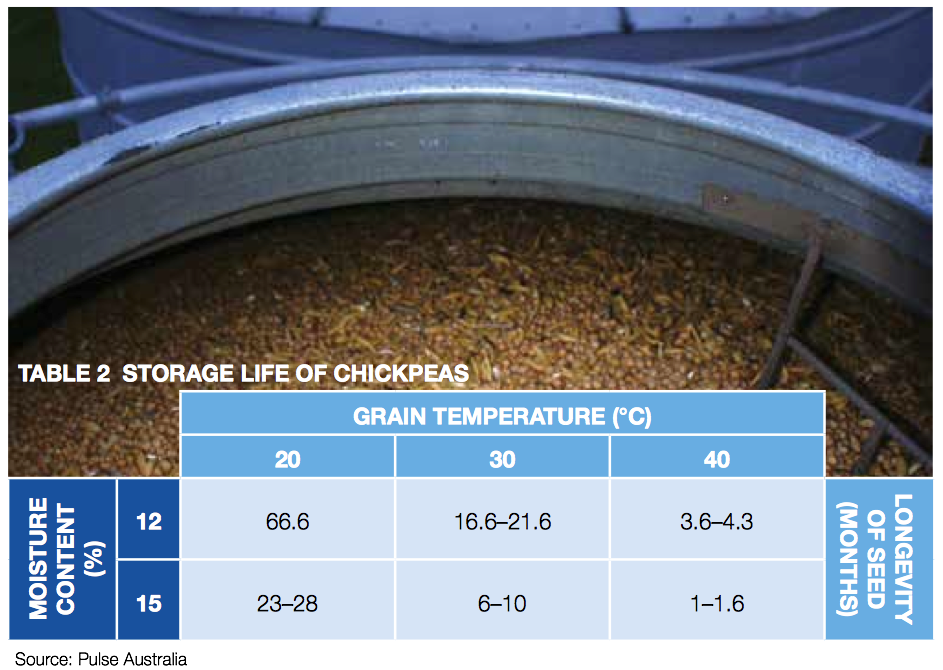
Storing pulses successfully requires a balance between ideal harvest and storage conditions. Harvesting at 14 per cent moisture content captures grain quality and reduces mechanical damage to the seed but requires careful management to avoid deterioration during storage.
Pulses stored above 12 per cent moisture content require aeration cooling to maintain quality.
Meticulous hygiene and aeration cooling are the first lines of defence against pest incursion.
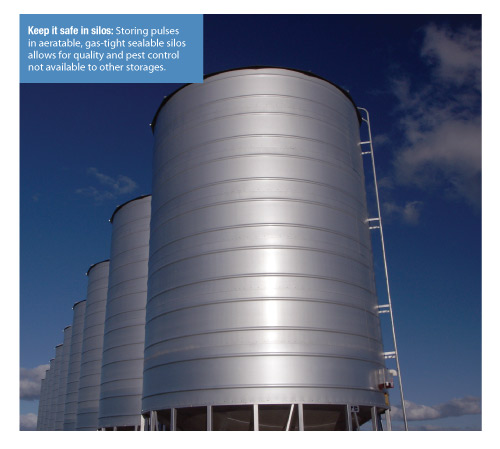
Fumigation is the only option available to control pests in stored pulses, which requires a gas-tight, sealable storage.
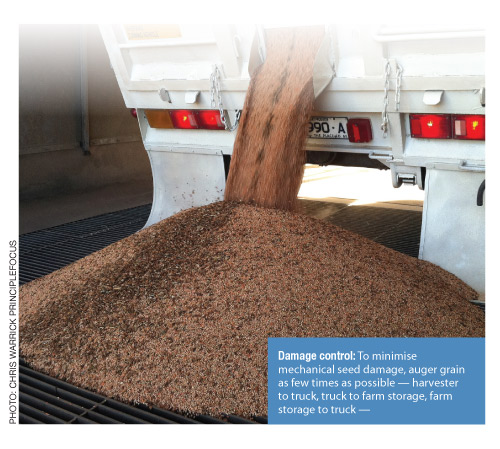
Avoiding mechanical damage to pulse seeds will maintain market quality, seed viability and be less attractive to insect pests.
Quality characteristics
Pulse crops most commonly grown in Australia include broad beans, faba beans, chickpeas, field peas, lentils, lupins, vetch and mungbeans.
Many of the quality characteristics of the grain from these crops are in the appearance, size and physical integrity of the seed. Mechanical seed damage, discolouration, disease, insect damage, split or small seeds will downgrade quality and market value.
Buyers prefer large, consistently-sized seed free of chemical residues for easy processing and marketing to consumers.
Optimum moisture and temperature
Research has shown that harvesting pulses at higher moisture content (up to 14 per cent) reduces field mould, mechanical damage to the seed, splitting and preserves seed viability. The challenge is to maintain this quality during storage as there is an increased risk of deterioration at these moisture levels. As a result, pulses stored above 12 per cent moisture content require aeration cooling to maintain quality.
Grain Trade Australia (GTA) sets a maximum moisture limit of 14 per cent for most pulses but bulk handlers may have receival requirements as low as 12 per cent. As a general rule of thumb, the higher the moisture content, the lower the temperature required to maintain seed quality (see Table 1).
Green pods and grains increase the risk of mould developing during storage — even at lower moisture content. Aeration cooling will help prevent mould and hot spots by creating uniform conditions throughout the grain bulk.
Weather damage hinders storage
Pulses exposed to weathering before harvest deteriorate more quickly in storage. Chickpeas stored for the medium to long term (6–12 months) continue to age and lose quality (see Table 2). Growers can minimise the effects of seed darkening, declining germination and reduced seed vigour by:
Lowering moisture content and temperature
Harvesting before weather damages the grain.
Aeration cooling — vital tool
Aeration cooling:
Creates uniform conditions throughout the grain bulk.
Prevents moisture migration.
Maintains seed viability (germination and vigour).
Reduces mould growth.
Lengthens (and in some instances stops) insect reproduction cycles.
Slows seed coat darkening and quality loss.
Aeration cooling allows for longer-term storage of low-moisture grain by creating desirable conditions for the grain and undesirable conditions for mould and pests. Unlike aeration drying, aeration cooling can be achieved with air-flow rates of as little as 2–3 litres per second per tonne of grain.
High-moisture grain can also be safely held for a short time with aeration cooling before blending or drying. Run fans continuously to prevent self heating and quality damage.
Be aware that small seeds such as lentils will reduce the aeration fan capacity as there is less space for air to flow between the grains. For information on aeration cooling management, refer to the GRDC fact sheet, Aeration cooling for pest control.
Aeration drying
Pulses stored for longer than three months at high moisture content (>14 per cent) will require drying or blending to maintain seed quality. Aeration drying has a lower risk of cracking and damaging pulses, which can occur with hot-air dryers.
Unlike aeration cooling, drying requires high airflow rates of at least 15–25 l/s/t and careful management. For more information on aeration drying refer to the GRDC booklet, Aerating stored grain, cooling or drying for quality control.
Handle with care
In addition to harvesting at high moisture content, growers can manage seeds quality at harvest by:
Minimising the number of times augers shift grain.
Ensuring augers are full of grain and operated at slow speeds.
Checking auger flight clearance — optimum clearance between flight and tube is half the grain size to minimise grain lodging and damage.
Operating augers as close as possible to their optimal efficiency — usually an angle of 30 degrees.
Using a belt conveyor instead of an auger where possible.
Silos fit the bill
Silos are the ideal storage option for pulses, especially if they are cone based for easy out-loading with minimal seed damage. For anything more than short-term storage (3 months) aeration cooling and gas-tight sealable storage suitable for fumigation are essential features for best management quality control.
Always fill and empty silos from the centre holes. This is especially important with pulses because most have a high bulk density. Loading or out-loading off-centre will put uneven weight on the structure and cause it to collapse. Avoid storing lentils in silos with horizontally corrugated walls as the grain can run out from the bottom first and collapse the silo as the grain bulk slides down the silo walls.
Pests and control options
The most common pulse pests are the cowpea weevil (Callosobruchus spp.) and pea weevil (Bruchids pisorum). The cowpea weevil has a short life span of 10–12 days while the pea weevil only breeds one generation per year.
The only control options are phosphine, an alternative fumigant or controlled atmosphere, all of which require a gas-tight, sealable storage to control the insects at all life stages.
For more information refer to the GRDC booklet, Fumigating with phosphine, other fumigants and controlled atmospheres.
Chemical sprays are not registered for pulses in any State. While there is a maximum residue limit (MRL) for dichlorvos on lentils, the product is only registered for use on cereal grains.
Weevil development ceases at temperatures below 20°C. This is a strong incentive for aeration cooling, especially if gas-tight storage is not available.
Keep it clean
The first line of defence against grain pests is before the pulses enter storage — meticulous grain hygiene. Because pest control options are limited, it’s critical to remove pests from the storage site before harvest.
Cleaning silos and storages thoroughly and removing spilt and leftover grain removes the feed source and harbour for insect pests.
Clean the following areas thoroughly:
Empty silos and grain storages
Augers and conveyers
Harvesters
Field and chaser bins
Spilt grain around grain storages
Leftover bags of grain
Chemicals used for structural treatments do not list the specific use before storing pulses on their labels and MRLs in pulses for those products are either extremely low or nil.
Using chemicals even as structural treatments risks exceeding the MRL so is not recommended.
Using diatomaceous earth (DE) as a structural treatment is possible but wash and dry the storage and equipment before using for pulses. This will ensure the DE doesn’t discolour the grain surface.
If unsure, check with the grain buyer before using any product that will come in contact with the stored grain. For more information see the GRDC fact sheet, Hygiene and structural treatments for grain storages.


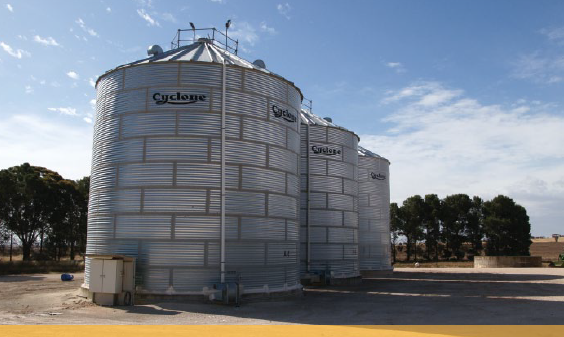
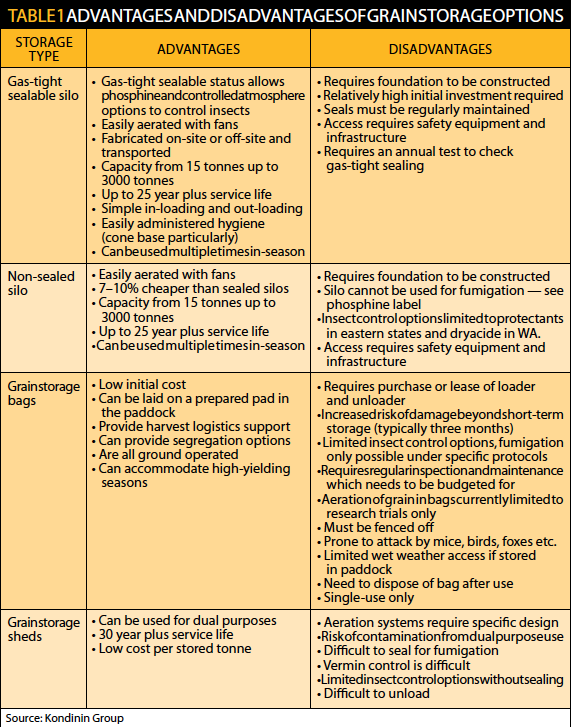
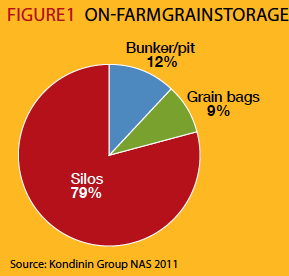
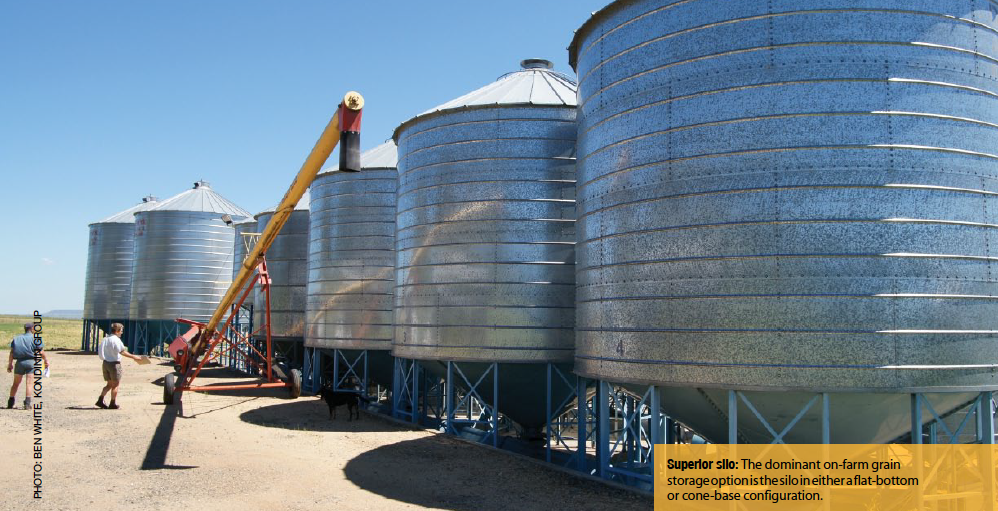
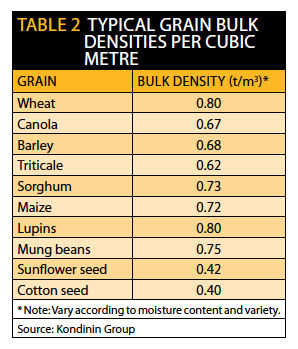
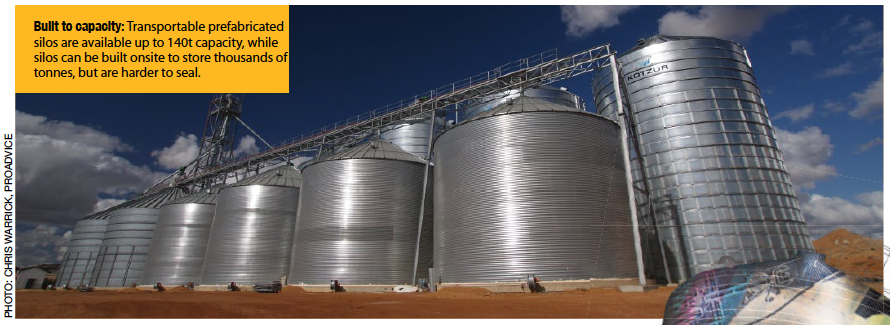
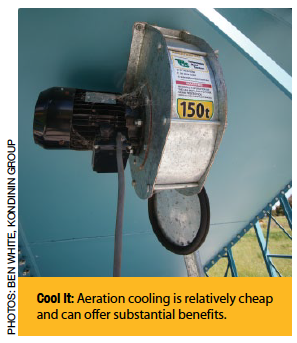


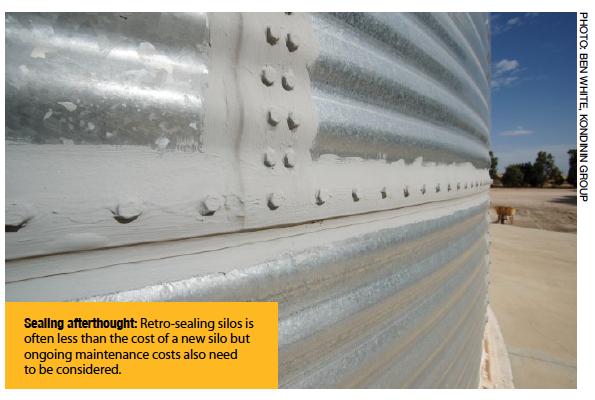
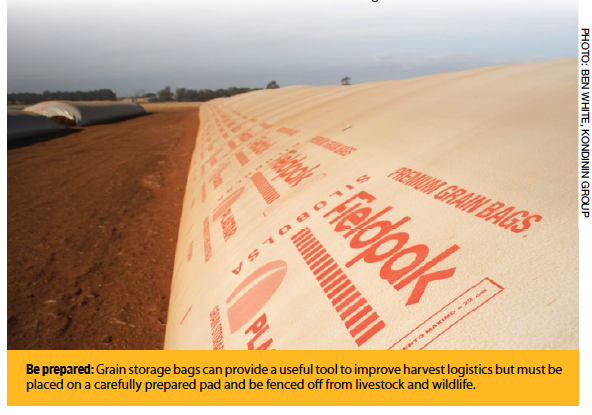
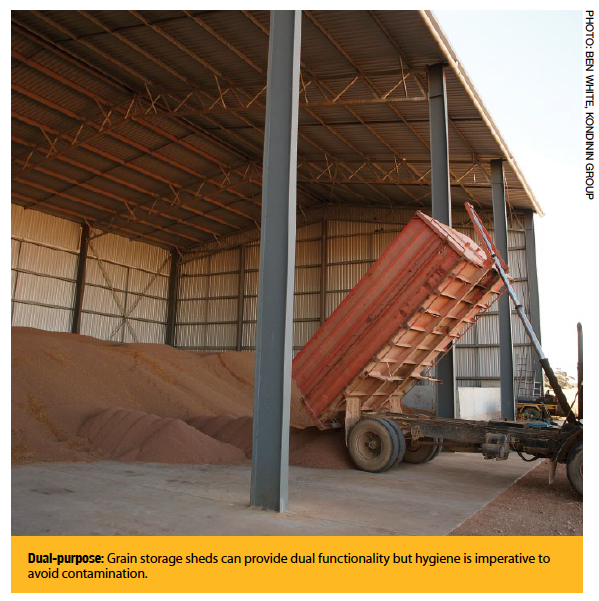
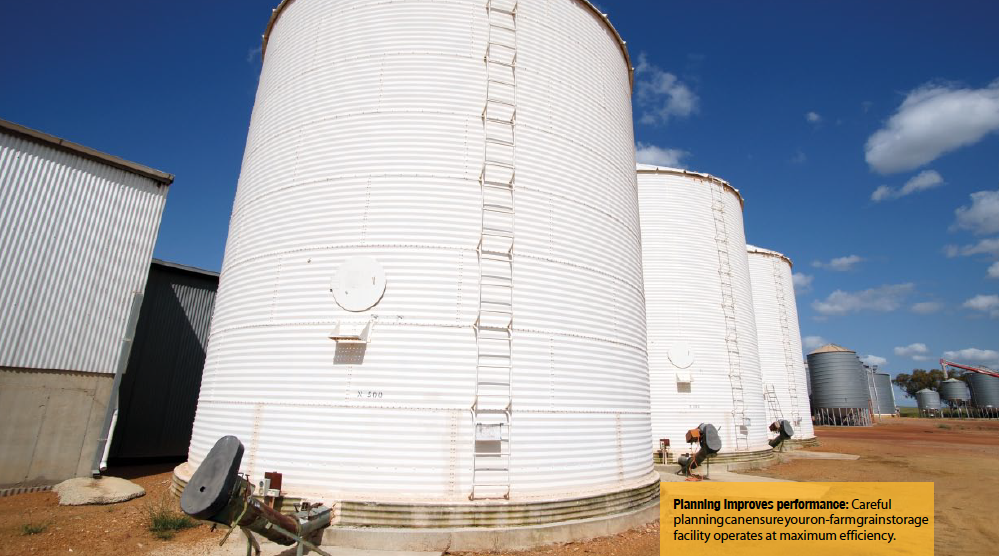
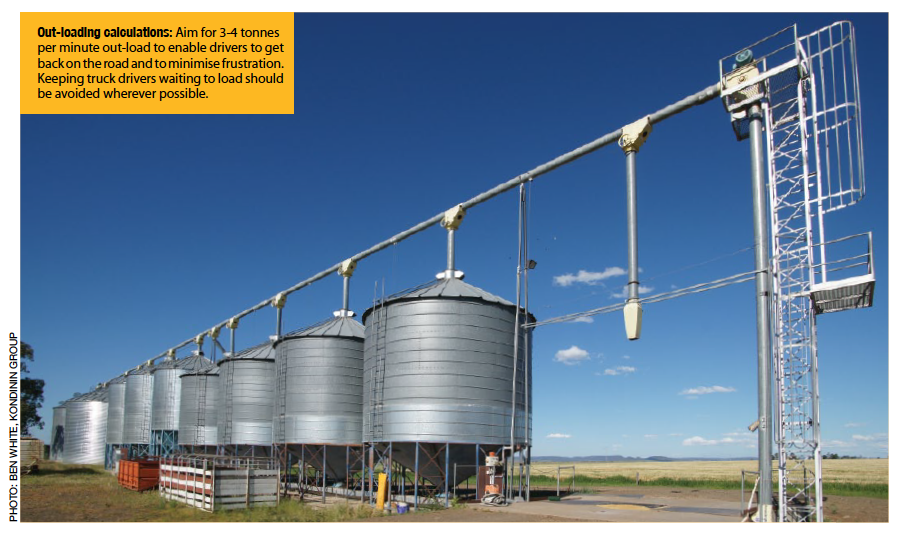
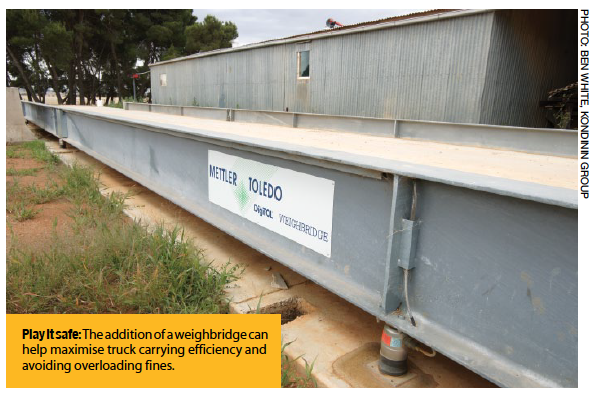
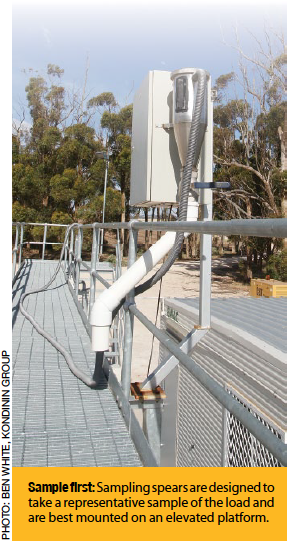
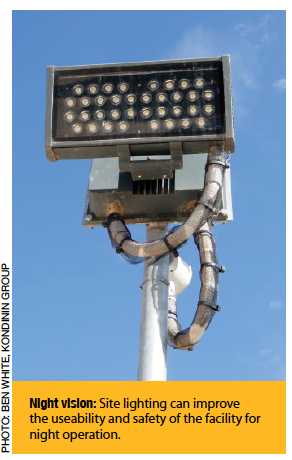
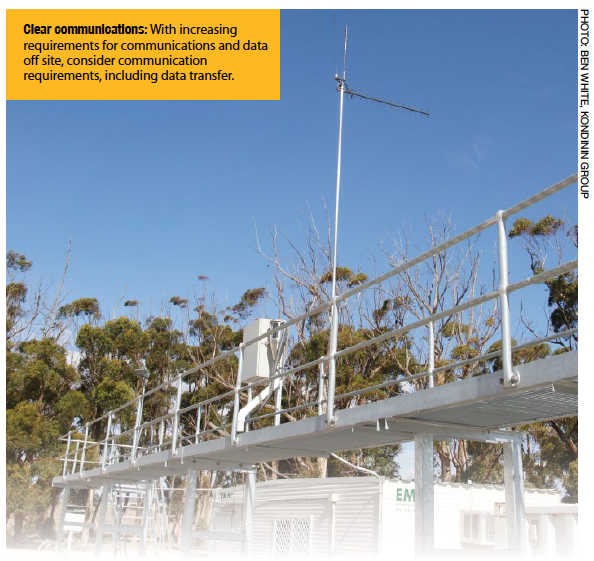
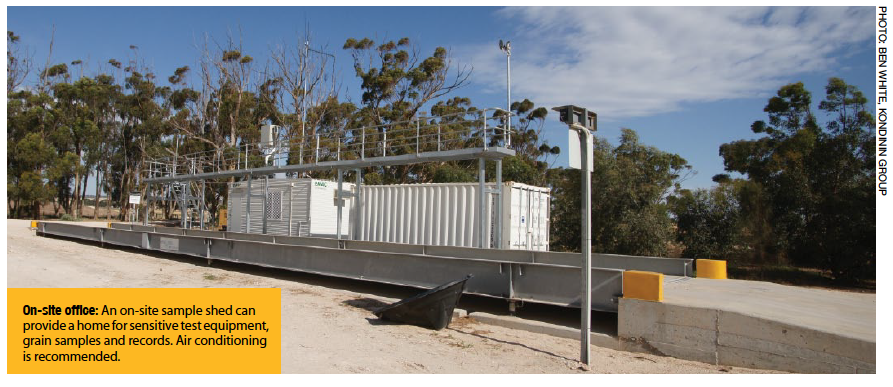
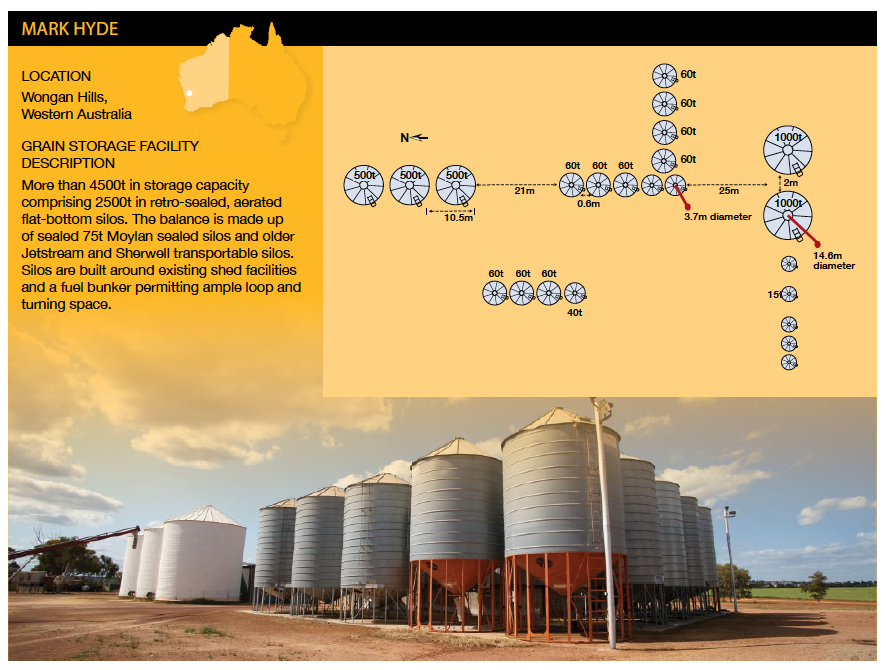
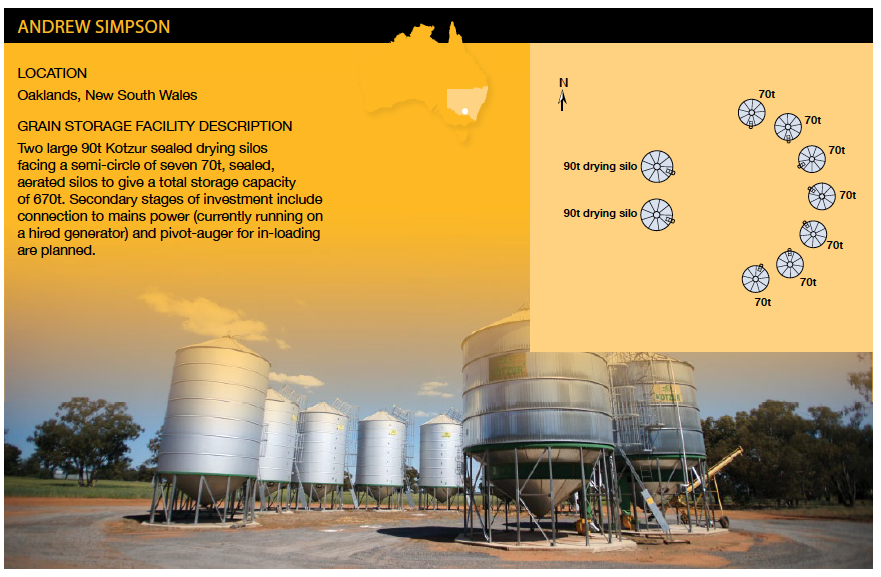

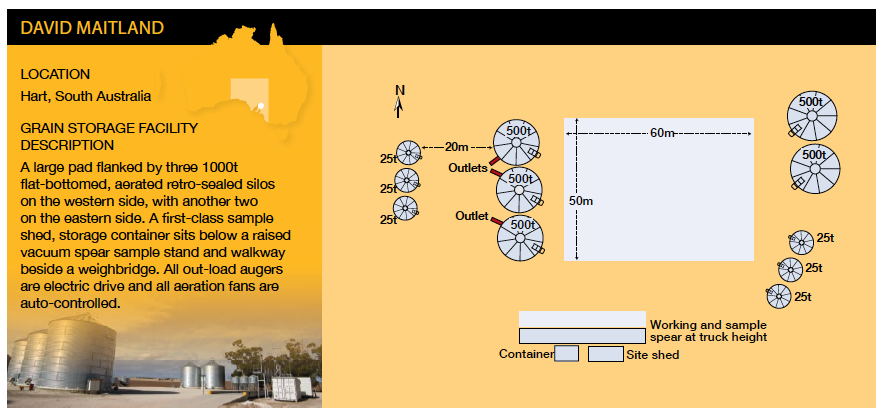
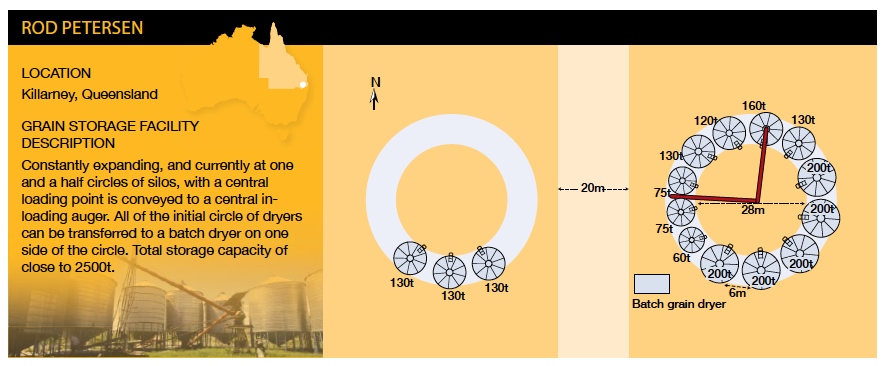
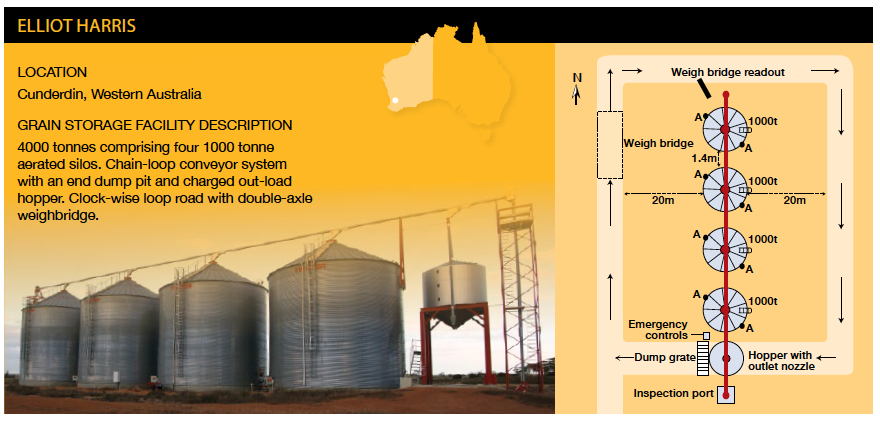
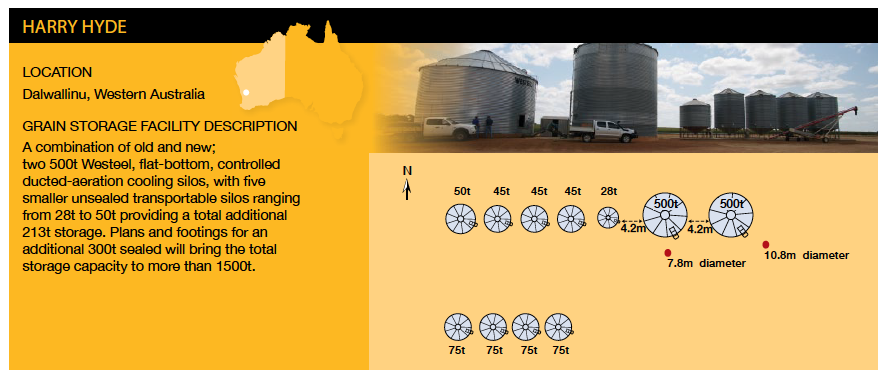
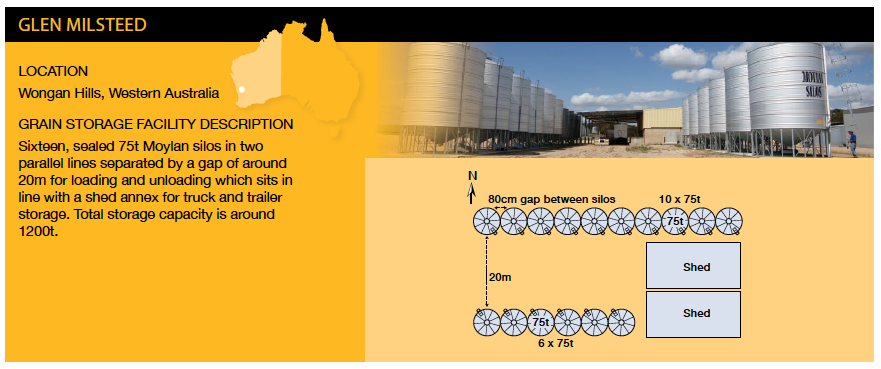
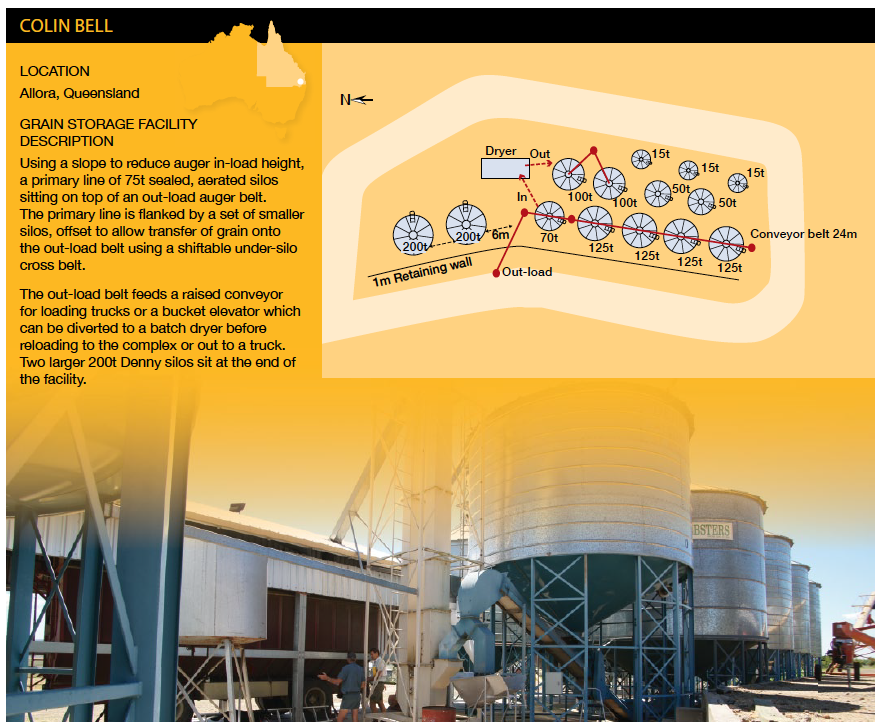

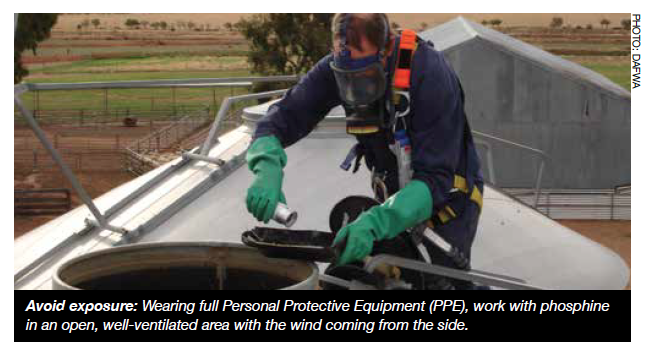
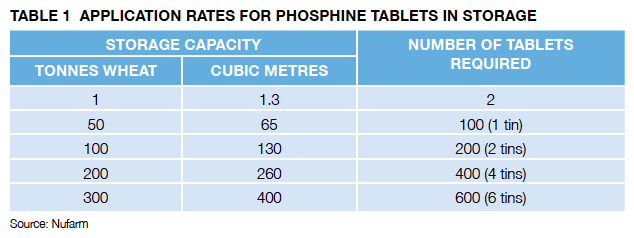
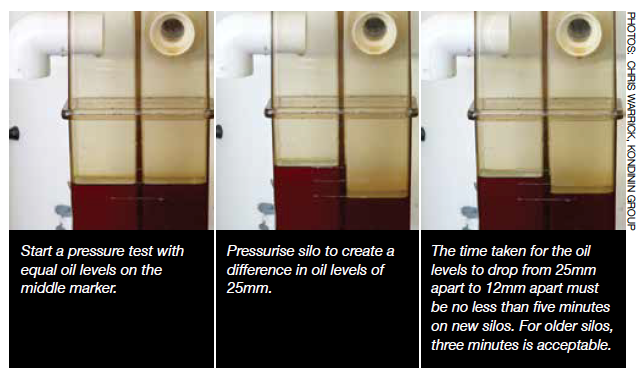
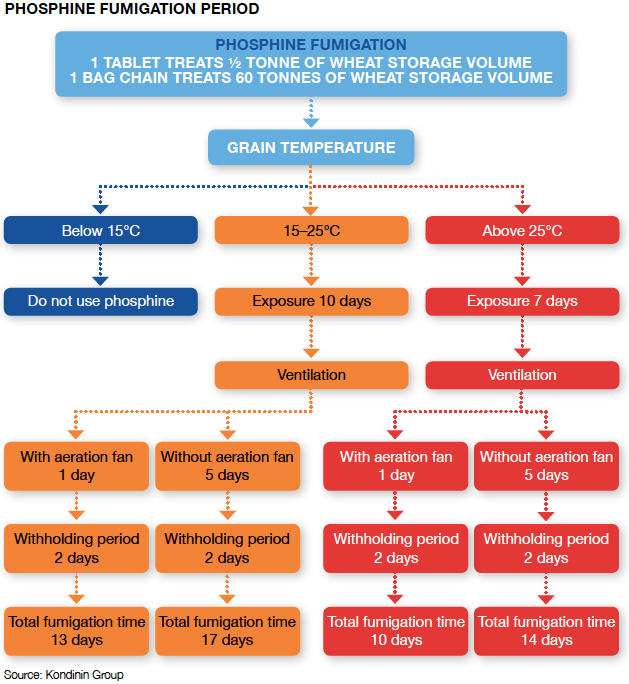

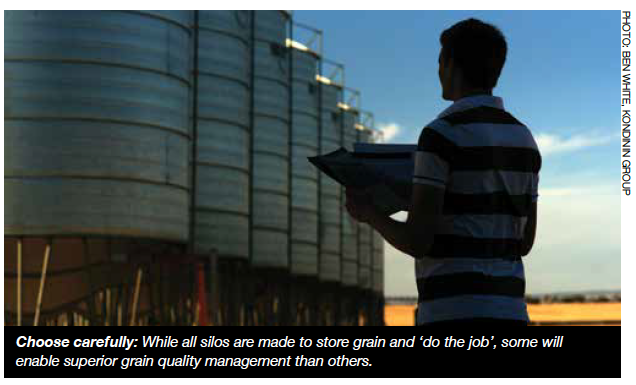
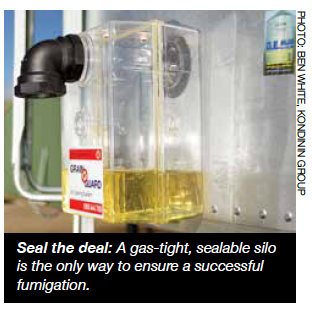
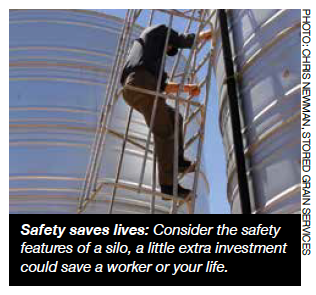
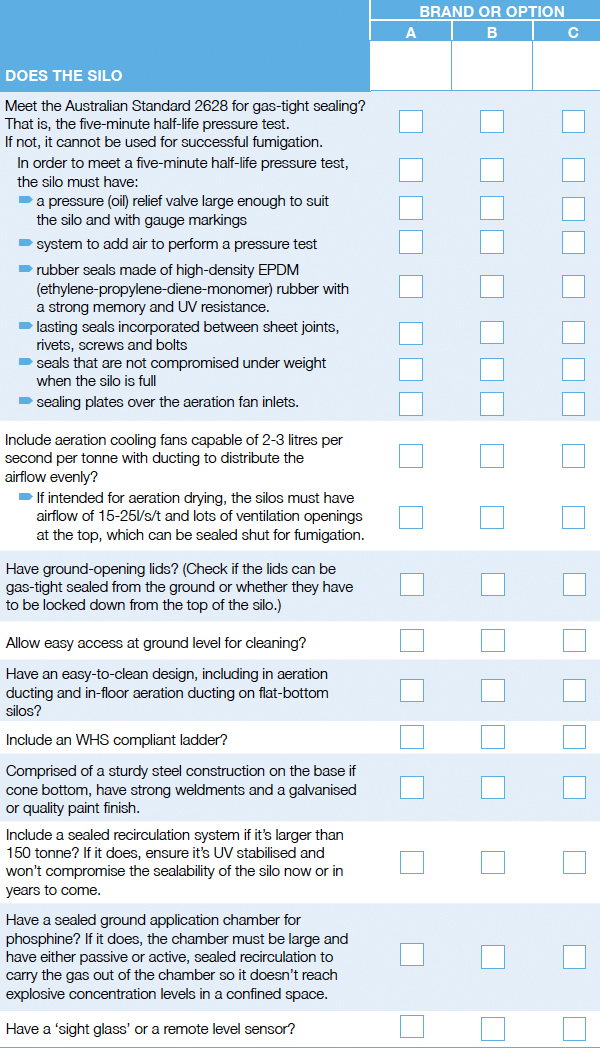

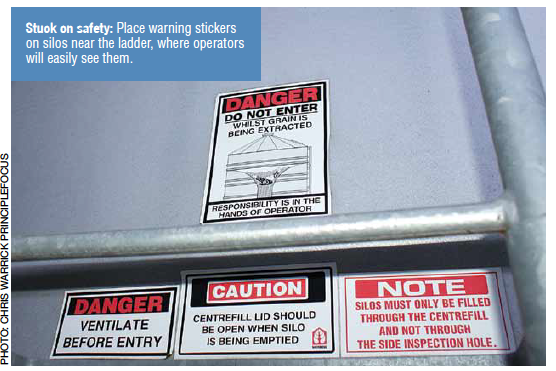
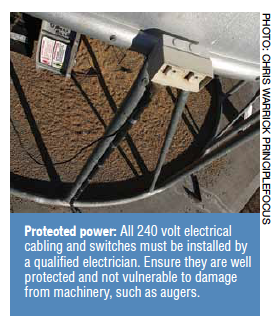
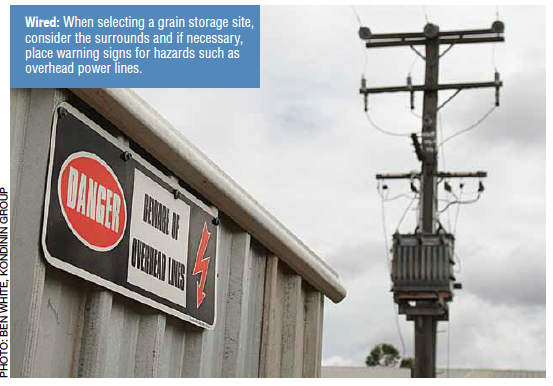
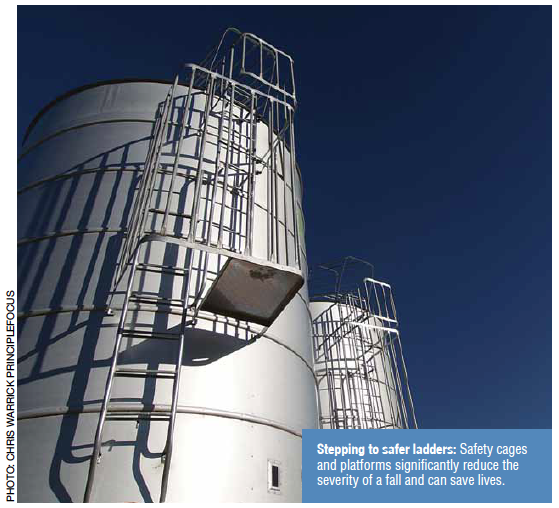
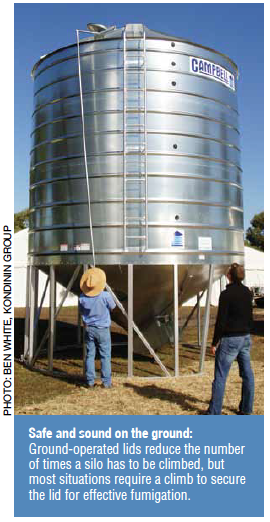


 When to perform a pressure test