Appropriate Personal Protective Equipment (PPE) is essential for health and safety when fumigating with phosphine.
The phosphine label mandates the use of a full-face respirator with a combination particulate (P1) and phosphine gas cartridge filter along with elbow-length rubber gloves to comply with label requirements.
Making the most of ageing silos

As silos age, growers face a crucial decision: repair, retrofit, or replace. The first step is always safety. Grain Storage Specialist Chris Warrick advises that growers begin by checking whether the silo is structurally sound. Cracked or tilted bases, rust on critical joints, or weakened bolts and sheets can all compromise safety and increase the risk of collapse. Faulty hatches, ladders, and access points also need to be addressed to protect workers.
Continue readingMasks for phosphine

Grain Storage Specialist Alex Conway guides us through purchasing the correct mask for handling phosphine.
Continue readingPhosphine meters

Grain Storage Specialist Alex Conway explains the various types of phosphine monitoring equipment. Types covered include high-range for fumigation, low-range for safety or clearance and real-time monitors.
Continue readingCare required as low-level phosphine rejections climb (GRDC GroundCover Sept 2022)

Recent reports indicate an increasing number of trucks are being rejected at delivery for excess phosphine. The rejections fall into one of two categories: high-level phosphine, where phosphine has been misapplied and put people in danger, and low-level phosphine, where the grower’s fumigation practices need tweaking to vent gas to a lower level.
Attempted fumigations just prior to, or even during, transport are thought to be the leading cause of the high phosphine readings at delivery sites. Misuse of phosphine, including any off-label practices, places operators, truck drivers, delivery site staff and, potentially, the general public in danger. Perpetrators in this category can expect to deal with the authorities and the consequences, which often involve quarantining the truck for several days until the load is vented to a safe level for off-loading.
Low-level phosphine rejections are the ones on the rise, according to the bulk handler, and there are a few contributing factors:
- The bulk handler has introduced phosphine detection probes requiring a clearance reading of less than 0.3 parts per million (ppm), measured via a grain spear sample.
- The bulk handler mandates all grain delivered after February be fumigated.
- Venting phosphine to 0.3ppm can take longer than the label directs in some cases.
Research required
Testing for phosphine residue at delivery ensures operators are not exposed to harmful levels of the gas while handling the grain. Confusion on what is a safe clearance level for phosphine has led the bulk handler to use a limit of 0.3ppm taken via a grain spear sample.
The safety limit of 0.3ppm is supposed to be measured via the time-weighted average in the enclosure and work area, not the grain bulk itself as the bulk handler is doing. Further research is required to develop a sampling method and gas limit to ensure operator safety, without unnecessarily penalising operators with small amounts of residual gas that does not pose a health and safety risk.
Gas concentrations found within a grain stack are significantly higher compared to the surface of the stack, let alone the air around it that operators are breathing.
Label directions
Following a fumigation with phosphine, the label directs venting either with aeration fans operated for two hours on and two hours off for not less than one day, or not less than five days without fans. Research has found that this venting period may not remove gas levels below 0.3ppm when sampled with a grain spear, so if a bulk handler is requiring this clearance level, a phosphine meter is the surest way to know when venting is complete.
Phosphine meters
It is worth noting that most phosphine meters are designed to measure either high range for fumigation gas levels or low range for clearance or safety. When purchasing a phosphine meter for checking venting progress, ensure the measuring resolution is accurate at low range to measure 0.3ppm.
There are multiple sources of phosphine meters in Australia; what’s important is checking the supplier guarantees quality and accuracy for low level readings. Two well-known suppliers in the eastern states are Canary Company, which sells the Silo Safe, and Graintec Scientific, which sells the Drager Pac 7000.
Handy optional extras with phosphine meters include a cradle for the Drager models to connect to a gas line or spear, the spear itself and pumps, either external or built-in to draw the gas to the meter.
 A low-level phosphine meter is the surest way to know if grain has been adequately vented to the delivery requirements. Photo: Chris Warrick
For reliable clearance measurements, turn aeration fans off for at least 12 hours and take readings before out-loading grain from the storage.
Research has found that phosphine venting can take longer if the exposure period was extended, if the grain temperature was cold, or if the storage bulk was large (a flat-bottom silo greater than 1000 tonnes).
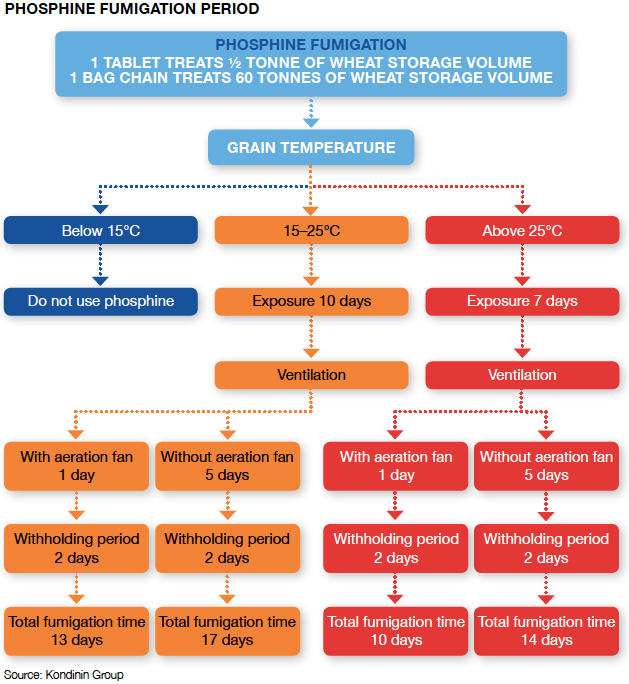
To ensure control of all life stages of insect pests, fumigation exposure periods must be long enough to allow the insects to continue developing to an active life stage to take up the gas; over 25°C takes seven days; between 15 to 25°C takes 10 days. Some operators choose to extend the fumigation exposure period to ensure gas concentrations reach the required 360ppm in all areas of the storage for the full seven to 10 days. What must be understood is that extending the exposure period allows more time for the grain to absorb the gas and, therefore, will also take longer to desorb during venting.
Cold grain has also been found to desorb phosphine slower than warm grain, so storages that have been under aeration cooling may take longer to vent below 0.3ppm than the one day directed by the label.
For obvious reasons, large storages can also take longer to vent given the distance gas has to travel through the grain before escaping.
Fumigation in grain bags has been proven possible. Phosphine is inserted into pipes placed every seven metres along the sealed bag for 10 days. However, venting can be the most challenging component to this fumigation process.
A large-capacity fan can be connected to the starting end of the bag and, with the other end of the bag propped open, gas can be sucked out in two or more days. If power is not available, recent research has found that passive venting is possible using 50-millimetre fumigation pipes, where the phosphine can be removed and caps left off – but expect it to take two weeks or more to vent below 0.3ppm.
GRDC Code PRB2011-001SAX
Grain Entrapment Demostration

The rescue unit is the first of its kind in Canada. Previously, units had been rented from the United States for demonstrations. It was designed and manufactured by Prairie Agricultural Machinery Institute in Humboldt.
Demonstration Video
Grain Fumigation – A Guide

Key Points
- To control insects at all life stages the only option is to fumigate in a gas-tight storage.
- Cool grain temperatures require a longer fumigation period.
- Aeration fans fitted on gas-tight silos provide a number of benefits including a shorter ventilation period following a fumigation.
The total time required for effective fumigation ranges from 10–17 days, accounting for the minimum exposure period, ventilation and withholding period. This highlights the importance of monitoring grain regularly and at least 17 days before out-loading to allow sufficient time to fumigate if required.
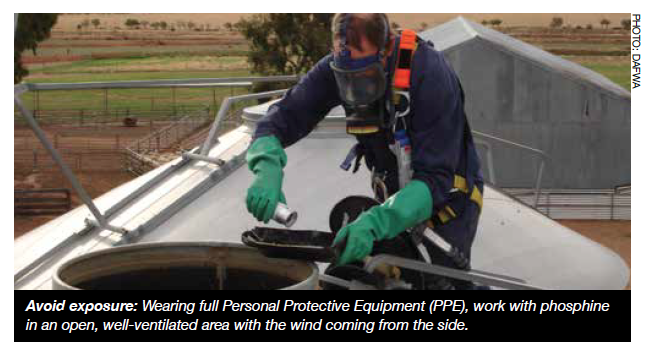
Avoid Exposure: Wearing full Personal Protective Equipment (PPE), work with phosphine in an open, well-ventilated area with the wind coming from the side.
Rates for success
When determining how much phosphine to apply, it is important to treat the entire storage volume, regardless of how much grain is contained inside. For example, a 100 tonne silo full of grain requires 200 phosphine tablets. If that same 100t silo is only half full of grain, it still requires 200 phosphine tablets for effective fumigation.
Handle with care
Phosphine is a highly toxic gas with potentially fatal consequences if handled incorrectly. As a minimum requirement, the label directs the use of cotton overalls buttoned at the neck and wrist, eye protection, elbow-length PVC gloves and a breathing respirator with combined dust and gas cartridge.
Where to apply
Arrange the tablets where as much surface area as possible is exposed to air, so the gas can disperse freely throughout the grain stack. Spread phosphine tablets evenly across trays before hanging them in the head space or placing them level on the grain surface inside a gas-tight, sealed silo. Hang bag chains in the head space or roll out flat on the top of the grain so air can freely pass around them as the gas dissipates. Bottom-application facilities must have a passive or active air circulation system to carry the phosphine gas out of the confined space as it evolves. Without air movement, phosphine can reach explosive levels if left to evolve in a confined space.
Time to kill
To control pests at all life stages and prevent insect resistance, phosphine gas concentration needs to reach 300 parts per million (ppm) for seven days (when grain is above 25°C) or 200ppm for 10 days (between 15–25°C). Insect activity is slower in cooler grain temperatures so require longer exposer to the gas to receive a lethal dose.
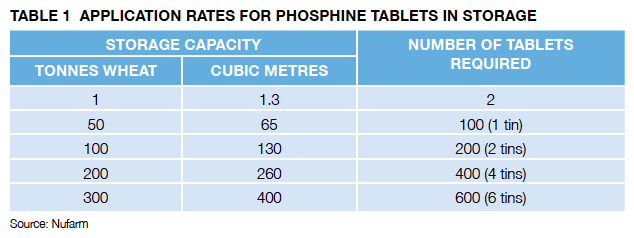
Table 1 – Application rates for phosphine tablets in storage
Gas venting
Following fumigation, ventilate silos so grain can be delivered free from harmful gas residues. With tablet residue or bag chains removed, leave silos open for no less than five days, or no less than one day with aeration fans
operating. The final step is to hold grain for a further two days after ventilation before using for human consumption or stockfeed
Disclaimer
Any recommendations, suggestions or opinions contained in this publication do not necessarily represent the policy or views of the Grains Research and Development Corporation. No person should act on the basis of the contents of this publication without first obtaining specific, independent professional advice. The Corporation and contributors to this Fact Sheet may identify products by proprietary or trade names to help readers identify particular types of products. We do not endorse or recommend the products of any manufacturer referred to. Other products may perform as well as or better than those specifically referred to. The GRDC will not be liable for any loss, damage, cost or expense incurred or arising by reason of any person using or relying on the information in this publication.
CAUTION: RESEARCH ON UNREGISTERED PESTICIDE USE
Any research with unregistered pesticides or of unregistered products reported in this document does not constitute a recommendation for that particular use by the authors or the authors’ organisations. All pesticide applications must accord with the currently registered label for that particular pesticide, crop, pest and region. Copyright © All material published in this Fact Sheet is copyright protected and may not be reproduced in any form without written permission from the GRDC.
GCTV Stored Grain: Stay Safe Around Grain Storage

Stay Safe around Grain Storage

KEY POINTS
- Safety is a three-step process — identify hazards, assess risk and address the hazard.
- Safe grain storage starts with well thought-out design and planning.
- Consider safety features when buying new storage.
- Using the correct storage for commodities such as granular fertiliser and high-moisture grain reduces the need enter the storage.
- Ventilate silos before entering and never enter a silo while it is being emptied.
- Use fumigants and chemicals carefully and follow the safety instructions on the label.
- Be aware of and comply with any worksafe and chemical use regulations in your state.
Start by identifying any hazards associated with the grain storage site. This involves talking with workers who use the site, taking time to thoroughly inspect the site and equipment and seeking advice and information from industry and Workplace health and safety (WHS) organisations to help identify risks that may not be initially apparent.
Secondly, assess the risk of each hazard in terms of its potential severity. If an accident occurred due to the identified hazard, would it result in scratches and bruises or is there potential for someone to be seriously injured or killed?
The third step is to address the hazard, starting with the highest-risk hazards first. The ultimate aim is to totally remove the risk, but where that’s not possible, find a way to control it. This could mean altering the way activities are carried out or providing protective equipment. After controlling the risk as much as possible, it is important to develop a plan of action in the event that an accident does occur. For example, if a worker is exposed to phosphine gas, or another harmful chemical, ensure emergency phone numbers are readily available to get medical help.
Designing a safe storage
Regardless of the type of grain storage used, selecting a suitable site is the first consideration when designing a safe grain storage system. If the storage site is already established, assess the site for following safety considerations and potential for improvement. If future expansion is being considered, it may be beneficial to build on a new site and decommission the current site when it reaches the end of its working life.
 Site safety considerations include:
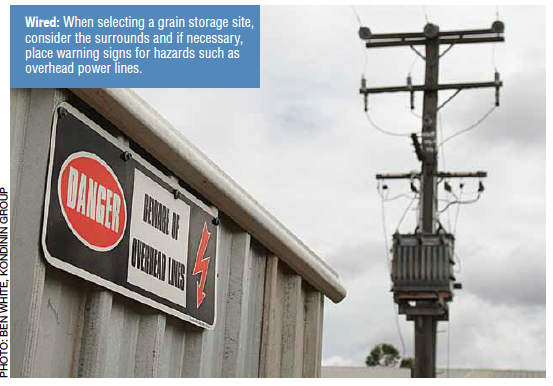
- Surroundings — locate the storage site away from overhead powerlines, houses where children might play, or houses or work areas that will be affected by dust and noise from grain storage activities.
- Access — ensure safe access for trucks turning into and out of the site from public roads without endangering other road users.
- Expansion — ensure the site is clear of trees, sheds and permanent structures to allow for expansion without having to manoeuvre trucks and augers in a cramped area.
- Drainage — select a relatively level site for easy and safe manoeuvring of augers and trucks, but ensure sufficient drainage is available to prevent having to work in wet, slippery and boggy conditions.
Smart storage selection
Choose storage that is cost effective and practical for the volume of grain to be stored. Considering safety in the mix makes for the ultimate storage result.
Sheds and bunkers are cost-efficient options for large quantities of grain, but require a considerable amount of manual labour and dedicated equipment to empty.
Silos are comparatively less labour intensive, although the amount of manual shovelling to completely empty silos is significantly reduced by choosing cone-bottom silos or flat-bottom silos with sweep augers.
Cone-bottom silos are the obvious choice for easy and safe out-loading. They are particularly beneficial if filled more than once a year — used as a buffer for harvest logistics.
Granular fertiliser, high-moisture grain and grain with a high percentage of screenings does not empty from standard silos very well, which commonly leads to people climbing into the silo to shovel out the stubborn grain. It is better to only store these types of commodities in silos with steeper cone bottoms or sheds where they can be out-loaded with a front-end loader.
Manufacturers are well placed to provide advice on choosing suitable storage types for various commodities.
Safety features on silos
Before buying a silo, consider the safety features on offer.
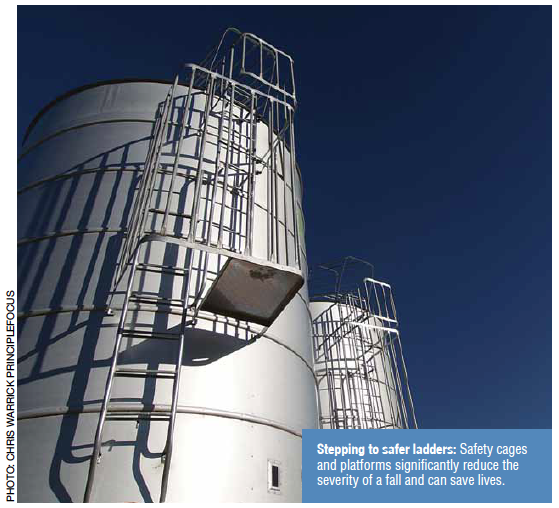
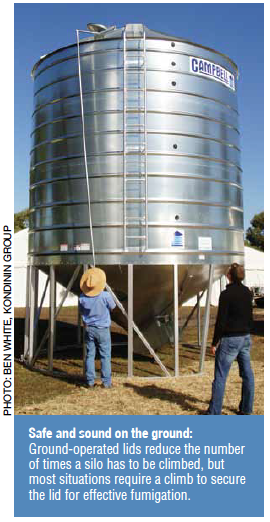
In most cases ladders are still required for monitoring grain in the top of the silo. State-based WHS requirements for ladders exist, but as a guide look for ladders with a safety cage and platforms every two metres, handrails on the top of the silo and a system that prevents children climbing the ladder.
Features that limit the need to climb the ladder are a valuable addition to silos and include:
- Sight glasses or a device to indicate the level of grain inside the silo.
- A system for applying fumigation at ground level, which will distribute the gas to the head space in the silo.
- Lids that can be opened and closed from the ground. (Be aware that few ground-operated lids can be closed and latched tight enough to be gas-tight for fumigation. Most lids still require a climb to the top of the silo to inspect rubber seals and latch the lid before the silo will meet a half-life pressure test, required for effective fumigation. When checking this point with manufacturers, refer to AS2628 — the Australian Standard for gas-tight silos.)
Safety on the inside
When working in a potentially dangerous environment, such as inside a silo, it is preferable to have another person outside to call if help is needed. Before entering the silo, ensure you are well hydrated and wearing suitable clothing to do the job (for example, sturdy, enclosed footwear). Avoid heat stress by carrying out the job during a cool time of the day so the internal silo temperature is more comfortable.
Before entering a silo:
- Open all lids and ventilation points well before entering to allow as much free-flowing air as possible. Damp grain, especially canola, will produce carbon dioxide and carbon monoxide at toxic levels. Monitors are available to test for these gases.
- Ensure all augers or conveyers filling or emptying the silo are stopped and cannot be started by someone else while you are in the silo.
- Stop and think if there is any way the job can be done from outside the silo.
- If entry is not through an access door at ground level, ensure the ladder has an appropriate safety cage. If not, a certified safety harness must be worn.
While working inside a silo:
- Have someone outside the silo to assist and get help if required.
- Wear an appropriate dust mask to prevent fine dust particles entering your lungs.
- Stay on the ladder above the level of compacted or bridged grain while dislodging it.
- If you become trapped under grain, avoid movement and don’t panic as this will worsen the problem — try to remain calm and call for help
Filling and emptying
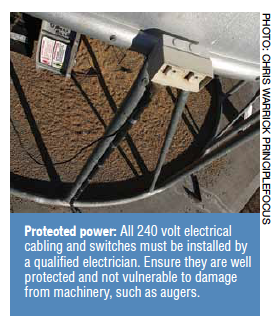
Always fill and empty silos from the middle. Filling or emptying a silo from the sides will cause uneven loading on the silo, potentially causing a structural failure. Ensure augers and conveyors are fitted with adequate guarding.
Wear high-visibility clothing while working around moving machinery to reduce the chance of being run over. Ensure all workers are trained to safely operate the grain storage facilities, filling and emptying equipment and associated machinery.
Fatigue and stress are common during harvest; ensure all operators get enough rest or downtime to avoid fatigue and stress-related accidents.
Stored grain fumigants and chemicals

Even though alternative fumigants are becoming more readily available, phosphine is still widely relied upon to control pests in stored grain.
Phosphine is also one of the most dangerous products used on farm, which is why it is classed as a schedule seven poison, indicated on the label — DANGEROUS POISON.
As a minimum requirement, the label directs the use of cotton overalls buttoned to the neck and wrist, eye protection, elbow-length PVC gloves and a breathing respirator with a combined dust and gas cartridge.
 Never rely on the odour of phosphine to determine if the atmosphere is safe. The odour threshold of phosphine (for those that can smell it) is 2 parts per million (ppm). The threshold limit value for a time weighted average is 0.3ppm and the short-term exposure limit is 1ppm. This means by the time workers can smell phosphine (2ppm) the gas concentration level is already exceeding the safe exposure limits.
Always read the product label and Material Safety Data Sheet (MSDS) for safety information and required personal protection equipment (PPE). The respirator must be fitted with a combined dust and gas cartridge (canister) with an international code that includes the letter ‘B’, which stands for inorganic gas. The number in the code refers to the capacity of the cartridge, for example an ABE1 has a shorter life span than an ABE2.
Personal phosphine monitors are available and easy to use. The monitors simply clip onto the operator’s collar or top pocket (close to their nose and mouth) and will sound an alarm if more than 0.3ppm is detected and sound another alarm if more than 0.6ppm is detected. Price may deter growers who only use phosphine occasionally, but these handy devices can potentially save a life, so are worth serious consideration.
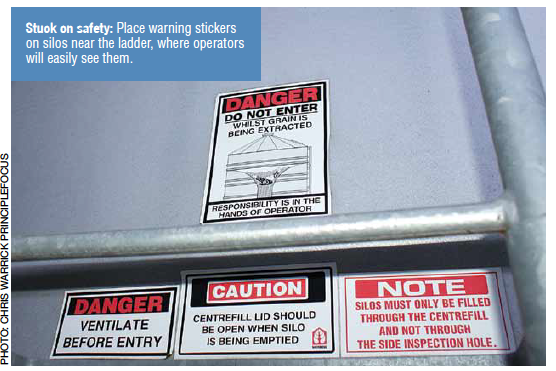
Place a warning sign on the silo to tell others to stay away. The sign must contain the words DANGER — POISONOUS GAS, KEEP AWAY.
State Worksafe organisations and government WHS contacts
- Safe Work Australia
www.safeworkaustralia.gov.au - WorkCover Authority of NSW
13 10 50
www.workcover.nsw.gov.au - WorkCover SA
1300 365 255
www.workcover.com - Workplace Health and Safety QLD
1300 362 128
www.worksafe.qld.gov.au - WorkSafe Tasmania
1300 366 322
www.worksafe.tas.gov.au - NT WorkSafe
1800 019 115
www.worksafe.nt.gov.au - WorkSafe Victoria
1800 136 089
www.worksafe.vic.gov.au - WorkSafe WA
1300 30 78 77
www.commerce.wa.gov.au/worksafe - WorkSafe ACT
(02) 6207 3000
www.worksafety.act.gov.au
Successful Storage in Grain Bags

KEY POINTS
- Grain bags are best suited for short-term, high-volume grains to assist with harvest logistics.
- Site planning and preparation is the first and most important step for successful storage.
- Bulk grain bags are a higher risk form of storage compared with silos — requiring experience and best management practice.
- Inspecting grain bags weekly, or more frequently, and patching holes will reduce the chance of spoilt grain from moisture or pests.
Bulk grain bags are best used for short-term storage (a few months maximum) to support harvest logistics.
Storing grain for longer periods requires:
- Prior experience
- A carefully prepared site
- A method of sampling grain for quality monitoring
- Regular inspections.
The capacity of grain bags varies with bag size, which generally ranges from 40 to 90 metres long, and anywhere from 100 to 300 tonnes depending on the type of grain and how much the bag is stretched during filling.
The material most commonly used for grain bags is a three-layer polyethylene — two white layers to protect against the ultraviolet rays and reflect heat and a black inner layer to block light.
Which grains?
Due to their short-term storage capacity and suitability for supporting harvest pressure, growers tend to use grain bags primarily for extending existing storage during high-yielding seasons of typically wheat, barley and sorghum.
Aeration cooling is not yet proven with grain bags. Storing canola or high-value legumes is not recommended.
Cereal grain quality is best preserved when the moisture content is below 12.5 per cent. Storing grain at higher moisture content in bags not only compromises grain quality but increases the risk of grain swelling and splitting the bag.
Being unable to aerate bags and having a large surface area exposed to heating from the sun means grain remains warm for months after harvest. This can affect seed germination rates and malt barley quality.
Storing grain at harvest temperatures of 30°C and above favours high insect reproduction rates, so take extra care with hygiene and monitoring.
Bulk grain bags are an effective form of storage when used in the right situations and when they are managed correctly.
Buying grain bags
- Test bag quality by pushing your thumb through an edge of the bag — you will be able to make a subjective judgement as to whether it is high or poor quality. Test different brands before you buy.
- Ensure the bag is UV stable for 12 months and complies with the ISO 9001 quality management system.
- Make sure the bag has stretch indicators for accurate filling.
- Ensure the grain bag is designed for grain not silage — different bags look similar and can be confused leading to disastrous results.
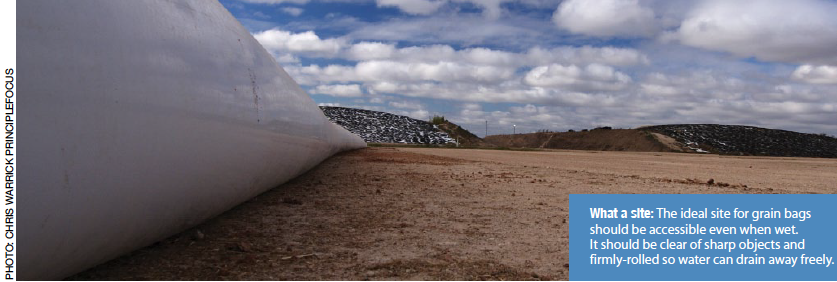
Choosing a site
- Appropriate site selection is the first and most fundamental step in successful grain bag management.
- Placing bags in different paddocks makes filling direct from the harvester or chaser bin easier but increases maintenance and monitoring time. This can compromise grain quality.
- Bags located in individual paddocks can be challenging in wet weather.
- A central, common storage site for bags is ideal for easier site preparation, monitoring, bag maintenance, vermin control and out-loading.
- Select a hard, smooth, elevated site with a gentle slope where water can drain away.
- Allow plenty of room around the grain bags for machinery access and trucks to turn around.
Preparing the site
- Grade and roll the site, removing sticks, rocks or sharp objects.
- Clear, firm ground makes operating the filling and emptying machines easier with less chance of brakes skidding.
- A firmly-rolled site helps drainage and prevents water pooling where the grain bag has sunken into soft ground.
- Anything that can puncture the bag is a threat and must be removed. Set up the site away from rocks, sticks, trees (they drop branches and harbour birds) and away from sand hills or long grass where rabbits, mice and foxes shelter.
- Anecdotally, a thin sprinkle of urea can be spread on the ground where the bag is to be laid to deter mice from burrowing under it.
Setting up the filling machine
The most common filling machines are power take-off (PTO) driven, forcing grain into the bag, stretching it by about 10 per cent as it’s laid. A more recent development is the gravity filling design, which requires no power or tractor to operate and relies purely on gravity to fill and stretch the bag.
Make sure the machine is clean before filling the bags.
Grain pests, such as weevils and other insects, can survive in small amounts of grain left in equipment from the previous season. If the machine is not clean, these pests can infest the new season’s grain and will multiply and spread through the entire grain bag
Fitting the bag onto the machine with two people saves time and reduces the chance of injury. When setting up the bag on the filling machine, ensure the stretch markers are on a side where they can be seen and measured when the bag is filling. Once filled, any holes in the bag will allow grain to absorb moisture from the ground.
Options include:
- sealing the ends of the grain bag with a heat sealer, or
- clamping the ends between two lengths of timber or steel, rolling each end around the timber then tucking the bag under itself with about a metre overlap.
The squarer the starting end of the bag, the easier it is to empty with less shovelling — a cable tie around the end is NOT a good idea.
Before filling the bag, use a string line to mark a straight path along the full length of the bag. A straight bag is a lot easier to empty than a curved bag.

Filling the bag
Patience and accuracy during filling will make emptying the bag much easier, reduce maintenance on the bag during the storage period and result in less spills and fewer stops to realign machinery.
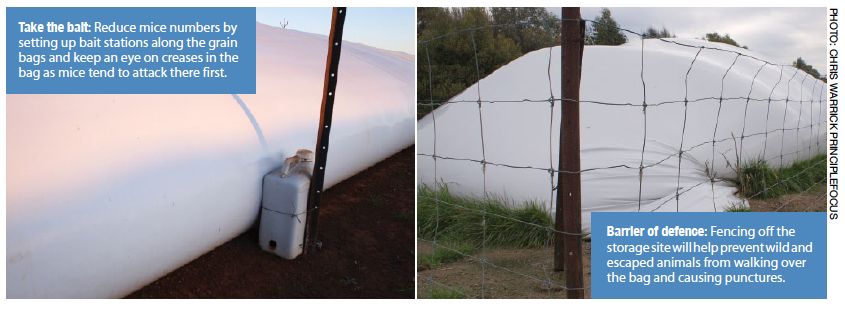
- Keep the bag filling evenly and straight to avoid creases — mice tend to attack creases.
- Adjust the brakes and direction often and in small increments.
- Avoid over-filling (over-stretching) the bag as extra strain makes it more prone to holes, splits and tears.
- Remember, the polyethylene bags will stretch more easily when filled with warm grain on hot days.
- Bags can be filled straight from the harvester, but operators may be tempted to rush, which leads to a poor job and increases the risk of an accident. (ie damage to machinery or operators).
- Stop filling the bag while there is still plenty of bag to seal and re-attach to the emptying machine — about four metres is a good rule of thumb.
- As with the starting end, heat seal or clamp the bag end to keep moisture out, then tuck the excess bag under itself and cover with soil to stop it flapping in the wind.
Site security and maintenance
Site security starts with hygiene. Cleaning the site after filling will not only remove harbours for grain insects, it will remove feed that attracts mice and wildlife. After cleaning up around the site, establish mice baiting stations along the length of each bag and put up signs to warn people of the poison.
Keep the site free of grass by spraying it regularly to remove cover for mice and wildlife. A sturdy fence, even an electric fence, around the bags can help prevent animals accessing the bags and chewing or walking on them. Even if there are no livestock in the paddock, remember there is always the potential for stray livestock or wild animals to cause a lot of damage in a short time.
Checking as often as twice daily may be required if vermin are plentiful during wet weather. During normal conditions check at least weekly. Patch any tears or punctures with quality tape or silicone to prevent moisture entering the grain bulk.
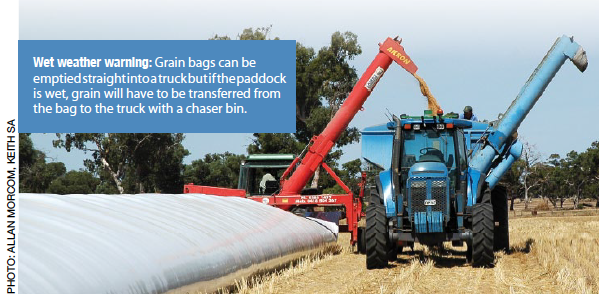
Emptying the bag
When making the initial cut in the bag for out-loading, place a piece of tape horizontally across the bag below where it is stretched tight at the top. Make the first cut perpendicular to the bag just below the tape. Do not make the cut parallel to the bag as there is potential for it to split up the entire length of the bag, exposing the grain and making it difficult to pick up.
As previously stated for filling the bag, frequent, small adjustments to align the machine and roller speeds are better than large adjustments. When the bag is almost empty and there’s not much weight left in it, the unloading machine may drag the bag towards itself. This can cause tears from the ground or from over stretching. To prevent this, drive the tractor slowly backwards as the last bit of the bag is emptied.
Clean up
Clean grain residues from machinery used for grain handling to prevent reinfestation with insect pests next season. Structural treatments are a wise addition to a thorough clean down.
An inert dust such as diatomaceous earth (DE), can be blown into the machinery to prevent insects harbouring during the off season.
Site clean-up is vital for success. Spilt piles of grain and leftover small bags of grain provide an ideal harbour for insects to live and breed.
Safety around grain bags
Filling and emptying grain bags poses a number of safety hazards, exacerbated by the fact that during harvest people are usually tired and in a hurry. Always follow machinery manufacturer instructions and consult your State occupational health and safety authority for advice.
- Treat all operating machinery with respect — keep a distance from machines and always have room to take a step away if needed.
- Think before you make any adjustments or movements on machinery.
- Ensure anyone on-site is standing clear of the filling machine and tractor before adjusting the brakes as it can lurch forward at any time. Making small adjustments reduces the risk of the machine lurching.