
GRDC Grain storage specialist Chris Warrick explains how long to leave phosphine in large grain silos. What does ‘surface only application’ mean on the phosphine label?
Continue readingGRDC Grain storage specialist Chris Warrick explains how long to leave phosphine in large grain silos. What does ‘surface only application’ mean on the phosphine label?
Continue reading


Bulk grain bags are best used for short-term storage (a few months maximum) to support harvest logistics.
Storing grain for longer periods requires:
The capacity of grain bags varies with bag size, which generally ranges from 40 to 90 metres long, and anywhere from 100 to 300 tonnes depending on the type of grain and how much the bag is stretched during filling.
The material most commonly used for grain bags is a three-layer polyethylene — two white layers to protect against the ultraviolet rays and reflect heat and a black inner layer to block light.
Due to their short-term storage capacity and suitability for supporting harvest pressure, growers tend to use grain bags primarily for extending existing storage during high-yielding seasons of typically wheat, barley and sorghum.
Aeration cooling is not yet proven with grain bags. Storing canola or high-value legumes is not recommended.
Cereal grain quality is best preserved when the moisture content is below 12.5 per cent. Storing grain at higher moisture content in bags not only compromises grain quality but increases the risk of grain swelling and splitting the bag.
Being unable to aerate bags and having a large surface area exposed to heating from the sun means grain remains warm for months after harvest. This can affect seed germination rates and malt barley quality.
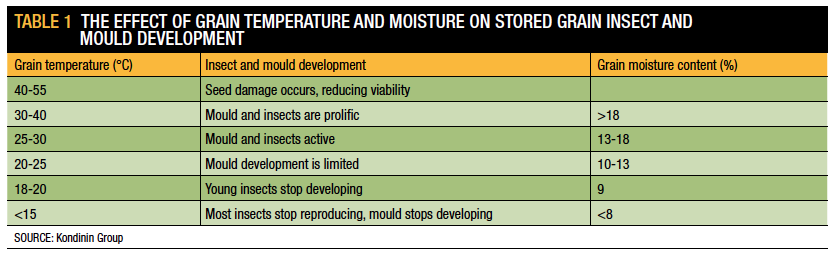
Storing grain at harvest temperatures of 30°C and above favours high insect reproduction rates, so take extra care with hygiene and monitoring.
Bulk grain bags are an effective form of storage when used in the right situations and when they are managed correctly.

The most common filling machines are power take-off (PTO) driven, forcing grain into the bag, stretching it by about 10 per cent as it’s laid. A more recent development is the gravity filling design, which requires no power or tractor to operate and relies purely on gravity to fill and stretch the bag.
Make sure the machine is clean before filling the bags.
Grain pests, such as weevils and other insects, can survive in small amounts of grain left in equipment from the previous season. If the machine is not clean, these pests can infest the new season’s grain and will multiply and spread through the entire grain bag
Fitting the bag onto the machine with two people saves time and reduces the chance of injury. When setting up the bag on the filling machine, ensure the stretch markers are on a side where they can be seen and measured when the bag is filling. Once filled, any holes in the bag will allow grain to absorb moisture from the ground.
Options include:
The squarer the starting end of the bag, the easier it is to empty with less shovelling — a cable tie around the end is NOT a good idea.
Before filling the bag, use a string line to mark a straight path along the full length of the bag. A straight bag is a lot easier to empty than a curved bag.

Patience and accuracy during filling will make emptying the bag much easier, reduce maintenance on the bag during the storage period and result in less spills and fewer stops to realign machinery.
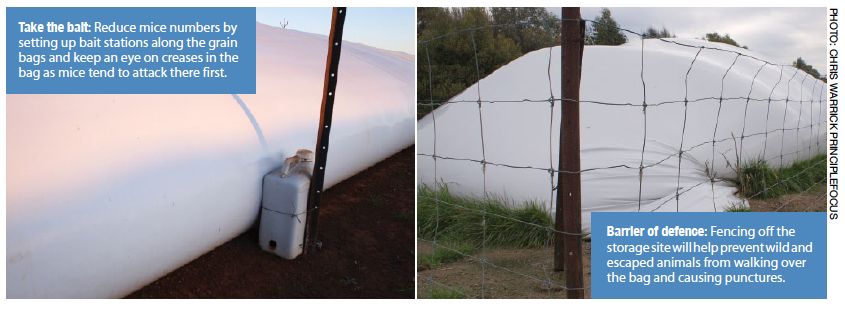
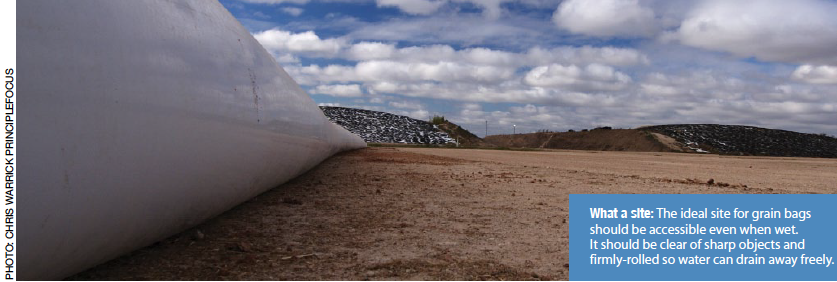
Site security starts with hygiene. Cleaning the site after filling will not only remove harbours for grain insects, it will remove feed that attracts mice and wildlife. After cleaning up around the site, establish mice baiting stations along the length of each bag and put up signs to warn people of the poison.
Keep the site free of grass by spraying it regularly to remove cover for mice and wildlife. A sturdy fence, even an electric fence, around the bags can help prevent animals accessing the bags and chewing or walking on them. Even if there are no livestock in the paddock, remember there is always the potential for stray livestock or wild animals to cause a lot of damage in a short time.
Checking as often as twice daily may be required if vermin are plentiful during wet weather. During normal conditions check at least weekly. Patch any tears or punctures with quality tape or silicone to prevent moisture entering the grain bulk.
When making the initial cut in the bag for out-loading, place a piece of tape horizontally across the bag below where it is stretched tight at the top. Make the first cut perpendicular to the bag just below the tape. Do not make the cut parallel to the bag as there is potential for it to split up the entire length of the bag, exposing the grain and making it difficult to pick up.
As previously stated for filling the bag, frequent, small adjustments to align the machine and roller speeds are better than large adjustments. When the bag is almost empty and there’s not much weight left in it, the unloading machine may drag the bag towards itself. This can cause tears from the ground or from over stretching. To prevent this, drive the tractor slowly backwards as the last bit of the bag is emptied.
Clean grain residues from machinery used for grain handling to prevent reinfestation with insect pests next season. Structural treatments are a wise addition to a thorough clean down.
An inert dust such as diatomaceous earth (DE), can be blown into the machinery to prevent insects harbouring during the off season.
Site clean-up is vital for success. Spilt piles of grain and leftover small bags of grain provide an ideal harbour for insects to live and breed.
Filling and emptying grain bags poses a number of safety hazards, exacerbated by the fact that during harvest people are usually tired and in a hurry. Always follow machinery manufacturer instructions and consult your State occupational health and safety authority for advice.

Caution: Research on unregistered pesticide use Any research with unregistered pesticides or of unregistered products reported in this document does not constitute a recommendation for that particular use by the authors or the authors’ organisations. All pesticide applications must accord with the currently registered label for that particular pesticide, crop, pest and region.
The combination of meticulous grain hygiene plus well-managed aeration cooling generally overcomes 85 per cent of storage pest problems. For grain storage, three key factors provide significant gains for both grain storage pest control and grain quality – hygiene, aeration cooling and correct fumigation.
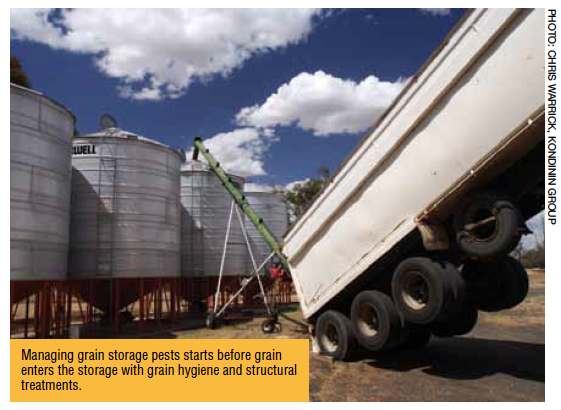 Hygiene
The first grain harvested is often at the greatest risk of early insect infestation due to contamination. One on-farm test found more than 1000 lesser grain borers in the first 40 litres of wheat passing through the harvester. Remove grain residues from empty storages and grain handling equipment, including harvesters, field bins, augers and silos to ensure an uncontaminated start for new-season grain. Clean equipment by blowing or hosing out residues and dust and then consider a structural treatment (see Table 2, page 3). Remove and discard any grain left in hoppers and bags from the grain storage site so it doesn’t provide a habitat for pests during the off season.
Freshly-harvested grain usually has a temperature around 30°C, which is an ideal breeding temperature for storage pests (see Table 1, page 2). Studies have shown that rust-red flour beetles stop breeding at 20°C, lesser grain borer at 18°C and below 15°C all storage pests stop breeding. Aim for grain temperatures of less than 23°C during summer and less than 15°C during winter. When placing grain into storage, run aeration fans continuously for the first 2-3 days to push the first cooling front through the grain and to create uniform moisture conditions. Then run the fans during the coolest 9-12 hours per day for the next 3-5 days. This will push a second cooling front through the grain bulk. Aeration cooling generally only requires air-flow rates of 2-4 litres per second per tonne. Finally the grain requires approximately 50 hours of appropriate quality air each fortnight during storage. Use an aeration controller that will perform the cooling process at the right time and continue to aerate the grain selecting the coolest air to run fans. An effective aeration controller will also ensure fans don’t operate when the relative humidity is higher than 85 per cent, which can re-wet and damage grain if operated for extended periods.
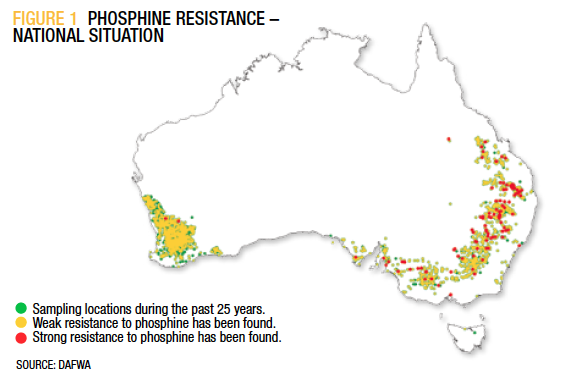
Fumigation with phosphine is a common component of many integrated pest control strategies. Taking fumigation shortcuts may kill enough adult insects in grain so it passes delivery standards, but the repercussions of such practices are detrimental to the grains industry. Poor fumigation techniques fail to kill pests at all life cycle stages, so while some adults may die, grain will soon be reinfested again as soon as larvae and eggs develop. What’s worse, every time a poor fumigation is carried out, insects with some resistance survive, and pass the resistance gene into their progeny making control more difficult in the future.
 Effective fumigation
Using the right type of storage is the first and most important step towards an effective fumigation. Only use fumigants, like phosphine, in a pressure-tested, sealed silo. Research shows that fumigating in a storage that is anything less than pressure sealed doesn’t achieve a high enough concentration of fumigant for a long enough period to kill pests at all life cycle stages. For effective phosphine fumigation, a minimum of 300 parts per million (ppm) gas concentration for seven days or 200ppm for 10 days is required. Fumigation trials in silos with small leaks demonstrated that phosphine levels are as low as 3ppm close to the leaks. The rest of the silo also suffers from reduced gas levels. Achieve effective fumigation by placing the correct phosphine rates (as directed on the label) onto a tray and hanging it in the top of a pressuretested, sealed silo or into a ground level application system if the silo is fitted with recirculation. After fumigation, ventilate grain for a minimum of one day with aeration fans running, or five days if no fans are fitted. A minimum withholding period of two days is required after ventilation before grain can be used for human consumption or stock feed. The total time needed for fumigating is 10-17 days. As a general rule, only keep a silo sealed while carrying out the fumigation (for example, one to two weeks). If grain moisture content is low (8-12%) the silo can remain sealed after fumigating but regular monitoring is essential to check for insect infestation and moisture migration to the head space.
When grain is put into storage it needs monitoring just like it does when it’s in the paddock – regularly. Check stored grain at least monthly, taking samples from the bottom, and if safe, the top of the storage.
Things to monitor:
When buying a new silo, buy a quality, sealable silo fitted with aeration and check with the manufacturer that it meets the Australian Standard for sealable silos (AS2628). Experience has shown that at least two sealable, aerated silos on farm provide the option for an effective fumigation and delivery program. Many older silos are not designed to be sealed and cannot be used for fumigation, however retrofitting aeration can reduce insect multiplication through grain cooling.
Seed that is dry, cool and sound (not weather damaged) will remain viable for longer. In well-managed storage, germination percentages can be expected to reduce by only 5 per cent after six months. To achieve this, keep grain moisture content below 12%. Grain temperature also has a major impact on germination. Aim for grain temperatures of 20°C and below in seed storage by using aeration cooling (with auto control). Wheat at 12 per cent moisture content stored at 30-35°C (unaerated grain temperature) will reduce germination percentages and seedling vigour when stored over a long period. Position small seed silos in the shade or paint them reflective white to assist keeping grain cool. WA growers can treat seed with a grain protectant combined with a dyed grain fungicide in combination with aeration cooling to maximise insect control.
Insect control options are limited for stored pulses and oilseeds. Aeration and phosphine fumigation are the main methods and controlled atmosphere (inert gasses such as carbon dioxide or nitrogen) may be an option. The effectiveness of phosphine fumigation on oilseeds is often reduced due to phosphine sorption during treatment. Monitoring gas concentrations with a gas monitor is essential to ensure the correct concentration is achieved for the correct length of time. Use sound grain hygiene in combination with aeration cooling to reduce insect activity. Small seed-size grains, such as canola, may need larger-capacity aeration fans to combat the greater amount of back pressure in the storage. Always store these grains at their recommended grain moisture content level.


[button link=”https://storedgrain.com.au/wp-content/uploads/2013/06/1978-DPI-Farm-Note-Drying-Sunflower.pdf” style=”download” window=”yes”]Download PDF[/button]